
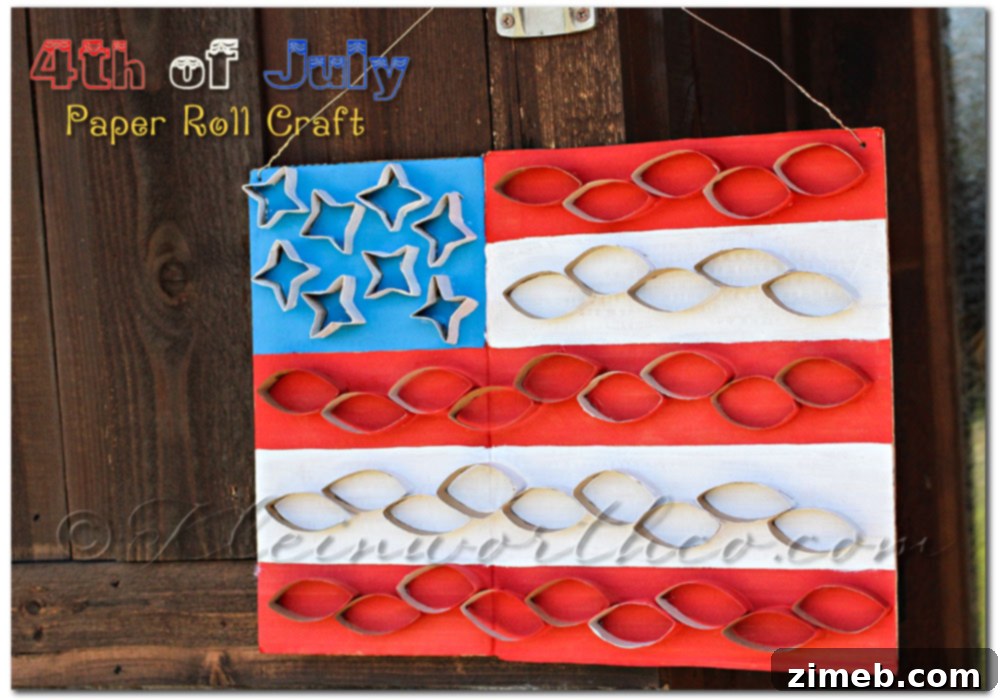
Embrace Sustainable Creativity: Crafting a Festive 4th of July Decoration from Recycled Paper Rolls
Have you ever found yourself hoarding what others might consider “junk,” convinced that one day it will be transformed into something truly special? If so, you’re not alone! My household knows this feeling all too well. My collection of empty paper rolls—from paper towels to toilet tissue—has grown to a formidable size, often drawing amused, albeit slightly bewildered, glances from my husband. He frequently asks, “What on earth are you doing with all of these? Don’t you think you have enough by now?” And my answer is always a resounding “Nope!” I see endless possibilities, and while he might just shake his head and wonder where I’ll store them all next, a project like our 4th of July Paper Roll Craft quickly brings him around to understanding the method behind the crafting madness.
There’s a unique satisfaction that comes with turning everyday discards into delightful decorations. This particular craft perfectly embodies that spirit, transforming simple paper rolls into a charming and patriotic display that’s ideal for celebrating the 4th of July, Flag Day, or any occasion that calls for a touch of national pride. It’s not just about saving items from the landfill; it’s about unlocking your inner creativity, engaging the whole family, and adding a personal touch to your home decor without breaking the bank.
Why Repurpose? The Joy of Upcycling Household Items
In an age where sustainability is more important than ever, upcycling offers a fantastic way to contribute positively to the environment while fostering creativity. Instead of simply tossing those empty paper rolls into the recycling bin (which is good, of course!), giving them a second life as a craft item reduces waste and conserves resources. Paper rolls are remarkably versatile; their cylindrical shape and sturdy structure make them perfect for a myriad of projects, from organizers to decorative pieces. They are readily available, cost nothing, and provide a blank canvas for imagination.
Beyond the environmental benefits, repurposing items for crafts brings a special kind of joy. It challenges you to look at ordinary objects in new ways, to envision their potential beyond their initial use. This process of creative problem-solving is incredibly rewarding, especially when the end result is a beautiful, functional, or festive item that you’ve made yourself. For families, it’s an excellent way to teach children about recycling, conservation, and the value of handcrafted items. It instills an appreciation for materials and encourages them to think resourcefully.
Introducing the 4th of July Paper Roll Flag Craft
With Flag Day often just around the corner and the 4th of July celebrations looming large on the calendar, there’s no better time to infuse your home with some festive, patriotic flair. This paper roll flag craft is designed to be a simple yet impactful decoration that can adorn your porch, a mantelpiece, or even a classroom. Its lightweight nature means it can be hung virtually anywhere, instantly transforming a space with its vibrant red, white, and blue hues. It’s a craft that combines ease of execution with a powerful visual statement, making it a perfect project for crafters of all skill levels, including enthusiastic little helpers.
Gather Your Materials: What You’ll Need for This Patriotic Project
One of the best aspects of this craft is that most of the materials are likely already in your home, making it incredibly budget-friendly. Before you begin, gather the following:
- Empty Paper Rolls: A collection of paper towel and toilet paper rolls. The more you have, the larger and more elaborate your flag can be!
- Cardboard Base: A sturdy piece of cardboard (from an old box works perfectly) that will serve as the backing for your flag.
- Acrylic Paints: Red, white, and blue acrylic paints. You might also want some white for the stars and a neutral color for the cardboard base if you’re not using white.
- Painter’s Tape or Masking Tape: To create clean lines on your cardboard base.
- Craft Glue or Hot Glue Gun: For attaching the paper rolls to the cardboard and to each other.
- Scissors: For cutting the paper rolls and cardboard. Adult supervision is recommended for children.
- Hole Punch: To create holes for hanging (optional).
- Wire or String: For the hanging mechanism (optional).
- Paint Brushes: Various sizes for different areas.
- Newspaper or Drop Cloth: To protect your work surface from paint spills.
Step-by-Step Guide: Crafting Your Recycled 4th of July Flag
Follow these simple steps to create your own unique and festive paper roll flag:
Step 1: Prepare Your Canvas – The Cardboard Base
Start by preparing your cardboard base. Decide on the desired size and shape of your flag. A rectangular shape works best for a traditional flag appearance. Once you have your cardboard cut, you’ll want to paint a background. For a classic flag look, you can paint a portion of the cardboard blue for the “union” (the star field) and leave the rest white, or paint it a contrasting color like cream or light gray for a rustic feel. If you’re aiming for crisp lines, use painter’s tape to mark off the section you intend to paint blue. Apply an even coat of paint and let it dry completely before carefully removing the tape. This creates a neat foundation for your paper roll design.
Step 2: Transform Your Paper Rolls – Cutting and Painting
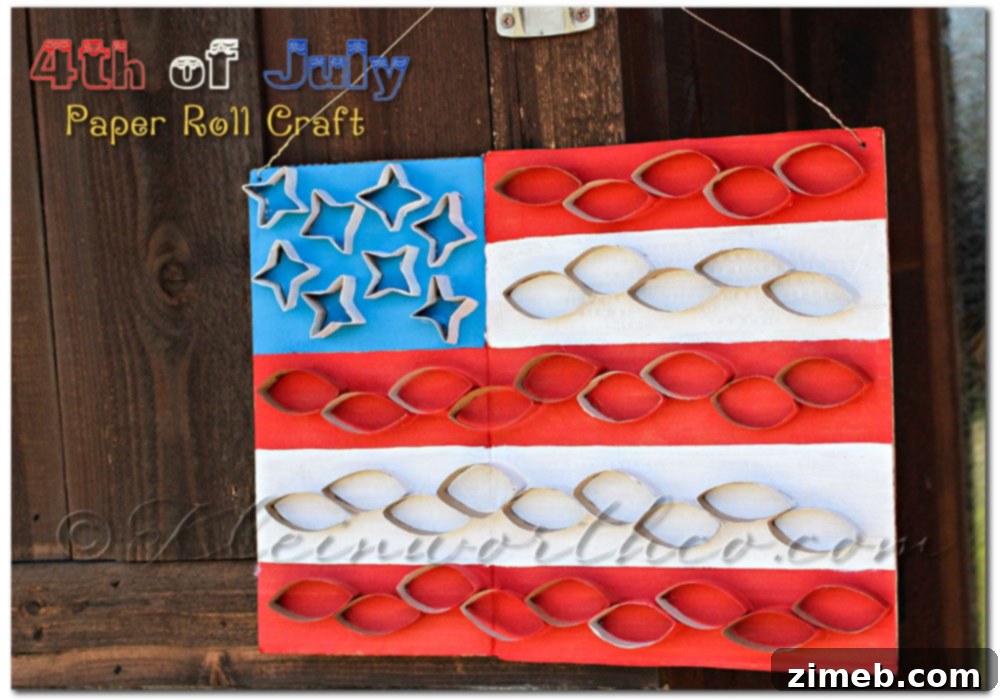
Now it’s time to bring your paper rolls to life with color! First, decide how many rolls you’ll need for each color (red, white, and blue). For the main stripes of the flag, you’ll want some rolls cut to uniform lengths. Use your scissors to cut the rolls into smaller sections. For variety, you can cut some shorter and some longer. Paint these sections in patriotic red and white. Apply two coats if necessary for vibrant color. For the “stars” section of the flag, take a few rolls and pinch one end to create a star-like shape, or simply cut small circles from the rolls to represent stars. Paint these blue or white, depending on your design preference. Allow all painted pieces to dry thoroughly.
Step 3: Assembling Your Flag Design
Once all your painted paper roll pieces are dry, it’s time for assembly. Begin by arranging your red and white paper roll sections onto the cardboard base to form the stripes of the flag. Alternate the colors, ensuring they fit well within the designated “stripe” area of your cardboard. Once you are happy with the arrangement, use strong craft glue or a hot glue gun to firmly attach each paper roll piece to the cardboard. Hold each piece in place for a few seconds until the glue sets. Work systematically, ensuring an even distribution and spacing of the rolls to create a visually appealing flag pattern. For the best result, ensure the rolls are glued securely so the craft will last.
Step 4: Adding the Stars and Hanging Mechanism
With the stripes in place, it’s time to add the iconic stars. Take the paper rolls you pinched into star-like shapes or cut into circles and paint them white (if not already done). Arrange and glue these “stars” onto the blue section of your cardboard base. You can experiment with different patterns – a cluster, scattered, or even just a few prominent ones. Once everything is glued and dry, you’ll want to add a way to hang your beautiful creation. Use a hole punch to make two holes at the top corners of your cardboard base. Thread a piece of wire, twine, or ribbon through these holes and tie the ends to create a loop for hanging. This makes your flag lightweight and easy to display on your porch, door, or any wall.
The Perfect Project for Little Hands: Crafting with Kids
This paper roll craft is not only a fantastic way to decorate but also an excellent activity for engaging children. My girls loved helping with the cutting and pinching of the rolls, and they took immense pride in painting the vibrant colors. Involving kids in crafting offers numerous developmental benefits:
- Fine Motor Skills: Cutting, pinching, and gluing all help to develop dexterity and hand-eye coordination.
- Color Recognition and Creativity: Children learn about colors and have the freedom to experiment with their own design ideas.
- Problem-Solving: Arranging the rolls and planning the flag layout encourages spatial reasoning.
- Patience and Focus: Crafting requires concentration and teaches the importance of seeing a project through to completion.
- Family Bonding: It’s a wonderful opportunity for quality time, creating lasting memories together.
Remember to supervise young children, especially when using scissors and hot glue, and allow them to take ownership of certain steps to boost their confidence.
Why This Craft Shines: Benefits and Versatility
There are many reasons why this 4th of July paper roll craft stands out as a must-try project:
- Eco-Friendly: It’s a prime example of upcycling, giving new life to items that would otherwise be discarded.
- Budget-Friendly: Made almost entirely from recycled materials, it’s incredibly inexpensive to create.
- Lightweight and Versatile: Its minimal weight means it can be hung virtually anywhere without needing heavy-duty fixtures.
- Customizable: While designed for the 4th of July, the basic technique can be adapted for other holidays or themes.
- Durable: Once assembled and glued, the cardboard and paper rolls create a surprisingly sturdy decoration that can be reused year after year.
- Kid-Friendly: Simple steps make it accessible for children, fostering their creativity and involvement.
Beyond the 4th of July: Endless Possibilities for Paper Roll Crafts
The beauty of paper rolls lies in their incredible versatility. Once you’ve mastered the technique for this patriotic flag, you’ll likely find yourself looking at every empty roll with new creative ideas bubbling up. Paper roll crafts aren’t just for summer holidays; they can be adapted for any season or celebration:
- Halloween: Transform rolls into spooky monster eyes, black cats, or tiny haunted houses. Paint them orange and black, add googly eyes, or cut out jagged edges to create eerie silhouettes.
- Christmas: Create charming ornaments by painting rolls with festive patterns, adding glitter, or shaping them into mini wreaths. You can also craft a delightful advent calendar by decorating each roll and filling it with a small treat or activity idea for each day leading up to Christmas.
- Easter: Decorate rolls to resemble cute bunnies, chicks, or even colorful Easter baskets. Use pastel paints, cotton balls, and pipe cleaners to bring these characters to life.
- General Home Decor and Organization: Beyond holidays, paper rolls can be incredibly useful. Glue them together to create desk organizers for pens and pencils, small cubbies for craft supplies, or even a mini “fairy house” village for imaginative play. They can be painted, covered in fabric, or embellished with buttons and beads to match any room’s decor.
Each new project is an opportunity to experiment with colors, textures, and shapes, demonstrating just how much potential lies within these humble cardboard tubes.
Tips for a Successful Crafting Session
To ensure your crafting session is enjoyable and your finished project is a success, keep these tips in mind:
- Protect Your Work Surface: Always lay down newspaper, old towels, or a plastic drop cloth before painting to prevent accidental spills and stains.
- Ventilation: Work in a well-ventilated area, especially when using acrylic paints, to ensure good air circulation.
- Patience with Drying Times: Allow each layer of paint and glue to dry completely before moving on to the next step. Rushing can lead to smudges or weak adhesion.
- Keep it Fun: The goal is to enjoy the process! Don’t stress over perfection. Embrace the unique imperfections that give handcrafted items their charm.
- Encourage Creativity: While following steps, encourage children (and yourself!) to add their personal touch. Maybe a different pattern for the stars, or some glitter for extra sparkle.
Join the Movement: Share Your Creations
We absolutely love seeing your creativity come to life! If you decide to make your own 4th of July paper roll craft, or any other repurposed project, please share it with us. Your unique interpretations inspire others and contribute to a growing community of sustainable crafters. This craft is a perfect reminder that beauty and purpose can be found in the most unexpected places.
Discover More Repurposed & Upcycled DIY Crafts!
Conclusion: A Craft That Celebrates and Sustains
This 4th of July paper roll craft is more than just a seasonal decoration; it’s a testament to the power of imagination and the value of sustainability. It proves that with a little creativity, common household items can be transformed into meaningful and beautiful pieces of art. It’s an inexpensive, eco-friendly, and incredibly fun way to celebrate patriotic holidays while spending quality time with loved ones. So, the next time you finish a roll of paper towels or toilet paper, resist the urge to discard it. Instead, start a collection, because you never know what amazing creation might be just around the corner, ready to bring joy and festive cheer to your home.