
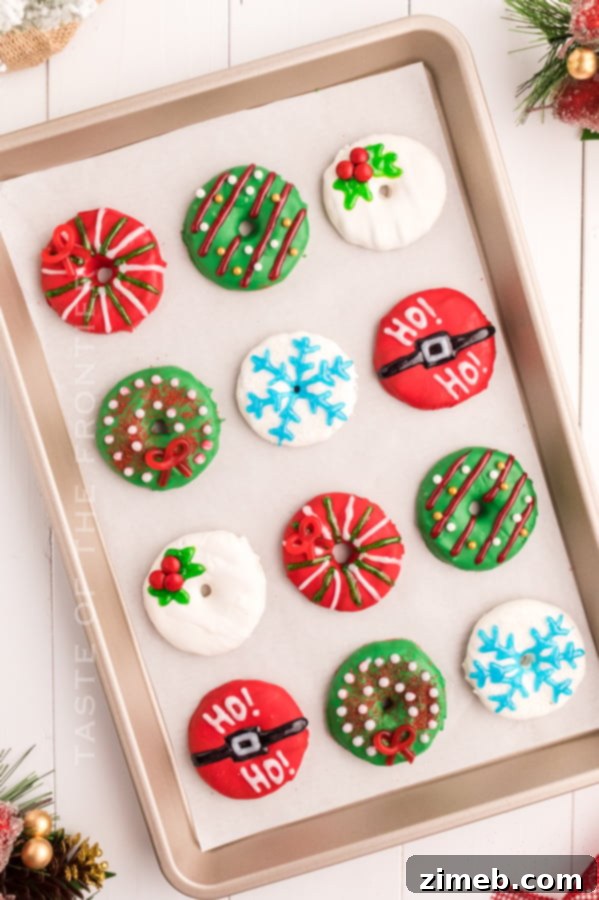
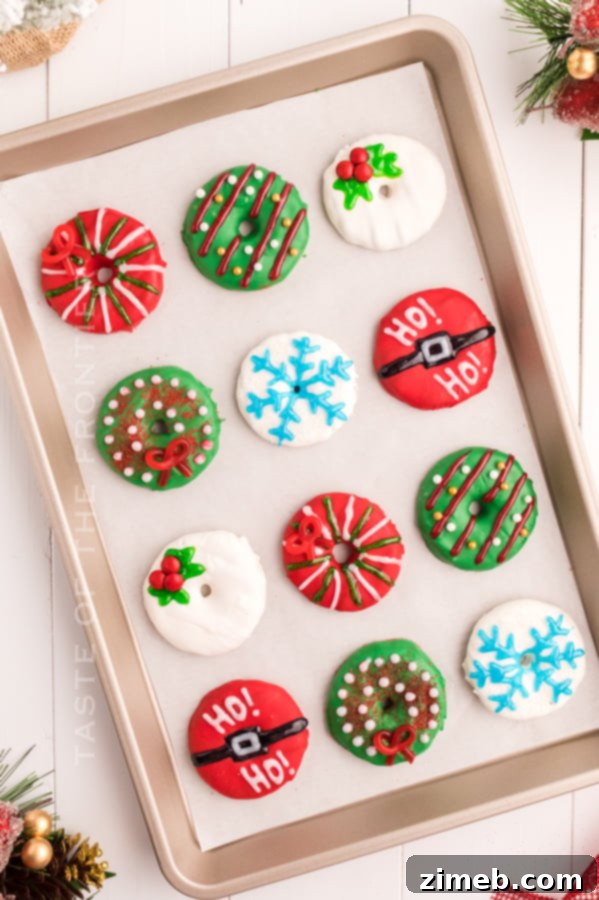
Decorated Christmas Wreath Cookies are a truly festive holiday dessert, perfect for spreading cheer at any cookie exchange or simply enjoying a delightful moment with family and friends. This easy recipe promises big smiles and impressive results with minimal effort.
Are you looking for a heartwarming, semi-homemade gift that truly shines during the busy holiday season? Or perhaps you’re planning a lively cookie decorating party and need creative, yet simple ideas to keep the fun going without becoming overwhelmed? We have the ideal solution to make your holiday preparations enjoyable and stress-free.
Introducing these adorable Christmas Wreath Cookies! They are not only super cute but also incredibly easy to make, even if you’re short on time. Using pre-packaged fudge-striped cookies as a base, along with a handful of other festive ingredients, you can whip up a batch of these charming treats in about an hour. They look like you spent all day perfecting them in the kitchen, but in reality, they come together so quickly, leaving you more time to savor the holiday magic. You’ll surely fall in love with them, just like we have!
Unleash Your Creativity: Customizable Christmas Wreath Cookies
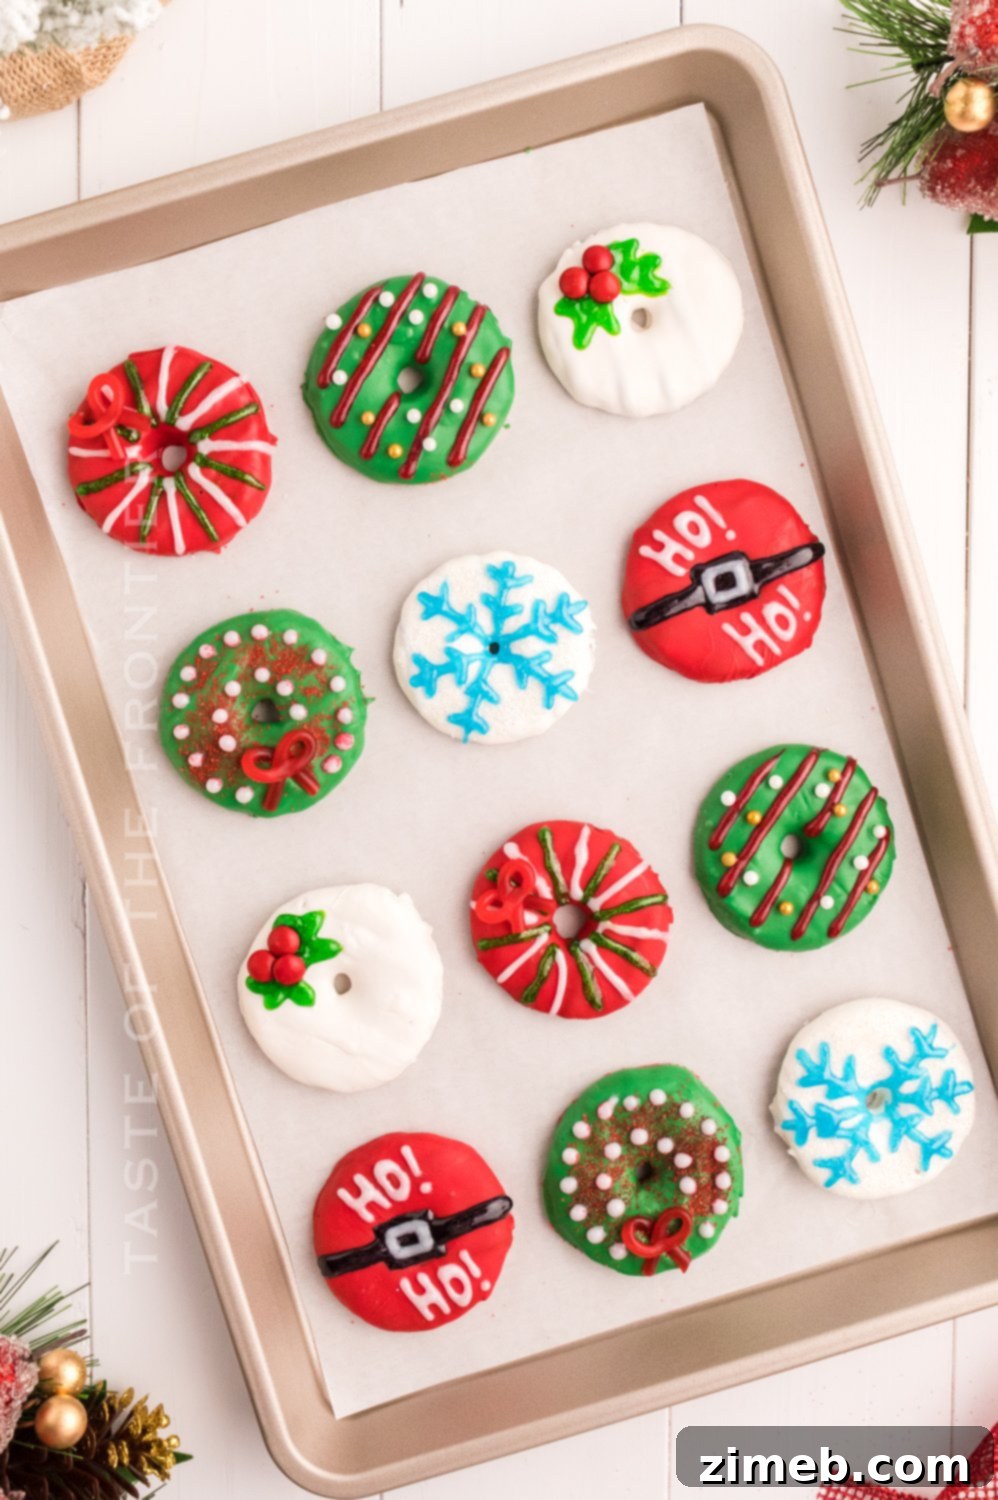
One of the most exciting aspects of these delightful cookies is their incredible versatility. The decorating possibilities are truly endless, allowing you to customize them for any holiday celebration, gathering, or even just for a spontaneous moment of creative fun. Imagine transforming these simple cookies into miniature works of art that reflect your unique style and festive spirit.
This endless customization makes them a fantastic choice for hosting a cookie decorating party, especially for the little ones. It provides a wonderful opportunity for children to engage in a creative activity, keeping their hands busy and their imaginations alight. Whether they’re carefully adding sprinkles or happily taste-testing as they go, everyone will enjoy the process and the delicious outcome. From vibrant colors to whimsical designs, each cookie becomes a personal masterpiece, making every bite a joyful experience.

Frequently Asked Questions About Christmas Wreath Cookies
How to Store Decorated Christmas Wreath Cookies
Proper storage is key to keeping your beautiful Decorated Christmas Wreath Cookies fresh and vibrant. Once the chocolate coating has completely firmed up and all decorations are set, you can carefully transfer them to an airtight container. It’s crucial to arrange them in a single layer to prevent any damage to the delicate decorations.
These cookies do not require refrigeration and can be safely kept at room temperature for several days, maintaining their delightful flavor and texture. However, we strongly advise against stacking them, as the edible glitter and sparkle gels typically do not harden completely. Stacking will almost certainly cause the colors to smudge and the decorations to get ruined, diminishing their festive appeal. For best results, keep them flat and undisturbed.
What is the Best Chocolate for Dipping Holiday Cookies?
When it comes to dipping cookies, selecting the right chocolate can make all the difference in achieving a smooth, professional finish. While you *can* technically use regular white chocolate chips and tint them with food coloring, this often requires additional steps. You might find yourself needing to add a bit of coconut oil or vegetable shortening to achieve the perfect melting consistency, preventing the chocolate from becoming too thick or lumpy.
For unparalleled ease and consistently excellent results, we highly recommend using candy melts. Candy melts are specifically formulated to melt smoothly and maintain the ideal consistency for dipping, without needing any additives. Moreover, they come in a vast array of vibrant colors, including the festive green, red, and white you’ll need for these wreath cookies. This eliminates the tricky step of coloring white chocolate, which can sometimes lead to seizing (where the chocolate becomes grainy and unusable) when food coloring is introduced. With candy melts, you get reliable performance and brilliant colors every time, making your decorating process much faster and more enjoyable. The variety of colors, flavors, and forms available means your creativity knows no bounds when crafting these festive treats.
Can These Christmas Wreath Cookies Be Made Ahead of Time?
Absolutely! Preparing these cookies in advance is a fantastic way to streamline your holiday baking and entertaining. You can coat the fudge-striped cookies with the candy melt chocolate ahead of time, allowing you to focus solely on the fun decorating aspect closer to your event. Simply store the chocolate-coated cookies in an airtight container at room temperature.
It’s important to note a common phenomenon: chocolate coating tends to “sweat” or develop condensation when it sits at room temperature after being refrigerated. This excess moisture can make the decorating part more challenging, as sprinkles and gels may not adhere as effectively. For the best adhesion and easiest decorating experience, it’s ideal to apply your decorations while the chocolate coating is still semi-soft and has not fully set. If you are preparing in advance, consider doing the chocolate dipping a day or two before, storing correctly, and then setting up your decorating station when you are ready to add the finishing touches.
Can I Use Chocolate Chips Instead of Candy Melts?
While the idea of using chocolate chips might seem appealing for convenience, it’s generally not recommended for recipes like this where a smooth, stable coating is essential. Standard chocolate chips, especially white or colored varieties, don’t always temper well for dipping and coating purposes. They often require the addition of an emulsifier like coconut oil or vegetable shortening to achieve a creamy enough consistency to properly coat the cookies.
A significant risk with chocolate chips, particularly white or pre-colored ones, is that they are prone to seizing. This means the chocolate can suddenly become thick, grainy, and unworkable, often due to overheating or exposure to a tiny amount of moisture, making it an unusable mess. Candy melts, on the other hand, are specifically engineered to melt smoothly and remain fluid, making them far more reliable for dipping and achieving that perfect wreath cookie finish. For a hassle-free and successful outcome, sticking with candy melts is your best bet for this recipe.
Ingredients for Festive Decorated Christmas Wreath Cookies
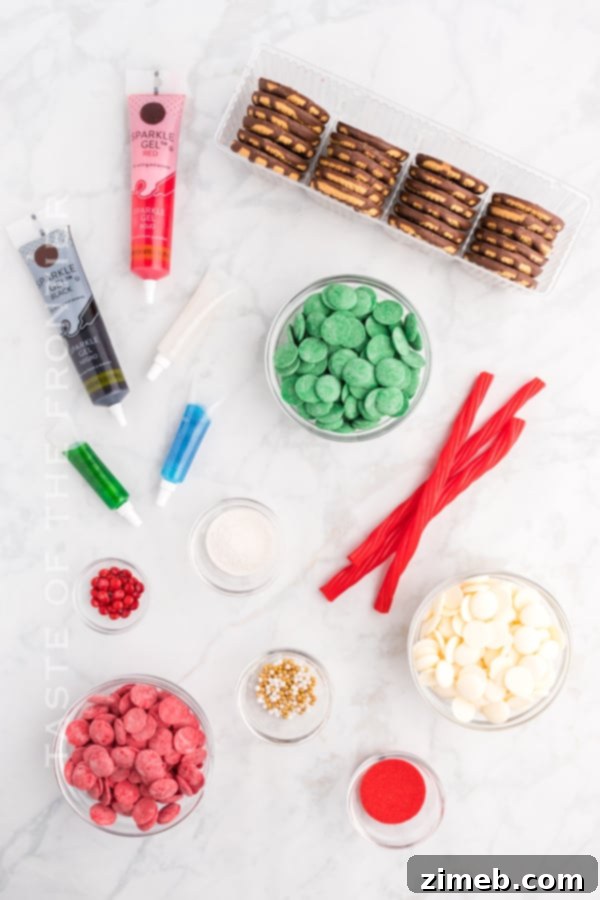
Gather these simple ingredients to create your beautiful holiday treats:
- **Candy Melts:** You’ll need green, red, and white candy melts. Wilton brand (12-ounce bags) works perfectly for vibrant colors and smooth melting.
- **Fudge Striped Cookies:** One package of classic fudge striped cookies, such as Keebler brand. Their convenient hole in the center makes them ideal for wreaths!
Delightful Decorations:
- **Edible Glitter/Sparkle Gel:** Stock up on black, white, red, blue, and green for varied designs and a touch of holiday sparkle.
- **Mini M&M’s:** We primarily use the red ones for classic Christmas accents.
- **Gold & White Beads:** Wilton 4-Cell Gold Sprinkles Mix offers a lovely assortment for an elegant touch.
- **Red & Silver Sanding Sugar:** Adds a beautiful shimmer and texture to your wreaths.
- **Pull ‘n’ Peel Licorice:** Perfect for crafting cute little bows to adorn your festive creations.
Note: If you choose to use Nonpareils for decoration, please be aware that they have a tendency to “sweat” when refrigerated, which can cause their colors to bleed and potentially stain your beautiful cookies.
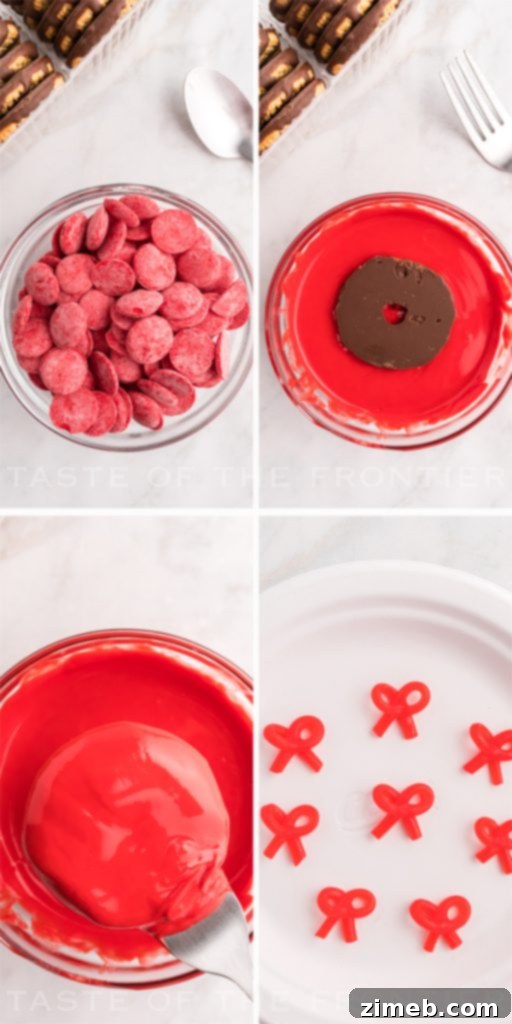
How to Make Decorated Christmas Wreath Cookies: Step-by-Step Guide
- Prepare Your Workspace: Line a baking sheet with parchment paper. This will prevent sticking and make cleanup a breeze.
- Craft Licorice Bows: Ahead of dipping, prepare 8 small licorice bows – 4 for your green cookies and 4 for your red cookies. (See “Tips for the Best Decorated Christmas Wreath Cookies” below for detailed instructions on making bows).
- Melt Candy Melts: In a small, microwave-safe bowl, add 1 ½ cups of one color of candy melts. Follow the heating instructions on the back of the package carefully. Heat in short intervals, stirring frequently, until the candy melts are completely smooth and free of lumps.
- Dip Your Cookies: Take one fudge-striped cookie and carefully place it top-side down into the melted candy melt chocolate. Use a fork to gently flip the cookie, ensuring it’s completely submerged and covered.
- Remove Excess Chocolate: Lift the coated cookie out with the fork. Gently tap the fork against the side of the bowl to allow any excess chocolate to drip off. Continue tapping until the coating on the cookie top appears smooth and even.
- Decorate Immediately: Place the freshly coated cookie onto the prepared parchment paper. This is the crucial moment for decorating! It’s best to decorate while the chocolate is still warm and semi-set, as this ensures the decorations adhere firmly. For efficiency, we recommend dipping 2-3 cookies of the same color, decorating those, and then repeating the process with the remaining cookies of that color before moving on to a new color.
- Repeat for All Colors: Continue this dipping and decorating process with the other colors of candy melts (red and white), following steps 3-6.
- Allow to Set: Once all cookies are decorated, let them cool at room temperature until the chocolate hardens completely. For faster setting, you can place the baking sheet in the refrigerator for about 10 minutes.
- Serve and Enjoy: Your beautifully decorated Christmas Wreath Cookies are now ready to serve! They are delicious chilled or at room temperature.
- Store: Store any leftover cookies in an airtight container at room temperature for up to two weeks.
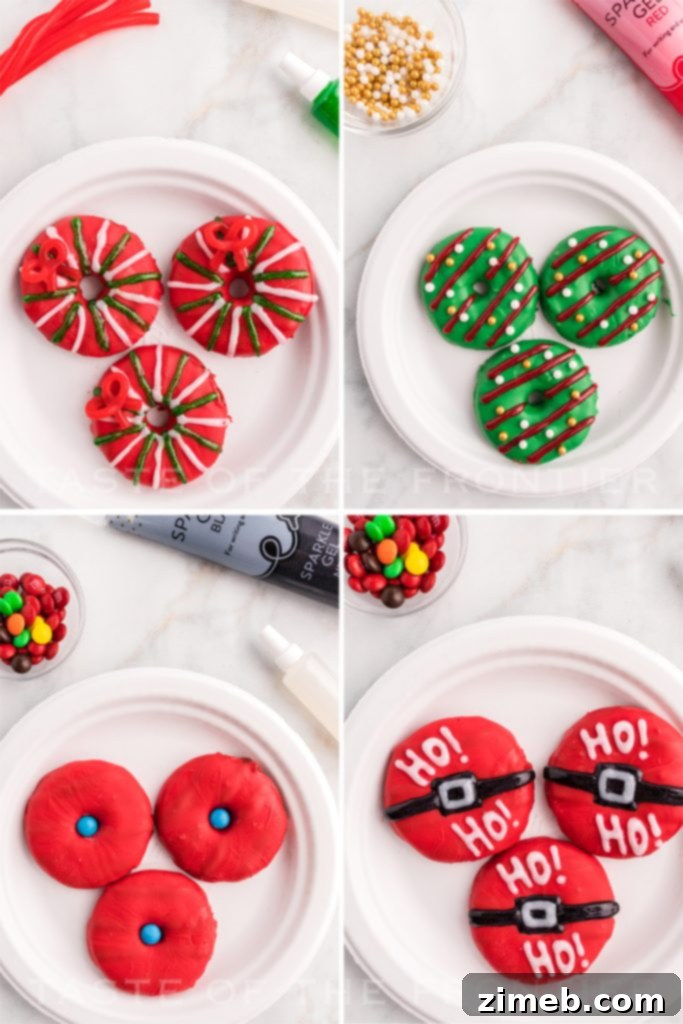
Festive Decoration Ideas for Your Red Wreath Cookies
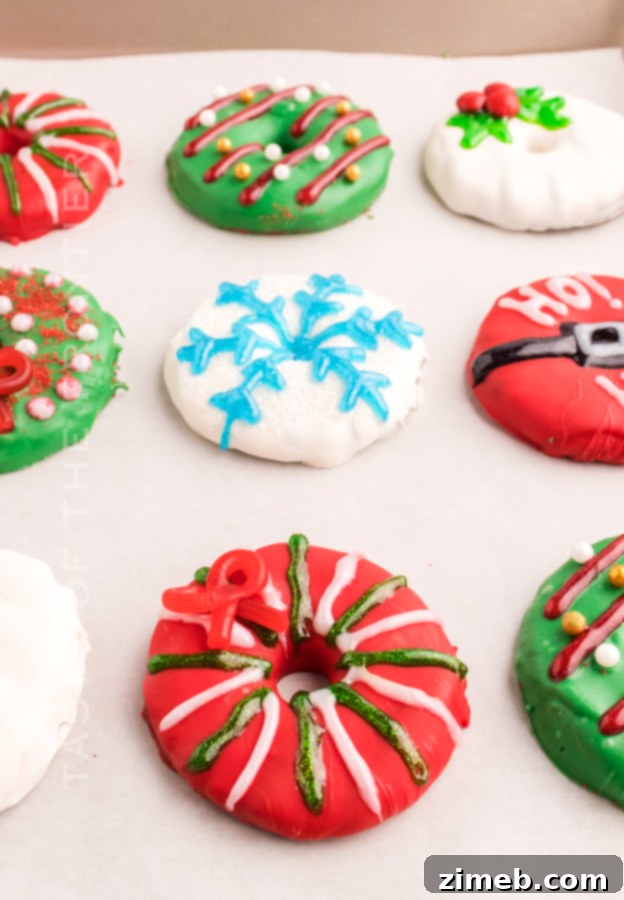
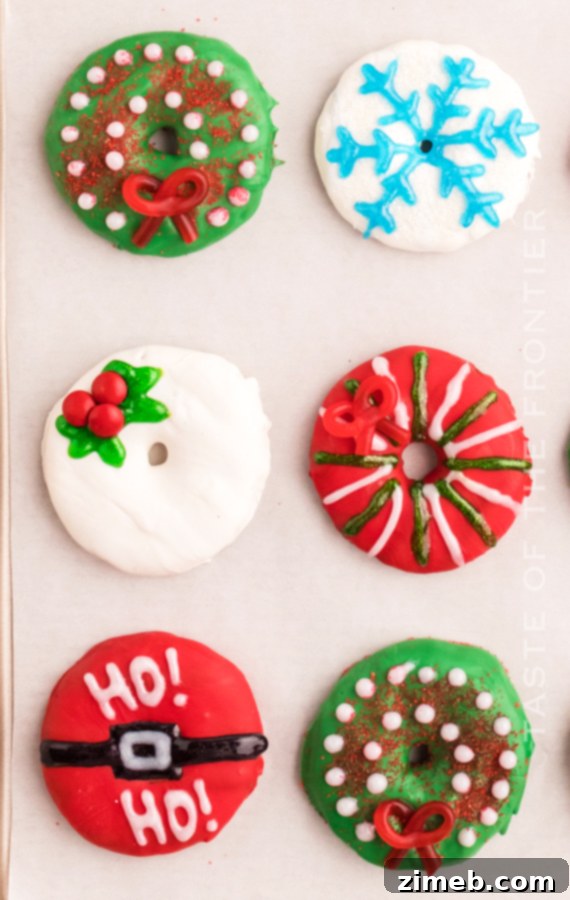
- Santa Belt Design: Start by carefully placing a mini red M&M into the center hole of the cookie; this prevents the gel from falling through. Use black glitter gel to draw a belt design across the middle of the cookie, including filling in a square for the center buckle. Then, add a touch of white glitter gel to highlight the buckle and make it pop. Finally, with white glitter gel, playfully add “Ho! Ho!” above the belt for a jolly touch.
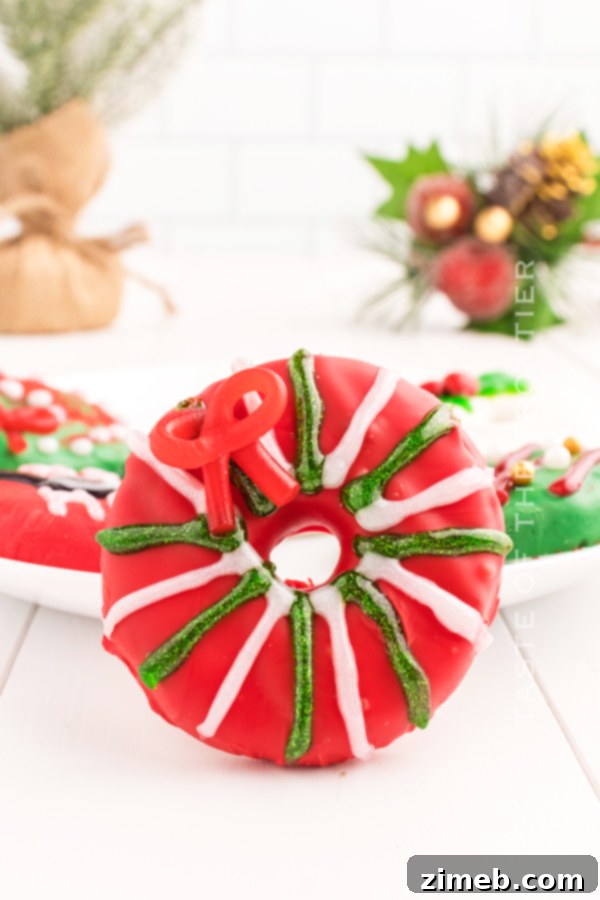
- Green & White Stripes: Create a striking striped pattern by drawing alternating lines of green and white glitter gel across the cookie. For an extra flourish, add a small, pre-made licorice bow in the upper left corner of the cookie while the gel is still wet.
- Candy Cane Swirl: For a simple yet elegant look, use white glitter gel to create swirling patterns reminiscent of a candy cane. Sprinkle with a touch of red sanding sugar while the gel is still wet for extra sparkle.
Understanding Chocolate Seizing: Why Your Candy Melts Might Not Melt Correctly
Have you ever tried to melt chocolate or candy wafers only to have them transform into a thick, chunky, and grainy mess instead of a smooth, creamy liquid? This frustrating phenomenon is known as “chocolate seizing.” It’s a common issue that can derail your decorating plans, but understanding its causes can help you avoid it.
There are two primary reasons why chocolate wafers might seize:
- Overheating: The first and simplest cause is burning the chocolate due to excessive heat. Chocolate is delicate and can easily scorch. If heated too quickly or at too high a temperature, the cocoa solids and sugar can burn, leading to a clumpy texture.
- Contact with Water or Steam: This is the most common culprit, especially when melting chocolate over a double boiler or in a microwave without proper care. Chocolate contains oils and fats that are hydrophobic, meaning they “fear” water. When even a tiny amount of water or steam comes into contact with melting chocolate, it creates an adverse reaction. The water causes the sugar particles in the chocolate to clump together, drawing in cocoa solids and resulting in a thick, gritty, unworkable paste. It essentially disrupts the emulsion of fats and solids that makes chocolate smooth.
To prevent seizing, always refer to the package directions when melting candy melts or chocolate. Use a clean, dry bowl and utensils. If using a microwave, heat in short bursts (15-30 seconds), stirring thoroughly after each interval. If using a double boiler, ensure the bowl doesn’t touch the water and that no steam escapes into the chocolate. Patience and low, gentle heat are your best friends for perfectly melted chocolate.
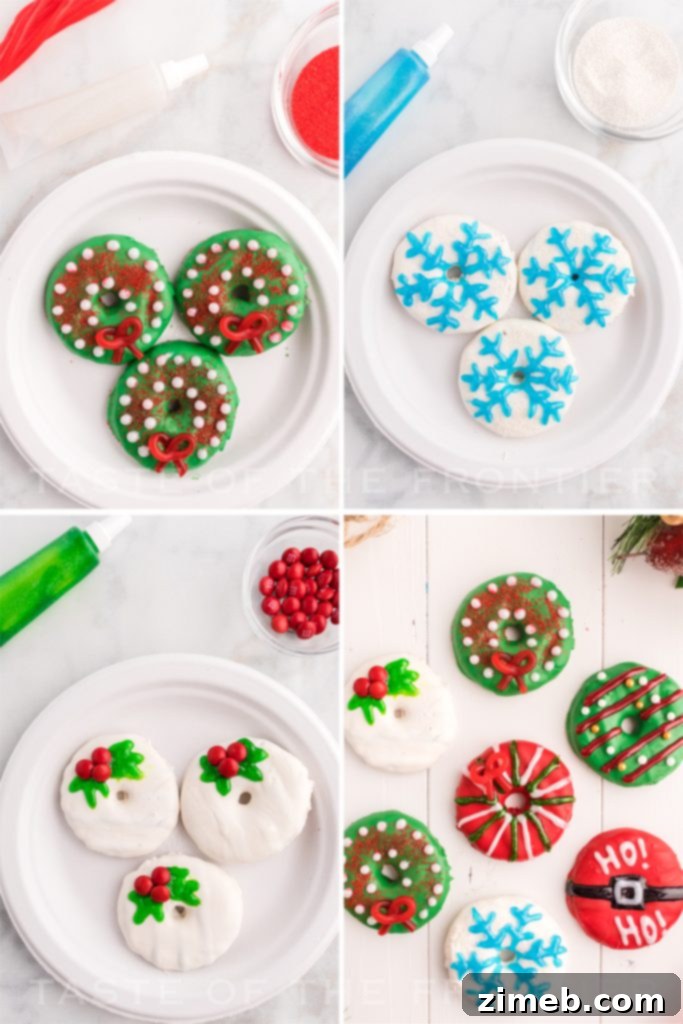
Elegant Decoration Ideas for Your White Wreath Cookies
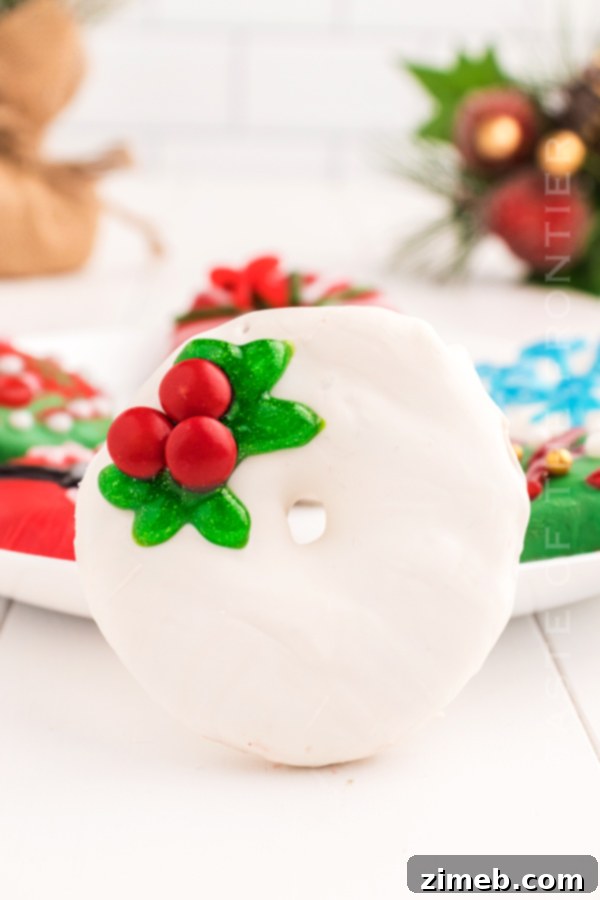
- Classic Holly Cookie: For a timeless holiday look, use green glitter gel to artfully draw two or three small holly leaves. Then, add three vibrant red mini M&M’s in the center to represent holly berries.
- Sparkling Blue Snowflake: Create a frosty winter wonderland by sprinkling silver sanding sugar evenly over the white coated cookie while it’s still slightly wet. Once set, draw a delicate snowflake design using blue glitter gel.
- Pearlescent Dots: For a simple yet elegant design, use white glitter gel to create small, evenly spaced dots around the edge of the cookie. Add a tiny silver bead to the center of each dot for a pearlescent effect.
Whimsical Decoration Ideas for Your Green Wreath Cookies
- Gold & White Beads: Begin by drawing a few elegant red glitter gel lines across the green cookie. While the gel is still wet, carefully add a scattering of gold and white beads for a luxurious and sparkling finish.
- White Dots with Bow: For a charming look, add your pre-made licorice bow to the cookie while the candy melt coating is still warm and tacky. Then, sprinkle a generous amount of red sanding sugar for a festive background, followed by creating delicate white glitter gel dots around the bow and edges.
- Multi-Colored Sprinkles: Embrace traditional festive colors by generously sprinkling a mix of red, white, and green nonpareils or jimmies over the wet green candy melt. This creates a vibrant, confetti-like effect that’s always a crowd-pleaser.
No-Bake Christmas Wreath Cookies: The Ultimate Easy Holiday Treat
These Decorated Christmas Wreath Cookies are not only beautiful and delicious, but they also offer the incredible advantage of being a no-bake recipe. This makes them an absolute holiday lifesaver, especially when your oven is in high demand for other festive dishes or when you simply want to minimize time spent baking from scratch. By starting with pre-made fudge-striped cookies, you skip all the mixing, rolling, and baking steps, jumping straight to the fun part: dipping and decorating!
The no-bake aspect means less mess, less fuss, and a quicker path to a stunning tray of holiday treats. It’s an accessible recipe for cooks of all skill levels, making it perfect for involving children in the kitchen without the dangers of a hot oven. These cookies prove that you don’t need to spend hours baking to create an impressive and memorable holiday dessert. They are the epitome of easy, festive, and fun, allowing you to enjoy more of the season’s magic.
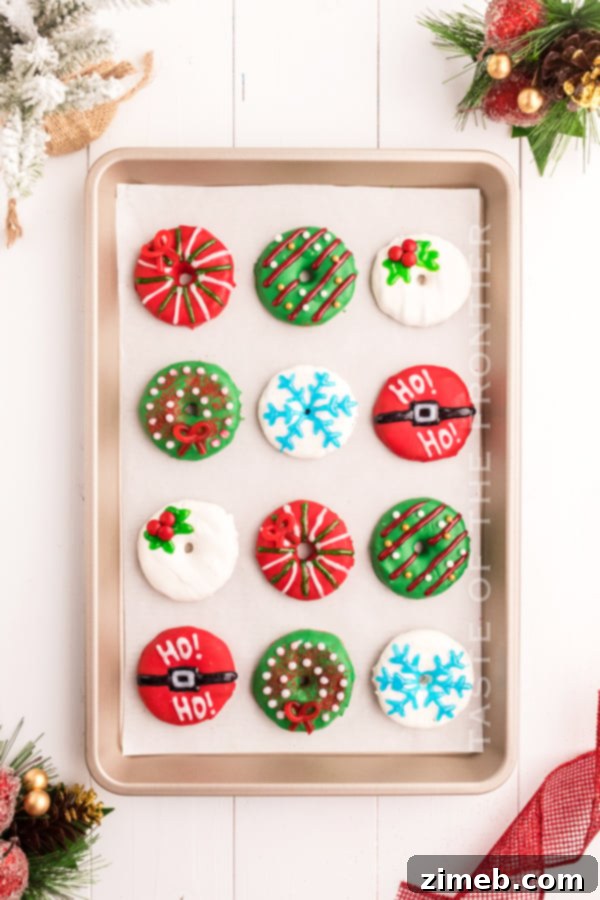
Tips for the Best Decorated Christmas Wreath Cookies
- Handle Glitter Gel with Care: Remember that the edible glitter and sparkle gels typically do not harden all the way. This means they will remain somewhat soft and sticky. Be extra careful when handling, eating, and transporting your cookies to avoid smudging the designs. For this reason, we strongly advise against stacking them directly on top of each other.
- Master the Licorice Bow: To create those adorable licorice bows, gently tear off a single string of pull ‘n’ peel licorice. Take one end and form a small loop, then take the other end and form another small loop. Cross the middle sections of these loops over each other in an “X” shape to create the bow. Firmly press the crossed section together to ensure the bow holds its shape. Finally, trim the “ribbon” ends of the bow to your desired length for a neat finish.
- Adjust Candy Melt Consistency: If your melted candy melts appear too thick for dipping, don’t fret! You can easily adjust their consistency by adding one teaspoon of vegetable shortening at a time, stirring thoroughly after each addition, until you achieve the desired smooth and dippable texture.
- Prevent Color Bleeding with White Melts: When working with white candy melts, you might notice that the dark fudge from the cookie can sometimes melt slightly and mix with the white coating, potentially turning it a light brown. To avoid this, try a different dipping method: place the fudge-striped cookie top-side up on your fork, then spoon the white candy melts over the top until fully covered. Lift the cookie, allowing excess to drip back into a *separate* bowl (not your main white candy melt bowl) to prevent any chocolate drippings from contaminating your pristine white melt. This method is generally more effective for maintaining the bright white color.
- Creative Topping Ideas: Don’t limit yourself to the suggested decorations! Consider adding crushed peppermint candies for a minty twist, tiny marshmallows for a snowy effect, or even miniature chocolate chips for a double chocolate treat. Always ensure toppings are added while the candy melt is still wet for best adhesion.
- Patience is Key: While this is a quick recipe, allowing sufficient time for the chocolate to set completely is crucial. Rushing this step can lead to smudged decorations and a less appealing finish.
What are Christmas Wreath Cookies?
Our delightful Christmas Wreath Cookies are a wonderfully clever and easy holiday treat! They start with classic fudge-striped cookies, which are then artfully dipped in vibrant, vanilla-flavored candy melts. The magic truly happens during decoration, as these cookies are adorned with an array of festive sprinkles, miniature candies, and shimmering edible glitter or sparkle gel. The beauty of this recipe lies in its customization – you can decorate them in countless ways to create your very own unique and charming wreath designs, making each cookie a mini celebration!
Why Use Fudge-Striped Cookies?
The choice of fudge-striped cookies for this recipe is no accident – it’s a stroke of genius for holiday baking! These cookies are already a beloved treat on their own, offering a delightful combination of crunchy shortbread and rich fudge. However, their true advantage for this recipe lies in their ingenious design: they already come with a perfect hole in the middle. This pre-existing opening instantly transforms them into the ideal base for a “wreath” shape, saving you the time and effort of cutting out centers. It’s a simple hack that makes these Decorated Christmas Wreath Cookies incredibly convenient and truly no-bake, letting you jump straight to the fun part of dipping and decorating!
How Long Does It Take to Make This Recipe?
One of the many appealing features of these Decorated Christmas Wreath Cookies is their relatively quick preparation time. You can anticipate that this entire recipe, from start to finish, will take approximately one hour. This estimate can vary slightly depending on a few factors, such as the complexity of the decorations you choose to apply and how efficiently your candy melts liquefy in the microwave.
The time it takes for the chocolate coating to fully set and harden also plays a role. This setting time can be influenced by the climate in and around your home; warmer and more humid environments may require a bit longer for the chocolate to solidify compared to cooler, drier conditions. Utilizing the refrigerator for a quick chill (as suggested in the instructions) can significantly speed up this hardening process, getting your beautiful cookies ready for enjoyment even faster.
Could I Add Other Toppings to This Recipe?
Absolutely! The beauty of these Christmas Wreath Cookies lies in their adaptability, and you are highly encouraged to personalize them with your favorite toppings. While it’s generally recommended to stick to dry ingredients to maintain stability and prevent moisture-related issues, the sky’s the limit for creative additions. Consider incorporating finely chopped nuts like pecans or walnuts for added crunch, festive sprinkles in various shapes and colors (just be mindful of nonpareils potentially bleeding when refrigerated), mini chocolate chips for an extra cocoa boost, or even a dusting of edible gold or silver glitter for an extra touch of glamour. Always ensure that any added toppings are pressed gently into the wet candy melt so they adhere securely as the chocolate sets.
Host a Memorable Cookie Decorating Party
These Decorated Christmas Wreath Cookies are not just a treat to make, but an experience waiting to happen! They are absolutely perfect for hosting a vibrant and joyful cookie decorating party during the holiday season. Imagine a table laden with colorful candy melts, an assortment of sprinkles, gels, and candies, and a batch of ready-to-decorate fudge-striped cookies. It’s an activity that sparks creativity in guests of all ages, from tiny tots to seasoned adults.
A cookie decorating party is a wonderful way to create lasting memories, foster togetherness, and unleash everyone’s inner artist. Set up individual stations with a variety of decorations, play some festive music, and let the magic unfold. Guests can take home their personalized creations as party favors, making the event doubly special. It’s a low-stress, high-fun way to celebrate the holidays, and these wreath cookies provide the perfect canvas for endless imaginative designs.
If you love this easy Christmas recipe, you’re going to adore these other festive treats too. Click each link below to discover more delicious, printable recipes!
Santa’s Favorite Chocolate Chip Cookies
Santa’s Favorite Chocolate Chip Cookies are the perfect classic treat to leave out with a glass of milk on Christmas Eve, guaranteeing a visit from the big man himself.
Check out this recipe

Struffoli
Struffoli, also known as Honey Balls, is a delightful deep-fried dough or pastry covered with sweet honey or syrup and topped with colorful sprinkles. This traditional Italian treat is often thought to bring good luck to the home where it is made.
Check out this recipe
Christmas Rice Krispie Treats
A classic holiday treat with a festive twist – these buttery, chewy Christmas Rice Krispie Treats are shaped into charming Christmas trees and adorned with cheerful sprinkles, perfect for any holiday gathering.
Check out this recipe
Melting Snowman Frosted Cookies
Melting Snowman Frosted Cookies offer an adorable and whimsical way to bring the magic of the season indoors. Crafted using classic sugar cookies, a dollop of ice cream, soft marshmallows, and more, these cookies are as fun to make as they are to eat.
Check out this recipe

Rudolph Gingerbread Cookies
These super soft and delightfully chewy Rudolph Gingerbread Cookies are the perfect festive addition to your holiday celebrations, guaranteed to bring big smiles from everyone, especially with their iconic red noses!
Check out this recipe

Grinch Chocolate Covered Pretzel Rods
Who says the Grinch doesn’t have a heart? These sweet and salty Grinch Chocolate Covered Pretzel Rods are a whimsical holiday treat, dipped and drizzled in rich green chocolate and topped with a single red heart. They’ll make any holiday snack table extra sweet!
Check out this recipe
Candy Cane Cookies
Candy Cane Cookies are charming peppermint-flavored cookies artfully shaped like classic candy canes. Their delightful festive look and refreshing taste make them an ideal choice for a holiday cookie exchange or any festive party.
Check out this recipe
Easy No-Cook Fudge
Easy No-Cook Fudge is a wonderfully quick and simple holiday recipe made with just 5 basic ingredients (plus any desired mix-ins). Everything is whipped together and chilled before serving, resulting in a rich, delicious fudge with minimal effort.
Check out this recipe
Easy Hot Chocolate Spoons
Easy Hot Chocolate Spoons make fantastic, thoughtful holiday gifts for friends, co-workers, and neighbors. Simply stir one into a mug of warm milk for a deliciously rich cup of cocoa on a cold winter’s day, bringing instant comfort and joy.
Check out this recipe

If you love this recipe for Decorated Christmas Wreath Cookies as much as we do, please take a moment to leave a five-star review below. Your feedback helps us share the joy of easy holiday baking with even more enthusiasts! And don’t forget to help us spread the festive cheer by sharing this recipe on Facebook and Pinterest!

CONNECT WITH YUMMI HAUS!
Be sure to follow us on our social media, so you never miss a post!
Substack, FB, Pinterest, IG, Email Subscription

Rate this Recipe
Decorated Christmas Wreath Cookies
Decorated Christmas Wreath Cookies are a festive holiday dessert. Perfect for a cookie exchange or to enjoy with family and friends.
Pin Recipe
Save Recipe
Chill Time: 10 mins
Total Time: 1 hr
Ingredients
- 3 bags candy melts: green, red, and white (Wilton – 12-ounces each)
- 1 package fudge striped cookies (Keebler brand recommended)
Decorations:
- edible glitter/sparkle gel (black, white, red, blue & green)
- mini M&M’s (red ones primarily used)
- gold & white beads (Wilton 4-Cell Gold Sprinkles Mix used)
- red & silver sanding sugar
- pull ‘n’ peel licorice
Instructions
- Line a baking sheet with parchment paper.
- Prepare 8 licorice bows (4 for green and 4 for red cookies) as detailed in the ‘Tips’ section.
- In a small microwave-safe bowl, add 1 ½ cups of one color candy melts. Follow heating instructions on the back of the package, stirring until smooth.
- Place one fudge striped cookie, top side down, into the melted candy melt chocolate. Use a fork to flip and ensure complete coverage.
- Lift the cookie out with the fork and gently tap off excess chocolate until smooth.
- Place the coated cookie on the parchment paper and decorate immediately! Decorations stick best while chocolate is still warm. Dip 2-3 cookies, then decorate them before continuing with that color.
- Repeat the process with the other colors of candy melts.
- Once decorated, let the cookies cool for the chocolate to harden. Refrigerate for 10 minutes for faster cooling.
- Serve chilled or at room temperature.
- Store in an airtight container for up to two weeks.
White Cookies
- Holly Cookie: Use green glitter gel for leaves, then add 3 red M&M’s.
- Blue Snowflake: Sprinkle silver sanding sugar, then draw a snowflake with blue glitter gel.
Green Cookies
- Gold & White Beads: Draw red glitter gel lines, then add gold & white beads.
- White Dots with Bow: Add the licorice bow while candy is still warm, then sprinkle red sanding sugar followed by white glitter gel dots.
Red Cookies
- Santa Belt: Put a mini M&M into the hole. Use black glitter gel for the belt and buckle, then white glitter gel to highlight the buckle and add “Ho! Ho!”.
- Green & White Stripes: Draw alternating lines with green and white glitter gel, then add a licorice bow in the upper left.
Notes
- Glitter gel doesn’t harden completely; avoid stacking when eating and transporting.
- To make a licorice bow: tear a string, make two small loops crossing in an “x”, press the center, and trim ends.
- If candy melts are too thick, add one teaspoon of vegetable shortening until desired consistency.
- For white candy melts, to avoid turning brown from the cookie’s chocolate, spoon melts over the top of the cookie (top-side up on a fork) and shake off excess into a separate bowl.
Nutritional information for the recipe is provided as a courtesy and is approximate. Please double-check with your own dietary calculator for the best accuracy. We at Yummi Haus cannot guarantee the accuracy of the nutritional information given for any recipe on this site.
Follow @KleinworthCo for even more tasty recipes!