
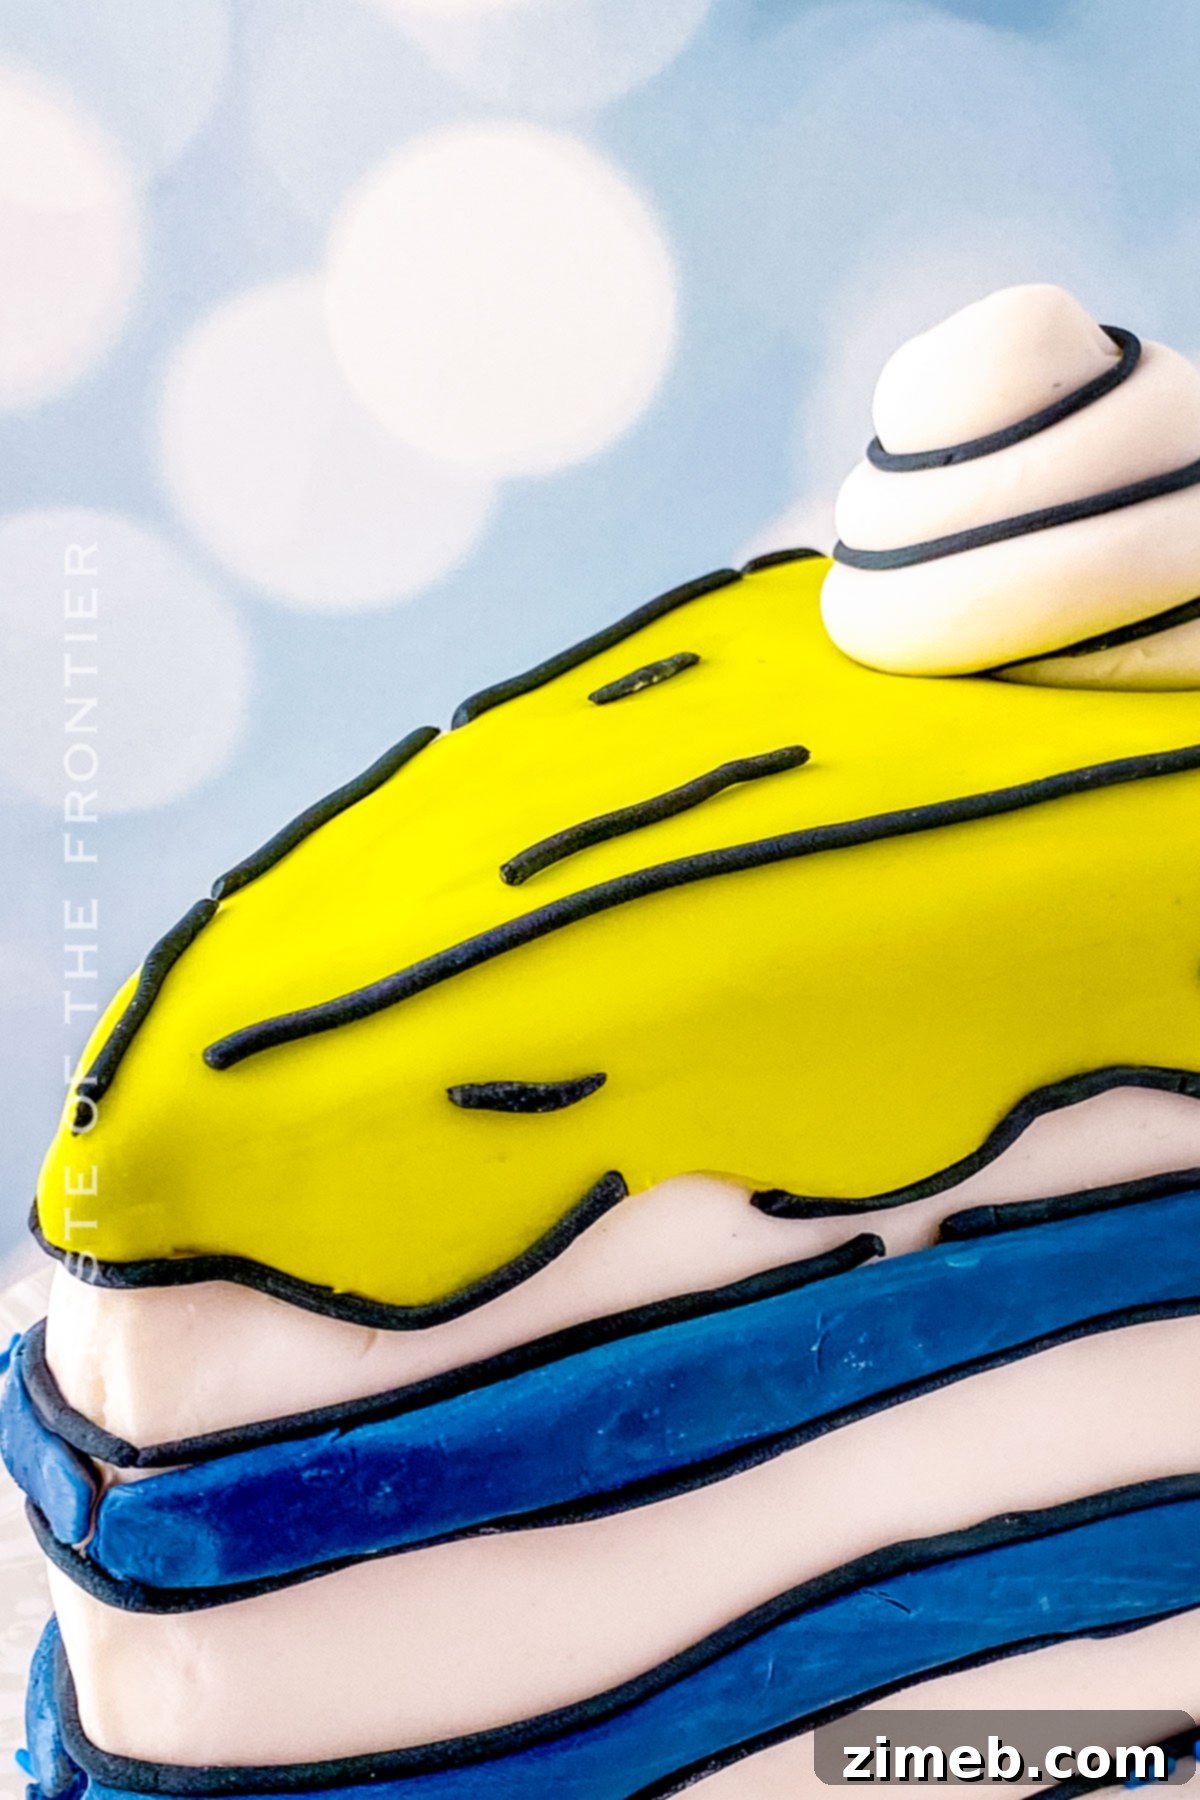
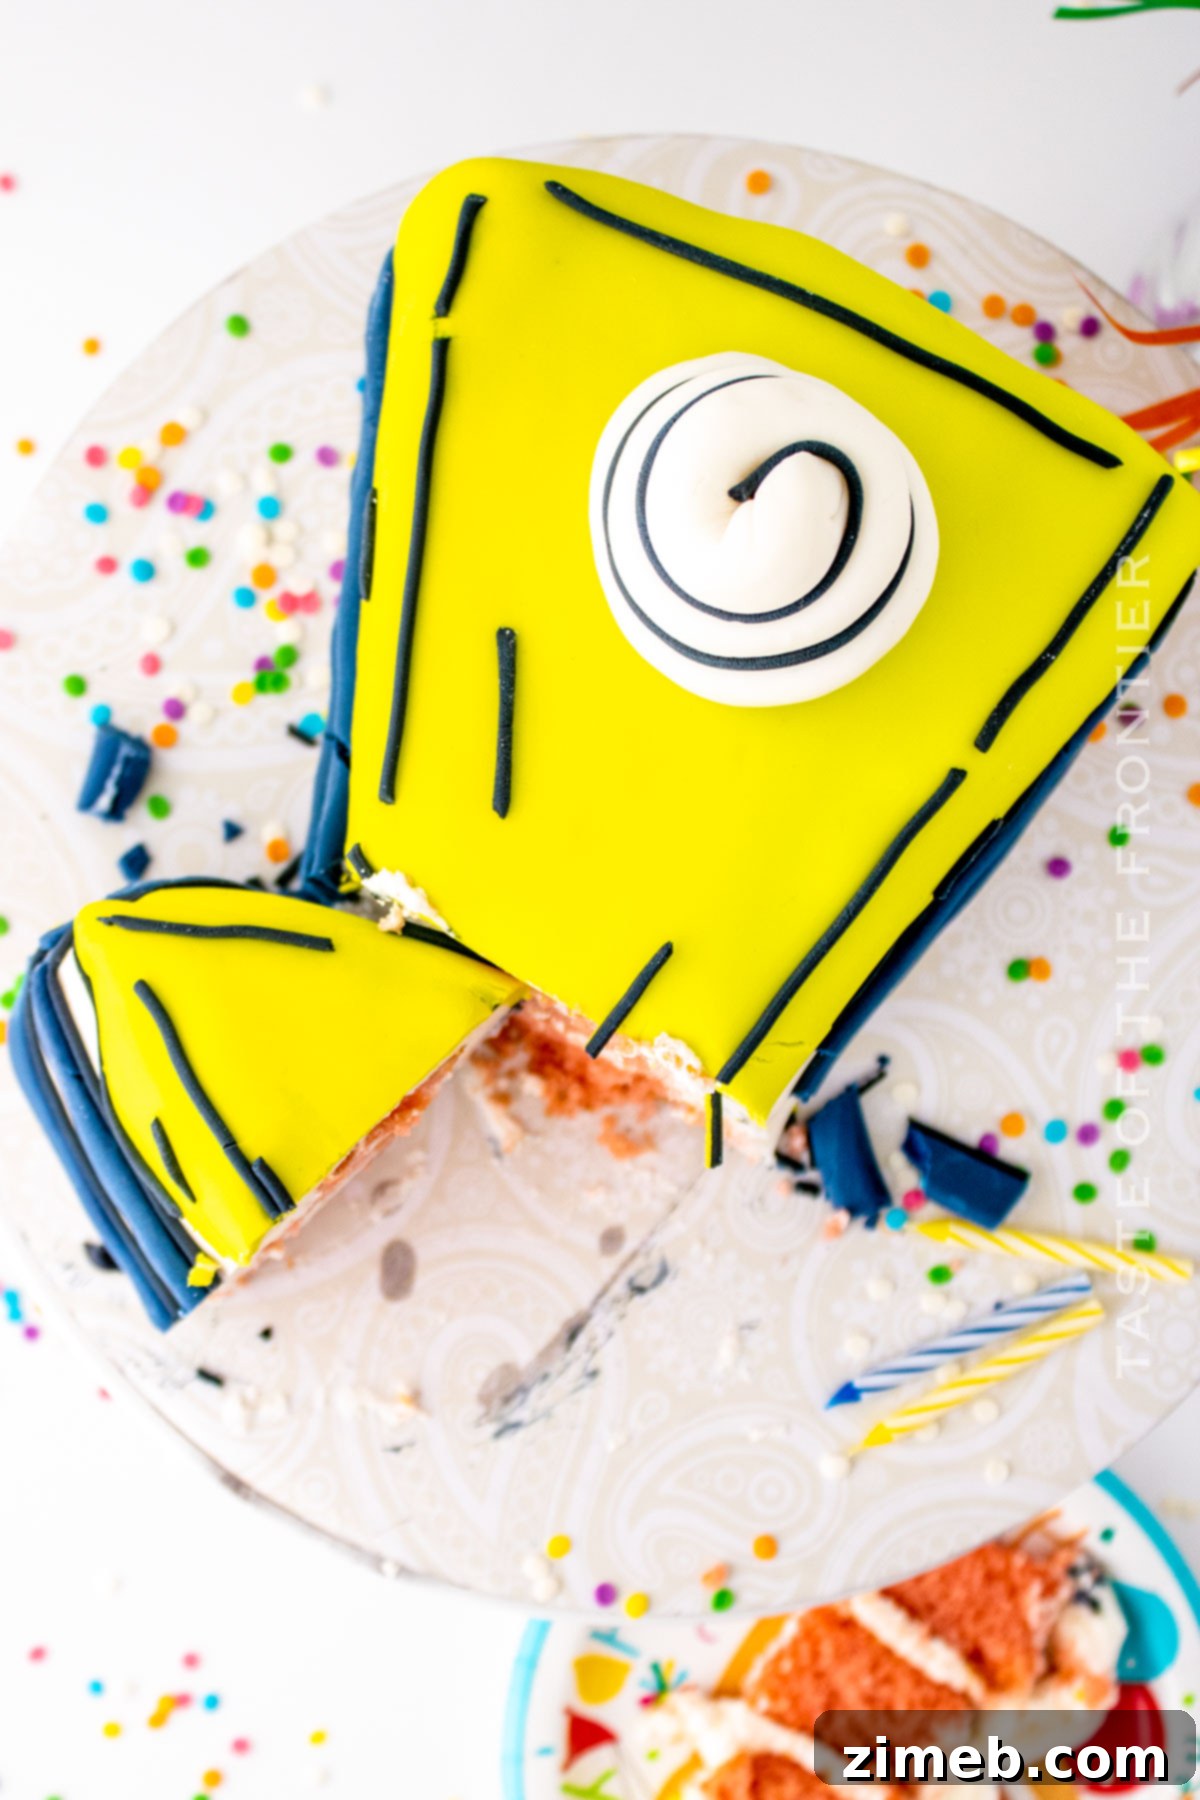
Step into a world where your dessert dreams leap straight from the pages of a graphic novel! This incredible Comic Book Cake recipe brings to life the whimsical charm of a two-dimensional cartoon, creating an edible masterpiece that’s both visually stunning and delightfully fun. The inspiration for this viral sensation comes from a talented Melbourne pastry chef who captivated social media with a custom-made cake boasting an unmistakably playful cartoon appearance. It’s a concept so brilliantly simple, yet the result is astonishingly cute, unique, and guaranteed to be the centerpiece of any celebration.
While the visual impact of this cake is undoubtedly its star feature, the process is surprisingly approachable. The majority of this recipe focuses on the creative art of decorating, allowing you to personalize every detail to your heart’s content. To make things even easier and save precious time, there’s no need to bake the cake from scratch unless you prefer to. You can effortlessly use a pre-baked sheet cake from your local grocery store or a beloved bakery, letting you dive straight into the most exciting part: bringing your comic book vision to life!
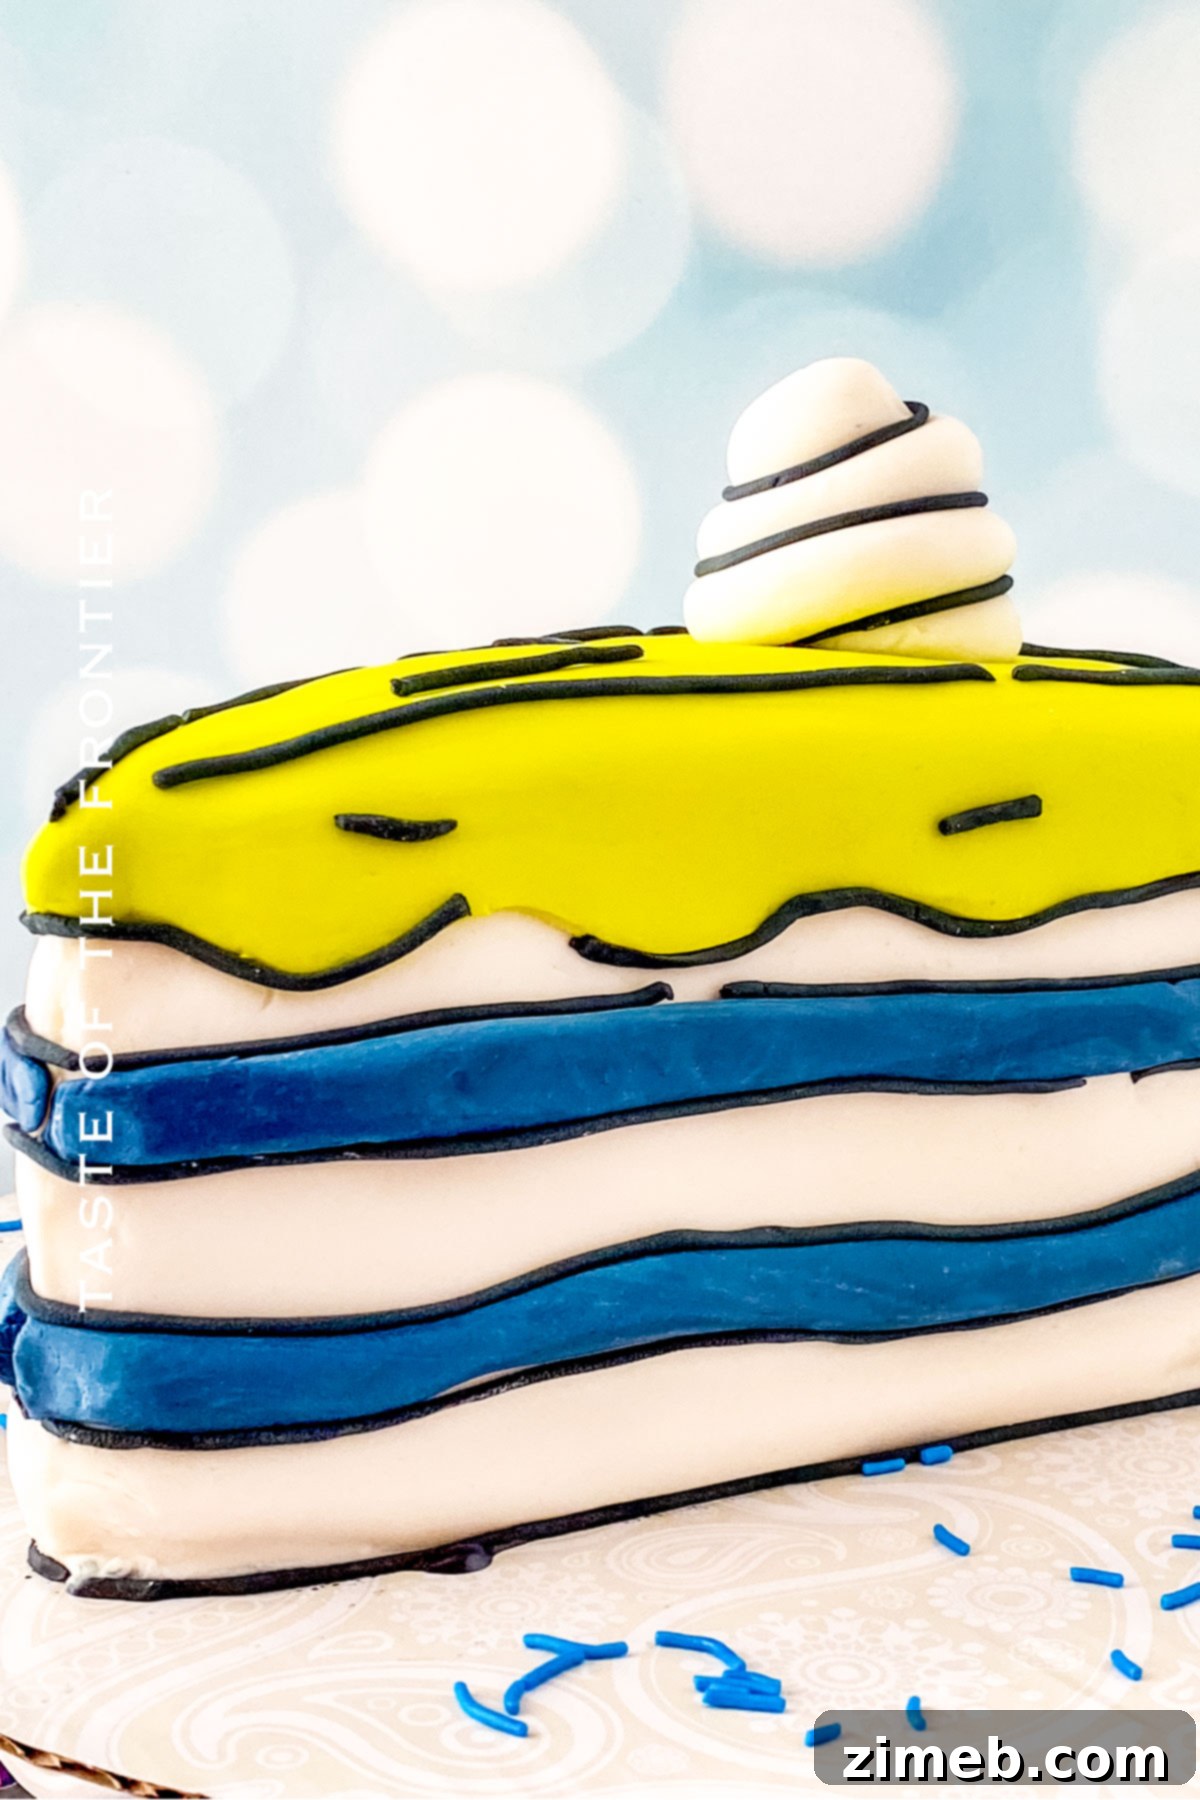
This viral cartoon cake is an absolute showstopper, making it an ideal choice for birthday celebrations. However, its versatile charm extends to many other occasions too! Imagine it at a superhero party, a nostalgic comic convention gathering, or even as a playful centerpiece for a themed bridal shower. The beauty of this recipe lies in its complete customizability. You have the freedom to select any combination of colors and flavors, allowing you to infuse your unique creative spin into every aspect. Whether you envision a classic comic palette or a modern, pastel interpretation, this cake offers a blank canvas for your imagination.
The next time you’re searching for a dessert that goes beyond the ordinary and truly embodies edible artistry, look no further. This whimsical Comic Book Cake offers a delightful challenge and an incredibly rewarding experience for any home baker or decorating enthusiast. Prepare to impress your guests with a dessert that looks too good to eat, yet is perfectly delicious!
Common Questions about the Comic Book Cake Trend
Before diving into the full Comic Book Cake tutorial, let’s address some frequently asked questions about this captivating dessert. Understanding the origins and characteristics of this viral trend will only enhance your appreciation for this unique baking project.
Who originated the viral comic book style cake trend?
While artistic, cartoon-style cakes have always been a niche in the baking world, the explosive popularity of the modern comic book cake trend can largely be attributed to the innovative Melbourne baker, Tigga Maccormack. Her captivating creations, shared widely on platforms like TikTok, went viral, igniting a global craze for these visually deceptive desserts. Tigga’s unique approach popularized the distinctive black outlines and bold colors that define this whimsical style, inspiring countless home bakers and professional pâtissiers to try their hand at crafting these edible illusions.
What exactly is a comic cake or cartoon cake?
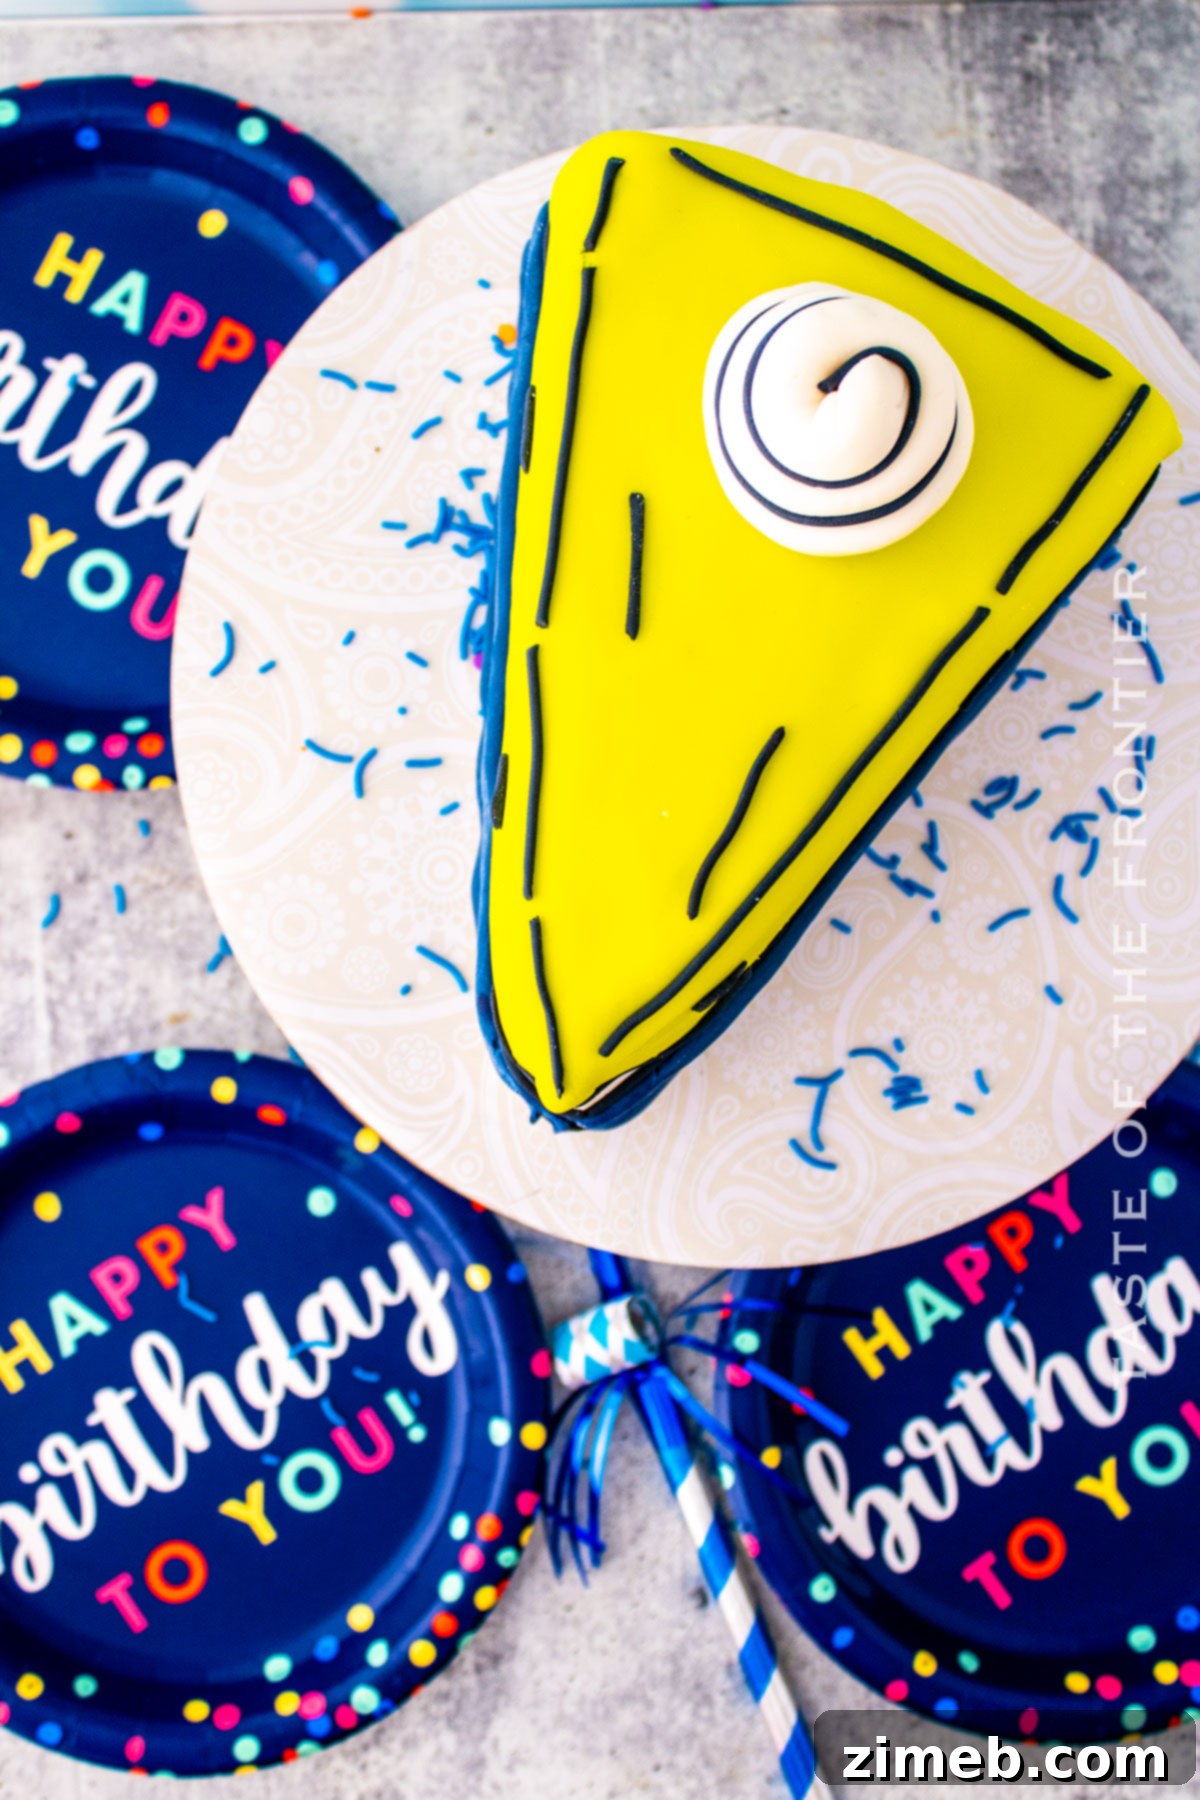
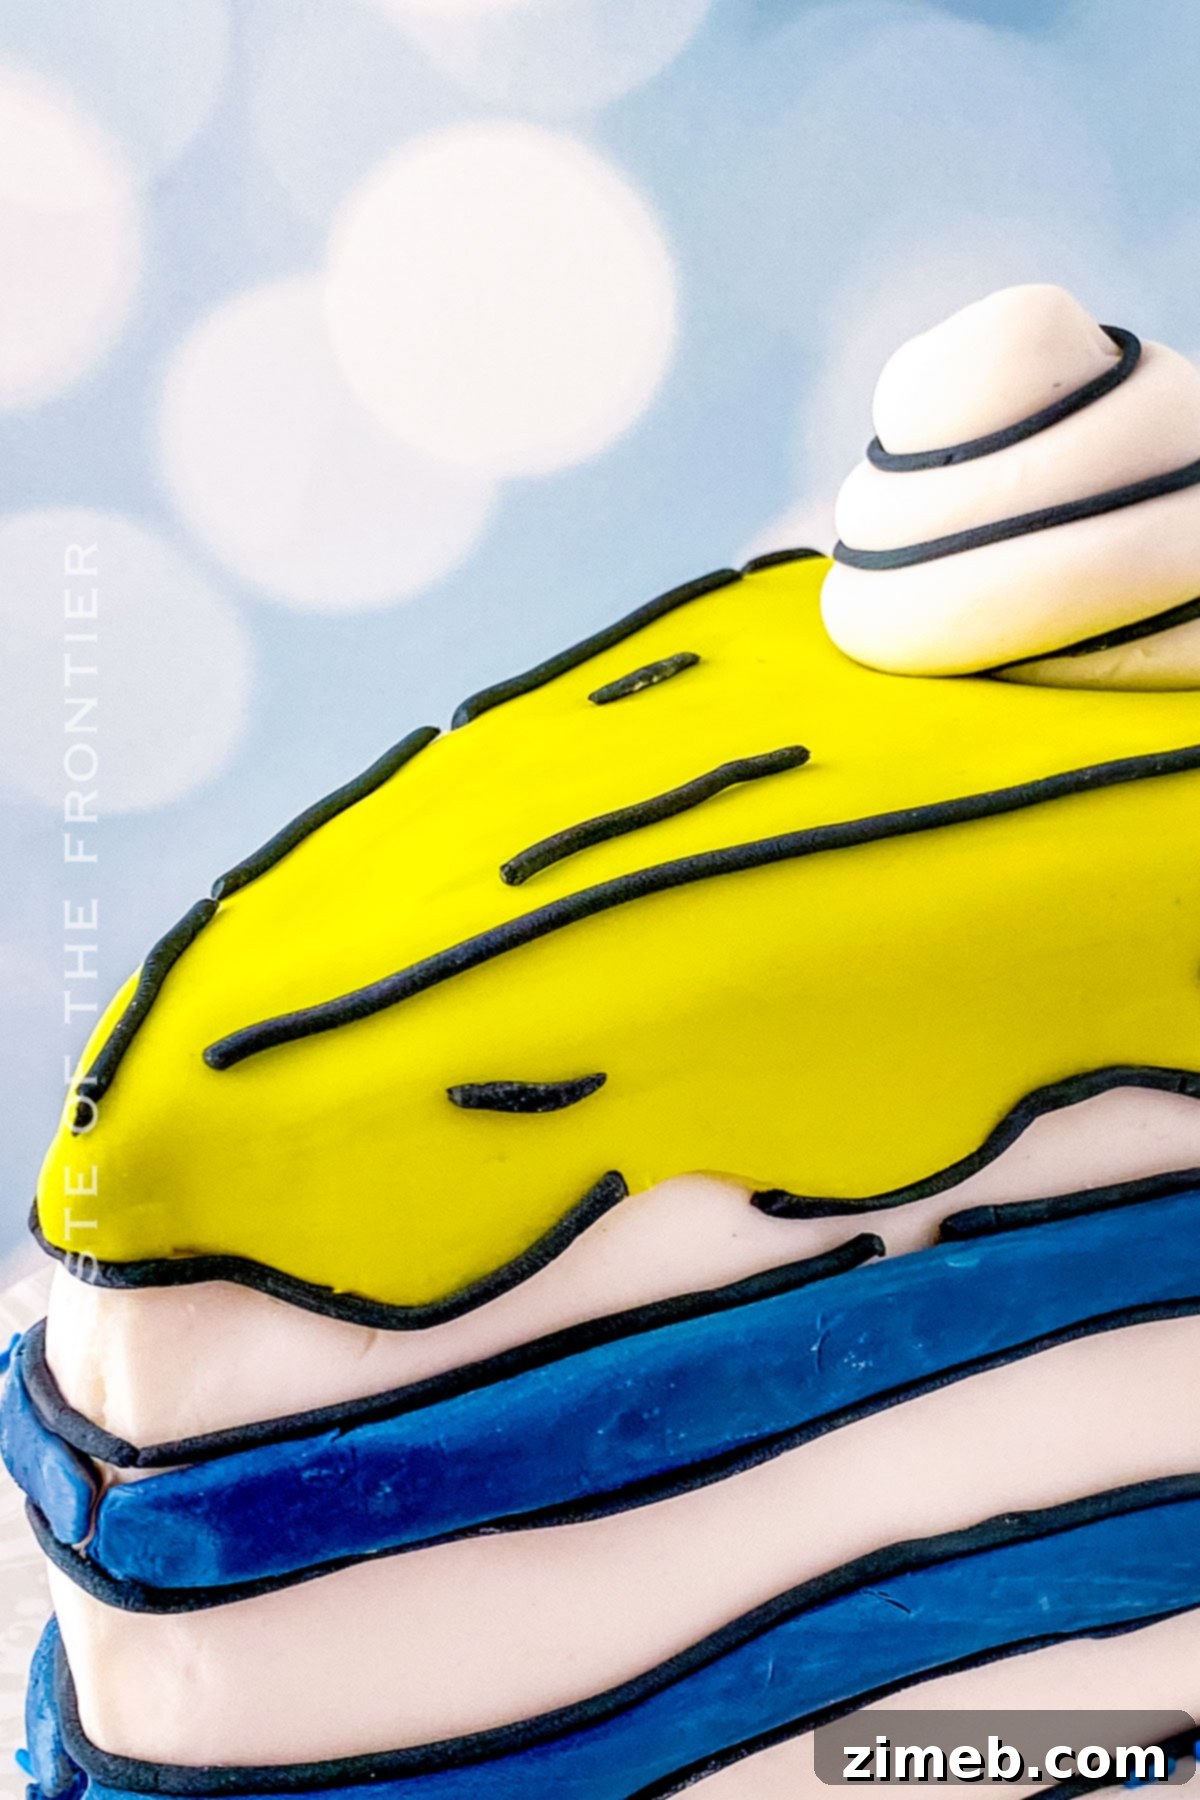
A comic cake, also widely known as a cartoon cake or 2D cake, is an ingenious dessert specifically designed to mimic the appearance of a hand-drawn illustration or a frame from a comic book or animated cartoon. The magic lies in its visual trickery: from certain angles, the cake appears almost flat, as if someone drew directly onto a plate. This stunning illusion is achieved primarily through the strategic use of bold, contrasting colors, often with a stark black outline defining every edge and detail, much like a cartoonist’s ink lines. The goal is to create a fun, playful, and utterly unique sketch-like aesthetic that truly makes the cake pop!
Making Your Comic Book Cake Ahead of Time
Strategic planning can make the decorating process even more enjoyable and less stressful. If you opt to bake your own sheet cake rather than purchasing a store-bought one, preparing it a day or two in advance is highly recommended. Baking the cake layers and allowing them to cool completely before chilling or freezing can significantly improve their stability and reduce crumbs during the carving and frosting stages. Once the cake layers are ready, however, it is generally best to assemble and decorate this type of cake all at once. The intricate fondant details adhere best to freshly frosted, slightly chilled buttercream, ensuring a seamless and striking 2D effect.
Proper Storage for Your Comic Book Cake
To preserve the vibrant appearance and delicious taste of your finished comic style cake, proper storage is essential. Given that this cake features a luxurious buttercream frosting, refrigeration is necessary to maintain its structure and freshness. The fondant decorations are also best kept in a cool, stable environment.
Refrigerator Storage: Ideally, store the entire cake in a large, airtight cake box. If a specialized cake box isn’t available, carefully cover the cake in multiple layers of plastic wrap, ensuring it’s completely sealed to prevent drying out or absorbing refrigerator odors. When stored correctly, your Comic Book Cake will remain fresh and delightful for 3-4 days in the refrigerator. Before serving, allow it to sit at room temperature for about 30-60 minutes to ensure the buttercream softens slightly for optimal flavor and texture.
Freezing for Longer Preservation: For extended storage, the Comic Book Cake freezes beautifully for up to 3 months. To freeze, first ensure the cake is completely chilled. Then, wrap it meticulously in plastic wrap, followed by a layer of aluminum foil. This double-layer protection guards against freezer burn. When you’re ready to enjoy it, transfer the frozen cake to the refrigerator overnight to thaw slowly. Once thawed, bring it to room temperature for the best experience.
Expert Tips For Creating The Best Comic Book Cake
Embrace the whimsical spirit of this dessert! Remember, the charm of a cartoon cake lies in its playful, hand-drawn aesthetic, so don’t get too caught up in achieving absolute perfection. A few small imperfections can even add to its authentic comic-book feel. Here are some pro tips to help you succeed:
- Fondant Texture is Key: The pliability of your fondant is crucial for a smooth decorating experience. If your fondant feels too hard or stiff, knead in a tiny bit of water, a drop at a time, until it reaches a workable, playdough-like consistency. Conversely, if it becomes too soft and sticky, dust your work surface and your hands with confectioner’s sugar and knead it in until the fondant firms up slightly.
- Avoid Over-Kneading: While kneading is necessary to achieve a smooth texture, be mindful not to over-knead the fondant. Excessive handling can introduce too much warmth, making it overly soft, sticky, and difficult to work with. Aim for just enough kneading to make it pliable.
- Rest for Soft Fondant: If you find your fondant has become too soft despite adding confectioner’s sugar, don’t despair. Cover it tightly with plastic wrap to prevent it from drying out, and allow it to rest for up to an hour in a cool, dry place free of humidity. This rest period often helps the fondant firm up and become more manageable.
- Layer Stability: Stick with three layers for your cake base. This number provides the ideal height and presence for your comic cake while ensuring it remains stable and easy to handle during the extensive decorating process. More layers could make it prone to tilting or collapsing.
- Chill Your Cake: Before applying any fondant, ensure your buttercream-frosted cake is thoroughly chilled, ideally frozen for a short period. A firm, cold cake is much easier to work with, as it minimizes crumbs and helps the fondant adhere smoothly.
- Work Quickly and Confidently: Fondant can dry out quickly when exposed to air. Work efficiently when rolling, cutting, and applying your pieces. Keep any unused fondant tightly wrapped in plastic wrap or in an airtight container.
Ingredients for Your Dazzling Comic Book Cake
Gathering all your ingredients before you begin will streamline the entire decorating process, allowing you to focus on the artistry rather than scrambling for supplies. Each component plays a vital role in creating the iconic 2D cake illusion.
- Sheet Cake (single-layer): This forms the base of your comic creation. A single-layer sheet cake is perfect for cutting into the necessary triangular shapes without excessive waste, providing a sturdy foundation.
- Buttercream Frosting: Essential for both adhering the cake layers and creating a smooth canvas for your fondant. A generous amount ensures a flawless finish and delicious taste.
- White Fondant: Used for the main body of the “cake slice” and provides a clean, bright base for other colors. Its pliability is key for crisp edges.
- Green Fondant: Perfect for mimicking the vibrant, dripping “icing” on top, adding a dynamic and playful element to your design.
- Navy Blue Fondant: This rich color provides a striking contrast, often used for the “filling” layers within the cake slice, enhancing the illusion of depth.
- Black Fondant: The most crucial element for defining the cartoonish outlines! Its deep hue creates the distinctive “inked” look that brings the comic book effect to life.
- Water: A small amount is used sparingly as an adhesive to help fondant pieces stick together and to the buttercream, without making them soggy.
- Confectioner’s Sugar: Your best friend for preventing fondant from sticking to your work surface and tools, ensuring smooth rolling and cutting.
Essential Kitchen Supplies You’ll Need for Decorating
Having all your tools organized and within reach before you start is paramount for a smooth and enjoyable decorating process. Each of these supplies plays a specific role in bringing your DIY cartoon cake to life, making intricate details and clean lines achievable.
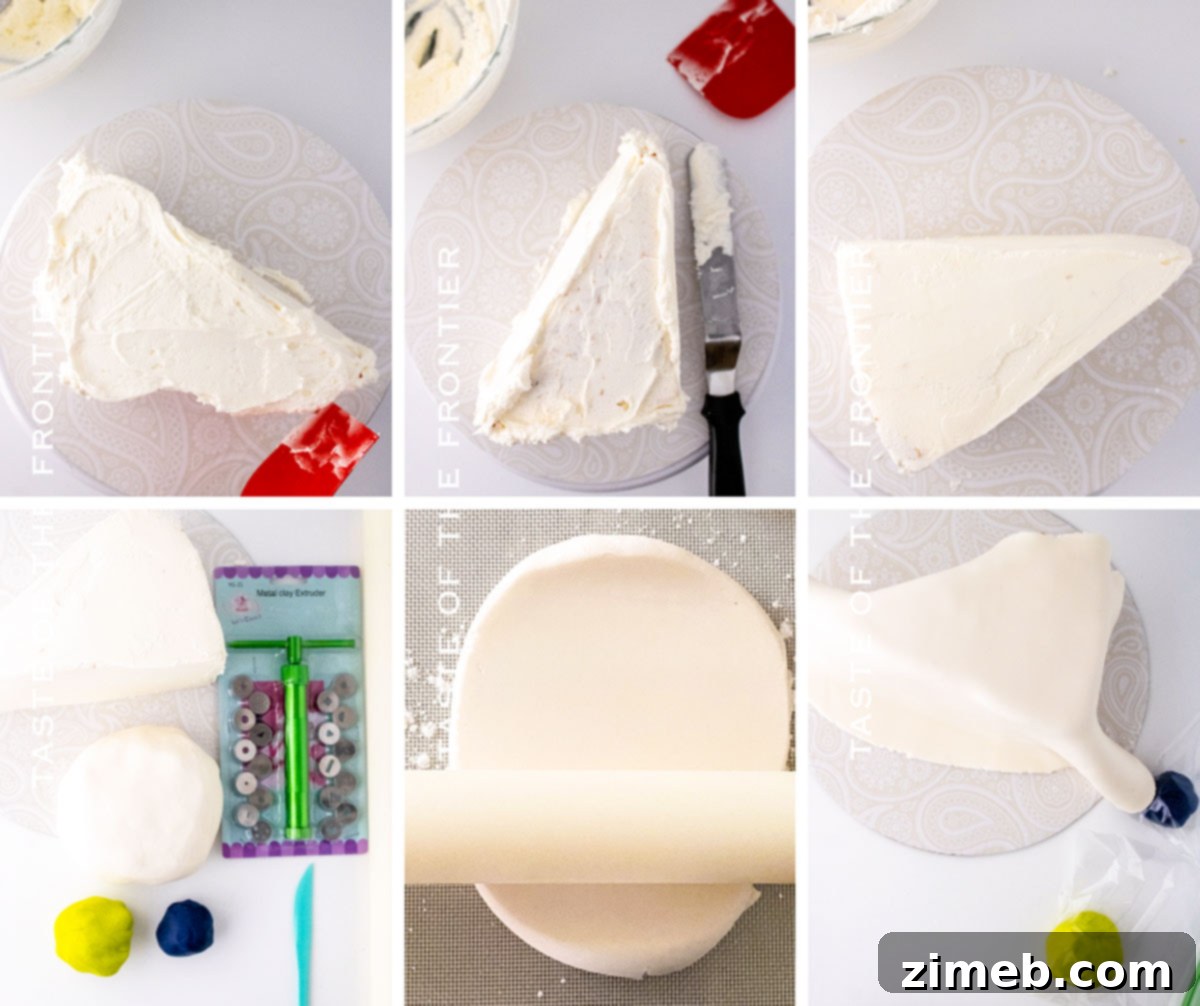
- Clay Extruder: This specialized tool is indispensable for creating thin, uniform strips of black fondant, which are vital for crafting the signature comic book outlines. Choose one with various disc attachments for different line thicknesses.
- Offset Spatula: Perfect for spreading buttercream smoothly and evenly over your cake, helping you achieve a flawless base for the fondant. Its angled design prevents your knuckles from dragging in the frosting.
- Rolling Pin: An absolute necessity for rolling out fondant to your desired thickness and shape. A non-stick rolling pin or one dusted with confectioner’s sugar works best.
- Spray Bottle: A small spray bottle filled with water is ideal for lightly misting fondant or buttercream, providing just enough moisture to activate its stickiness without making it wet or gooey.
- Sharp Knife (e.g., Serrated Knife or X-Acto Knife): Crucial for precise cutting of the cake layers into triangles and for carving intricate shapes and drip lines into the fondant. An X-Acto knife or craft knife (designated solely for food use) offers unparalleled precision for fondant details.
- Cake Board: Provides a sturdy base for assembling and decorating your cake, making it easy to move and serve.
- Small Paint Brush (Food Grade): Useful for applying tiny amounts of water as an adhesive for small fondant pieces, ensuring neat and controlled application.
- Ruler (Optional): Can assist in achieving straight lines and consistent measurements if you prefer a more precise, less “sketched” look.
How to Make a Phenomenal Comic Book Cake
This detailed guide will walk you through each step of creating your own show-stopping Comic Book Cake, from assembling the layers to applying the vibrant fondant details and the critical black outlines that define its cartoon aesthetic.
Assemble the Cake Base
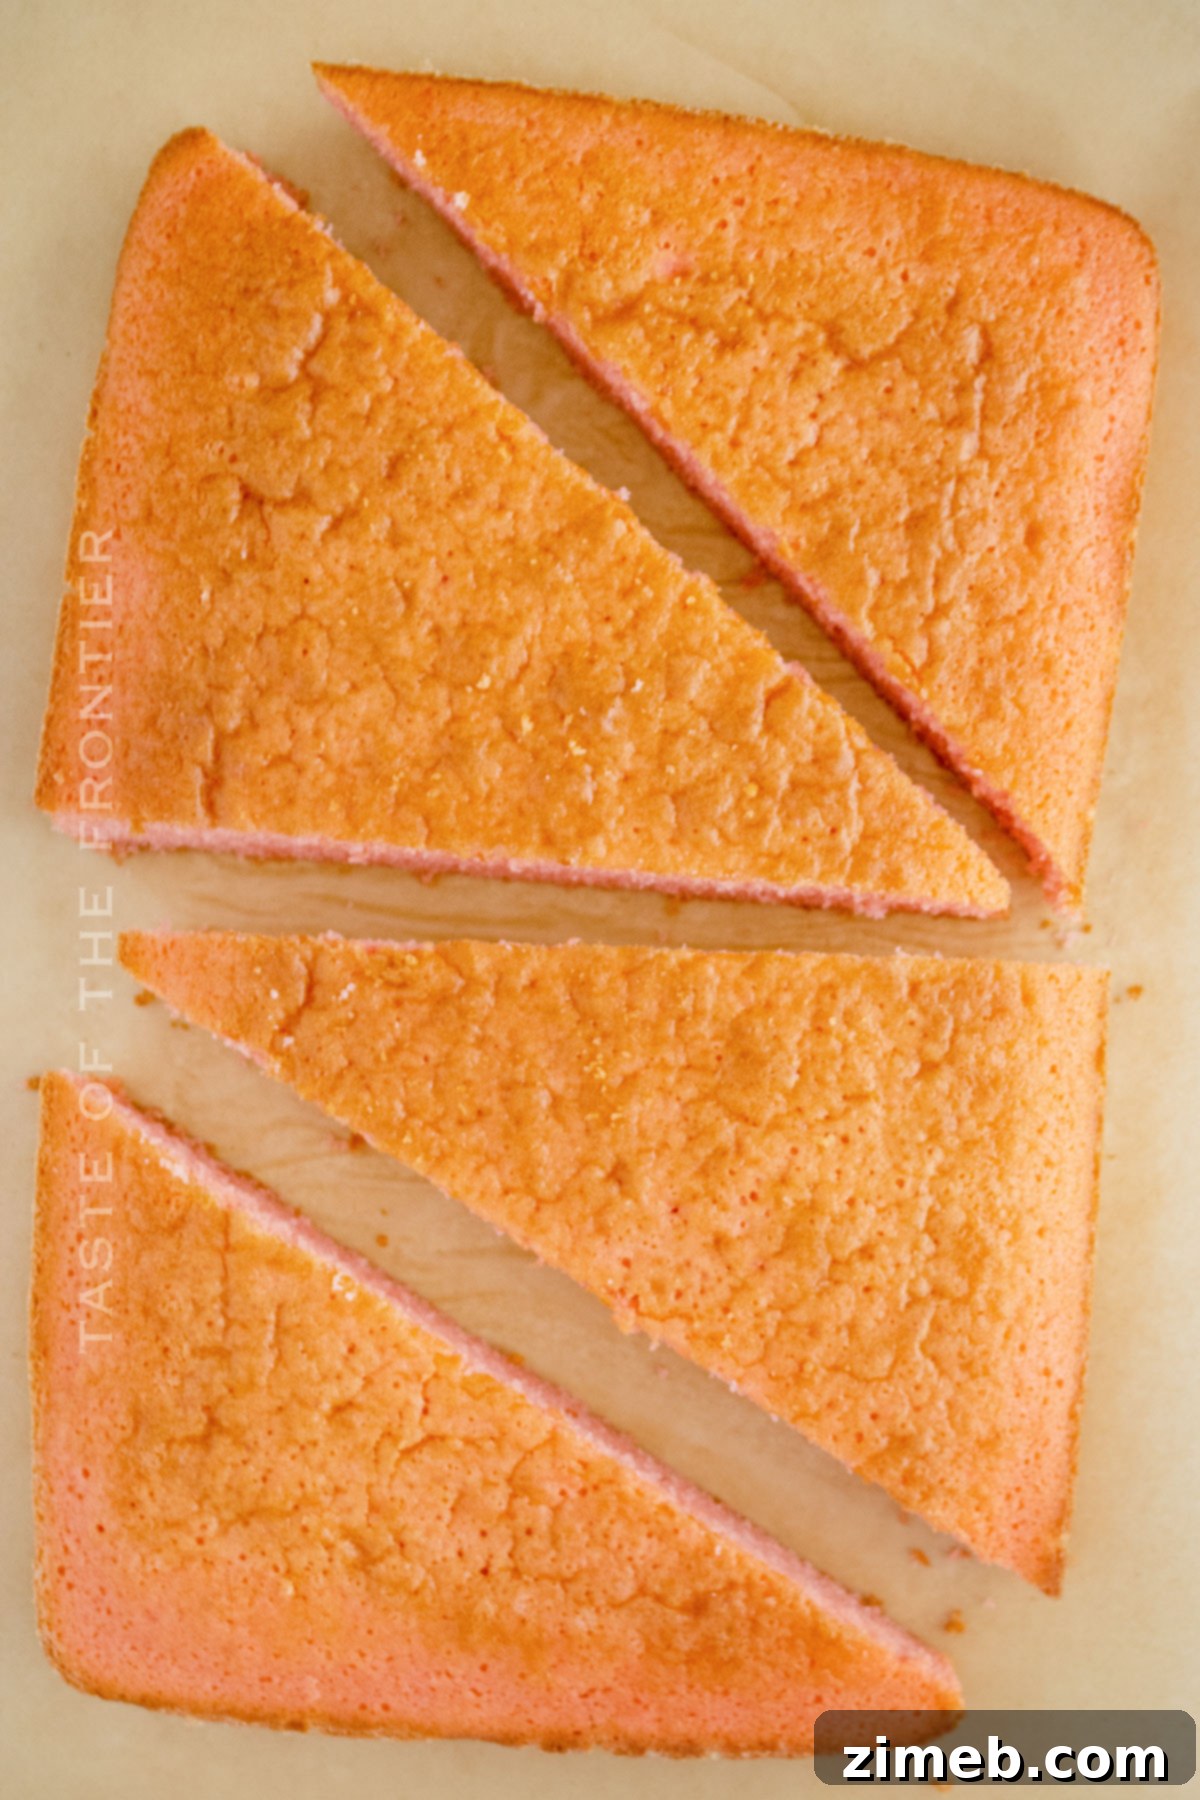
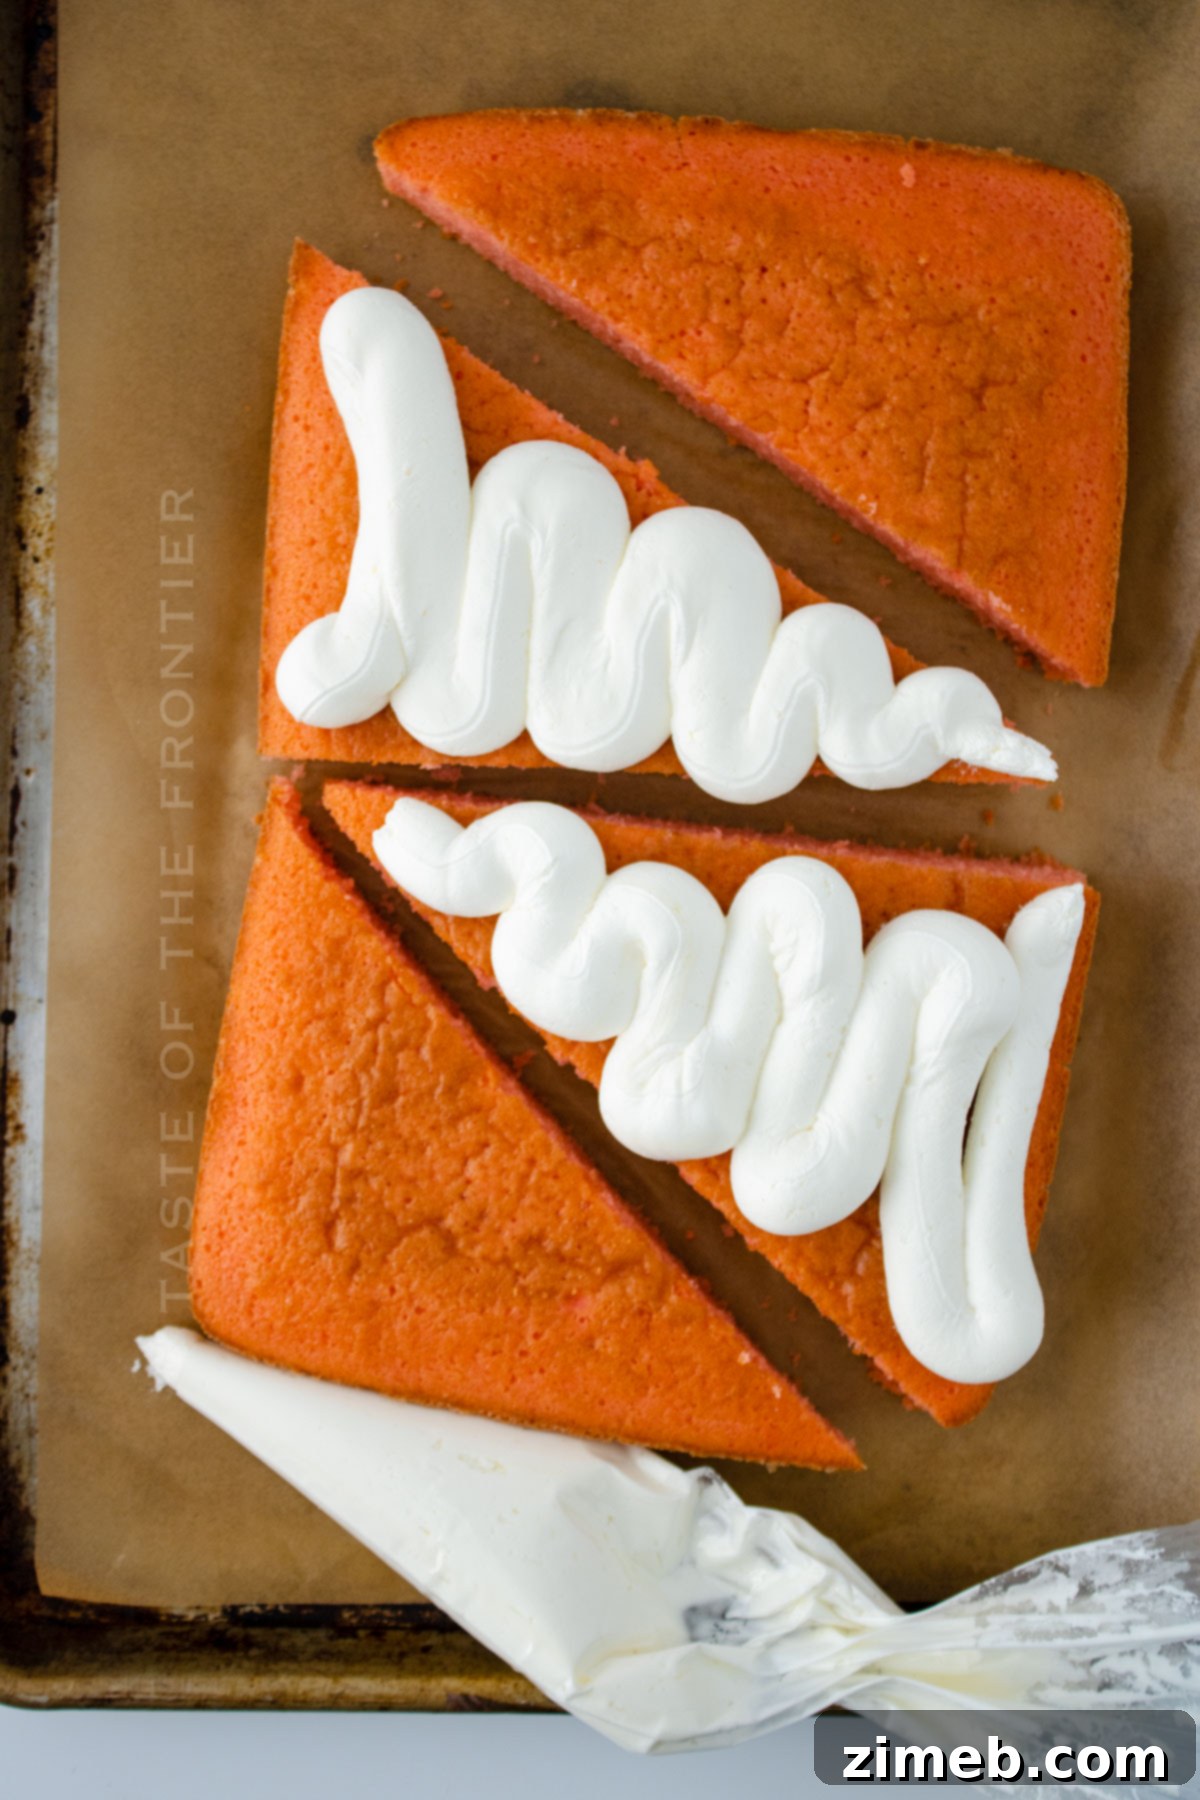
- Prepare Cake Layers: Using a sharp serrated knife, carefully slice three identical triangle shapes from your single-layer sheet cake. These three slices will form the foundation of your cake. *Tip: You may have a fourth piece left over; reserve it for another delightful dessert or a chef’s treat! It’s best to stick to three layers for optimal stability.*
- First Layer of Frosting: Place your first cake triangle onto your chosen cake board. Using an offset spatula, generously spread a layer of your prepared buttercream frosting evenly over the top surface of this first triangle.
- Stacking Layers: Carefully place the second cake triangle directly on top of the frosted first layer. Repeat the frosting process, spreading buttercream over the second layer. Finally, add the third cake triangle on top, completing your three-layered stack.
- Initial Chill (Optional but Recommended): For a sturdier cake and fewer crumbs during frosting, you can chill the stacked layers in the refrigerator for 15-20 minutes, or even in the freezer for 10 minutes, at this stage.
- Crumb Coat and Final Frosting: Using your offset spatula, apply a thin “crumb coat” of buttercream over the entire exterior of the cake. This traps any loose crumbs. Chill again for 15-20 minutes. Then, apply a final, thicker layer of buttercream, smoothing it out as necessary. Take your time to correct the cake’s overall shape with frosting, aiming for a relatively even surface for the fondant application.
Fondant Instructions for Paneling the Sides and Top
- Prepare the Fondant: Take your white fondant and knead it thoroughly until it becomes smooth, soft, and pliable, resembling the texture of playdough. Ensure there are no cracks, creases, or lumps.
- Dust Work Surface: Lightly dust your work surface with confectioner’s sugar to prevent the fondant from sticking.
- Roll Out Fondant for Sides: Using your rolling pin, roll out the white fondant to an even thickness, approximately ¾ inch. Roll only on one side to maintain a smooth surface.
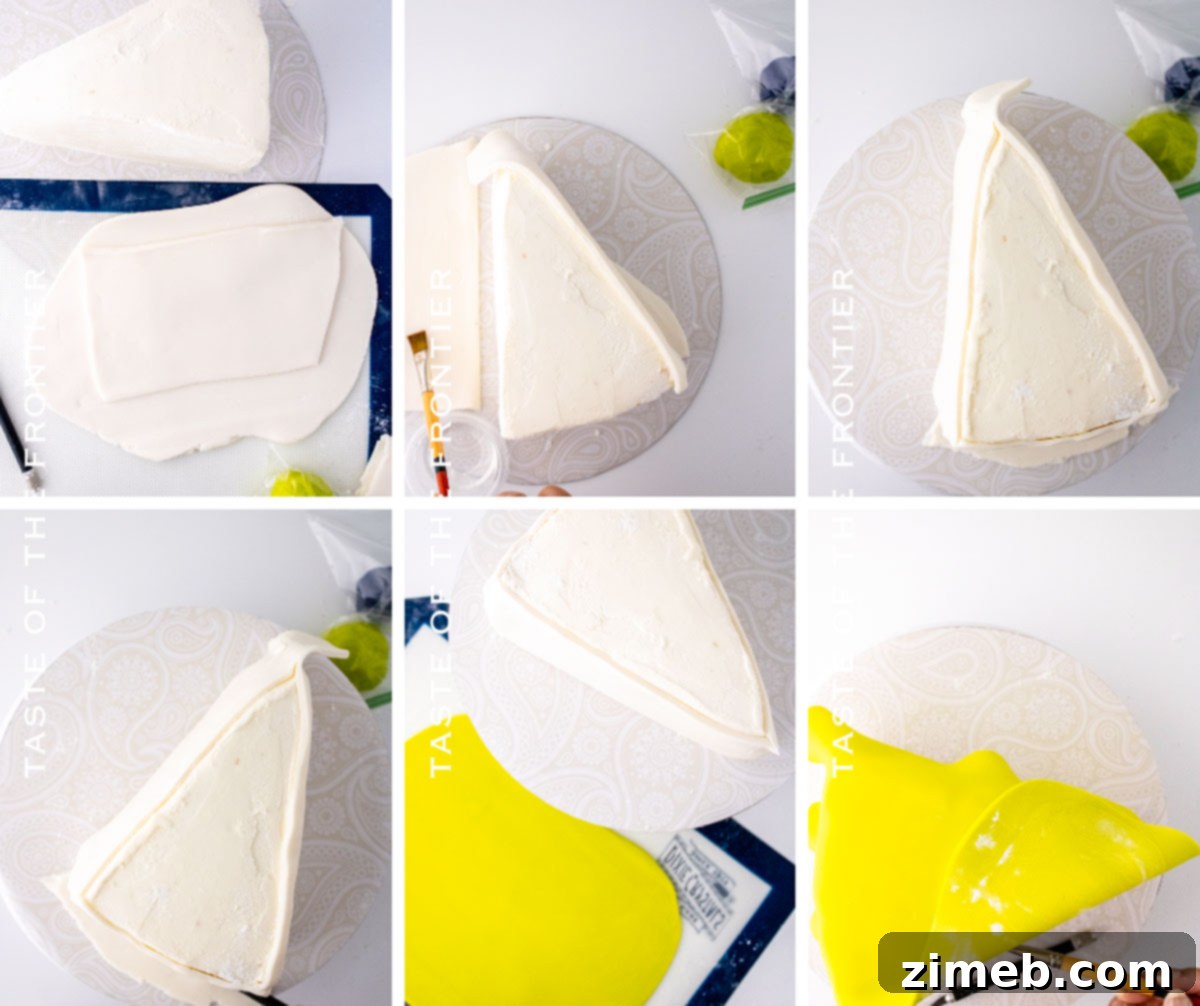
- Paneling the Sides: Gently lay the rolled fondant against one side of your cold/frozen cake. Using an X-acto knife or a sharp craft knife, carefully cut out the exact shape of that cake side. Repeat this process for the remaining two sides of the cake. This ensures a perfect fit for each “panel.”
- Adhering Fondant: Lightly mist the back of each fondant panel (the side that will touch the cake) with a very fine spray of water from your spray bottle. Alternatively, you can lightly mist the buttercream on the cake itself. The goal is to make the surface tacky, not wet.
- Press and Join: Gently press each fondant panel onto its corresponding side of the cake. Apply a small amount of water to the edges where the panels meet to help them adhere seamlessly to one another, creating a smooth, continuous surface.
- Green “Icing” Top: Dust your work surface again. Knead and roll out the green fondant into a long, somewhat triangular shape. This will be the “icing” on top of your cake.
- Drape and Shape: Carefully drape the green fondant triangle over the top of the cake, allowing some to overhang the sides.
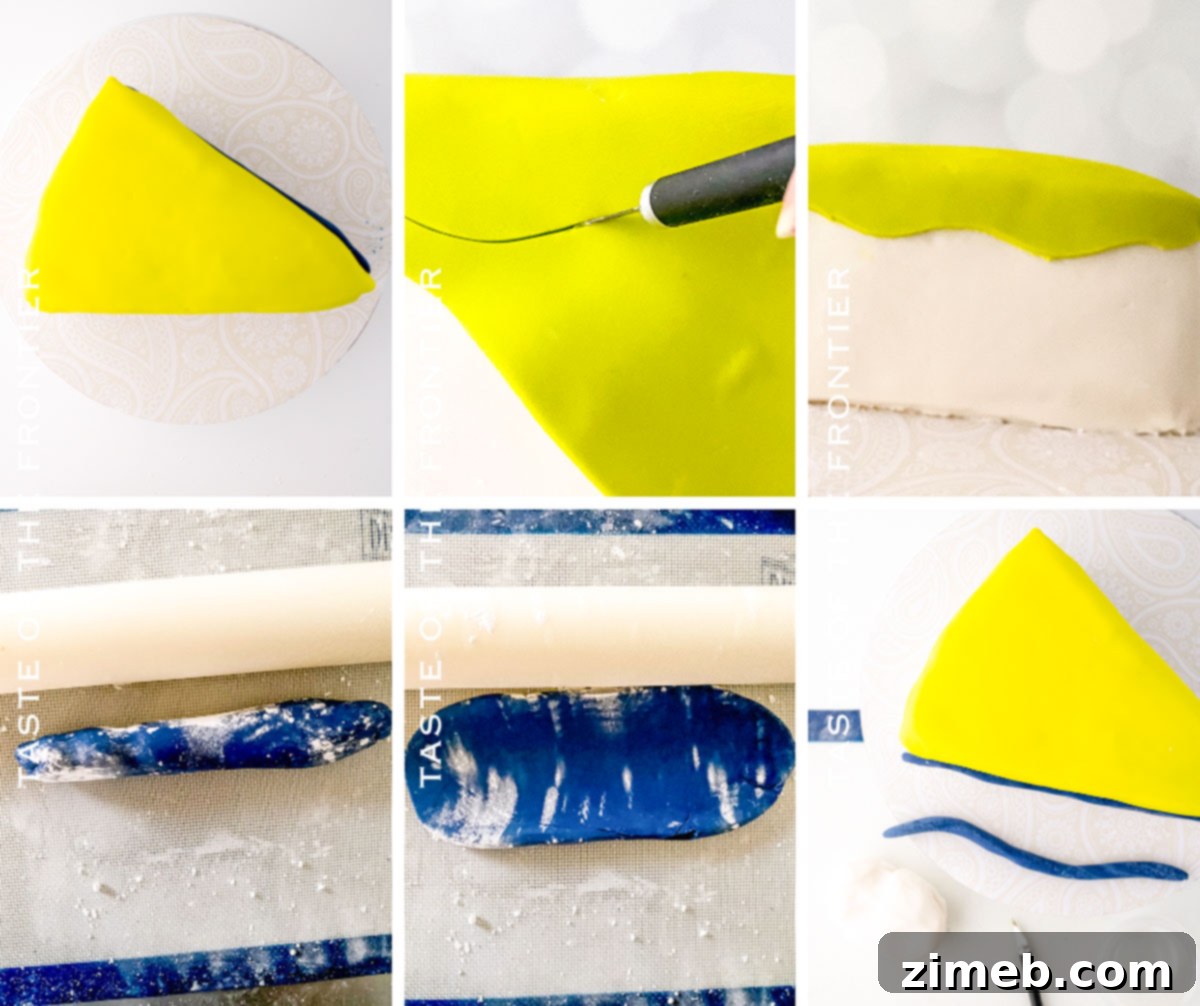
- Create Drip Effect: Gently lift the overhanging edges of the green fondant. Lightly mist the cake’s buttercream where you want the “drips” to form. Using your X-acto knife, delicately carve wavy or squiggle lines into the green fondant, mimicking the natural flow of dripping icing. Press the cut “drips” onto the misted buttercream to secure them.
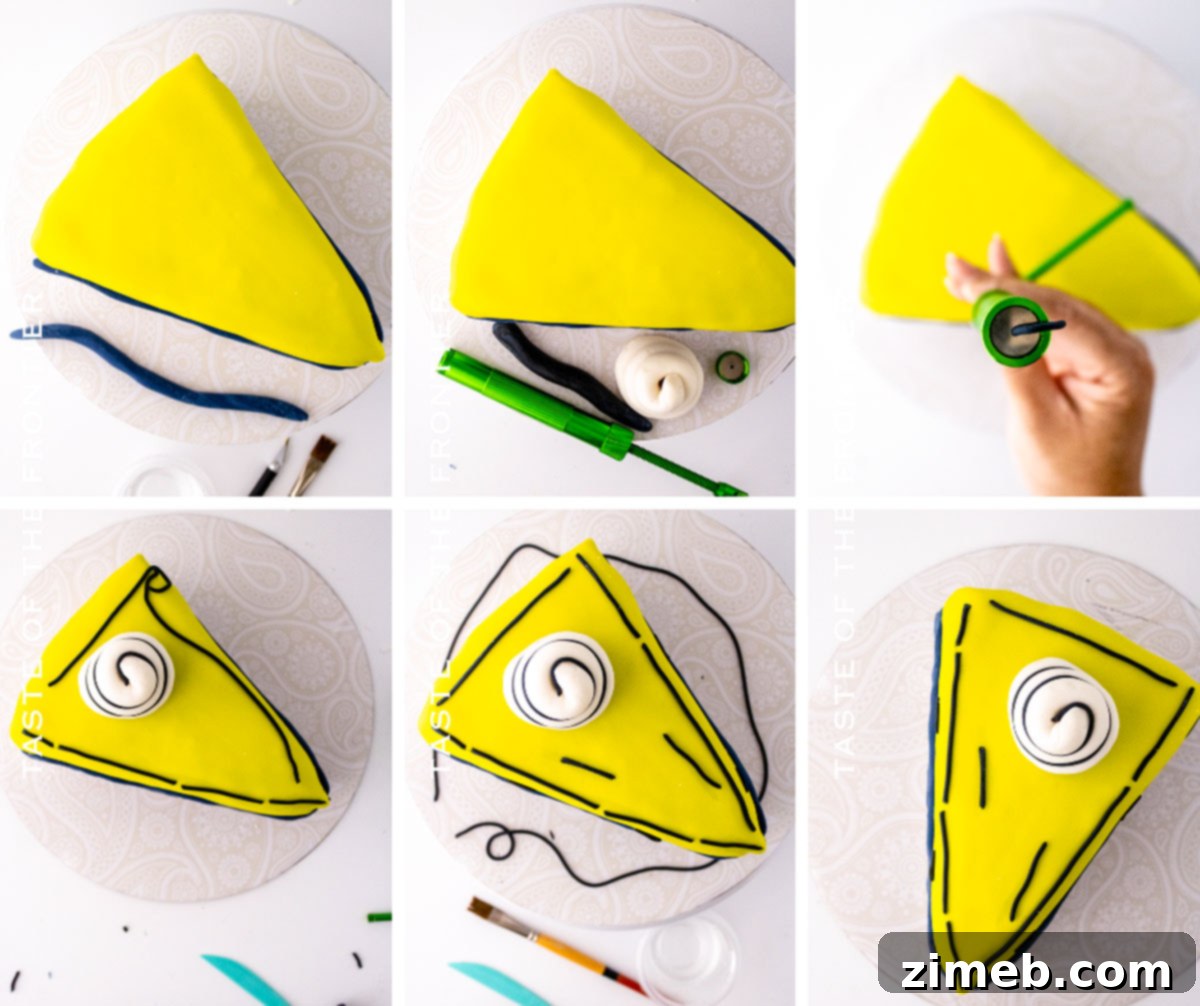
- Blue “Filling” Strips: Roll the navy blue fondant into a log. Then, using two fingers, gently press and flatten the log, creating an imperfect, textured strip. The more organic and “imperfect” the shape, the more it will resemble the cake’s filling within a cartoon slice.
- Adhere Blue Strips: Lightly mist the back of the blue fondant strips with water until they are tacky. Adhere these strips to the “long sides” (the interior slice-side) of your cake, repeating twice per side to create multiple layers of “filling.”
- White “Swirl” Accent: Roll a thick, long log of white fondant. Coil it around itself to form a whimsical “swirl of icing” or a soft serve ice cream effect for the very top of your cake. Set it aside for now.
Outline in Bold Black for the Comic Effect
- Prepare Black Fondant: Load the black fondant into your clay extruder. Select a small circular attachment, preferably not the absolute smallest, to create fine yet distinct strips for outlining.
- Outline the Cake: Begin to extrude thin strips of black fondant. Carefully adhere these strips to outline every edge and prominent feature of your cake. This includes the top perimeter, the edges where different colored fondants meet, and even tracing the “drips” of green icing. Use a tiny dot of water to make the black fondant tacky enough to stick.
- Embrace the Sketch: Remember, the goal is a “sketched” look. If the black fondant lines break or aren’t perfectly straight, that’s absolutely fine! These intentional or accidental imperfections actually enhance the cartoon aesthetic, making it look more authentically hand-drawn.
- Add Embellishments: Once the main outlining is complete, feel free to add any additional black fondant embellishments as desired, such as small dots for highlights or speech bubbles, to further enhance the comic book theme.
To Clean Up and Polish Your Cartoon Cake:
- Remove Excess Sugar: After all the fondant work and allowing the cake to dry slightly, you may notice residual confectioner’s sugar dusting on your fondant. To remove this without marring your design, lightly brush the affected areas with a food-grade paintbrush dipped in either vodka or lemon juice. The alcohol in vodka or the acidity in lemon juice will evaporate quickly, lifting the sugar without leaving moisture or altering the fondant’s texture. This step ensures a clean, vibrant finish that truly makes your colors pop!
What to Serve With Your Playful Comic Book Cake
The viral cartoon cake is a dessert masterpiece on its own, but pairing it with complementary treats can elevate the entire experience. You can serve anything alongside this whimsical creation that you would with any other traditional, celebratory dessert. Here are a few timeless suggestions:
- Ice Cream: Nothing complements a slice of cake quite like a scoop of creamy ice cream. A classic vanilla scoop allows the cake’s flavors and vibrant appearance to truly shine, while a bold flavor like chocolate or mint chip could add another layer of fun.
- Cold Beverages: A tall, frosty glass of cold milk is the ultimate companion for any cake, cutting through richness and refreshing the palate. Consider chocolate milk for an extra indulgent pairing, or your favorite dairy-free milk alternative to cater to all guests.
- Warm Beverages: For cooler weather or an after-dinner treat, warm beverages create a cozy contrast. A freshly brewed cup of coffee offers a sophisticated balance to the cake’s sweetness, while a mug of rich hot chocolate amplifies the celebratory mood and perfectly matches the playful theme.
- Fresh Berries: A light side of fresh berries, like strawberries or raspberries, can add a touch of freshness and a subtle tartness that beautifully contrasts with the cake’s sweetness and rich fondant.
Why You Absolutely Must Make This Recipe
Beyond being a recent and captivating TikTok trend, there are numerous compelling reasons why this adorable cartoon cake deserves a spot on your baking bucket list. It’s more than just a dessert; it’s an experience!
- Incredible Fun Factor: This cake isn’t just a treat; it’s a conversation starter and a source of pure joy! Any child, comic book enthusiast, or even adults young at heart will get an enormous kick out of this cake’s playful and imaginative design. It brings smiles and laughter wherever it goes.
- Uniquely Memorable: Tired of serving the same old sheet cake? This Comic Book Cake stands out from the crowd. It’s a truly distinctive dessert that you won’t find at every party you attend, guaranteeing your event will be remembered for its exceptional and creative centerpiece.
- A True Artistic Outlet: If you harbor a passion for baking and love creating interesting, visually captivating cakes, then embarking on this project will be an incredibly rewarding artistic endeavor. It allows you to explore color, dimension, and illusion in an edible medium.
- Visually Eye-Catching: Prepare for gasps and camera flashes! This vibrant, beautifully crafted cake is an undeniable showstopper. Whether it’s the focal point of a birthday party, a themed gathering, or a special celebration, its striking appearance is sure to captivate everyone who sees it.
- Customization Galore: The creative possibilities are endless. From selecting your favorite cake flavor to experimenting with different fondant colors and adding personalized embellishments, this recipe encourages you to make it truly your own.
Creative Variations and Delightful Add-ins for Your Comic Book Cake
While the essence of the Comic Book Cake lies in its distinctive style, there are plenty of ways to infuse your personality and creativity into this unique dessert. Given its specific aesthetic, dramatic swaps aren’t always feasible, but these thoughtful additions and modifications can truly make the cake your own.
- Experiment with Colors: The most straightforward way to customize your cake is by changing the fondant colors. While classic comic colors are striking, consider pastel shades for a softer, dreamier cartoon effect, or bold neon colors for a futuristic comic vibe. Let your imagination guide your palette!
- Sparkle with Decorator’s Sugar: For an extra touch of magic, lightly sprinkle a bit of decorator’s sugar over the finished fondant. This can add a subtle shimmer or a pop of contrasting color, making the cake look even more whimsical and eye-catching.
- Glimmer with Edible Glitter: Take the sparkle up a notch with edible glitter! Apply it strategically to certain fondant elements, like the “icing drips” or the white “swirl,” to create a dazzling effect that catches the light beautifully, enhancing its fantastical appeal.
- Fondant Additions & Embellishments: Don’t let excess fondant go to waste! Use it to craft whimsical fondant candles for a birthday celebration, or adorable fondant cherries to perch atop the cake. You could even create small fondant stars, hearts, or other comic-inspired shapes to adhere to the cake’s surface, adding another layer of detail.
- Personalized Edible Images: For a truly personalized touch, consider using a special edible image printer to print beloved comic book characters, personal photos, or custom messages onto edible paper with edible ink. These images can then be carefully attached to the fondant, turning your cake into a personalized narrative.
- Diverse Cake Flavors: The beauty of using a sheet cake (whether store-bought or homemade) is the flexibility it offers in flavor. Opt for classic vanilla or chocolate, a zesty lemon, a rich red velvet, or even a funfetti cake for an explosion of color inside. The external design is so strong, it pairs well with almost any cake flavor.
If you love this FUN cartoon cake recipe, you’re going to love these other birthday treats too. Please click each link below to find the easy, printable recipe!
Check out this recipe

Check out this recipe
Check out this recipe

Check out this recipe
Explore Other Creative Cake Creations
If the artistry and fun of the Comic Book Cake have inspired your inner baker, you’ll love venturing into these other imaginative and delightful cake recipes. Each offers a unique way to celebrate and express creativity through dessert.
S’mores Cake: Indulge in the nostalgic flavors of a campfire classic, transformed into a decadent, multi-layered cake featuring graham cracker crust, rich chocolate, and toasted marshmallow frosting.
Rainbow Cake: Bring a burst of vibrant color to any celebration with this cheerful cake, showcasing layers of brightly colored sponge, perfect for birthdays and joyful gatherings.
Homemade Funfetti Cake: Elevate the classic sprinkle-filled birthday cake with a homemade touch. This recipe ensures a moist, tender crumb packed with joyful confetti for an unforgettable treat.
Cake Batter Oreo Cheesecake: Experience the best of both worlds with this indulgent dessert, combining the creamy richness of cheesecake with the playful flavors of cake batter and crunchy Oreo pieces.
We hope you’ve been inspired to try your hand at creating this truly spectacular Cartoon Cake recipe! Its unique blend of artistic flair and deliciousness makes it an unforgettable dessert for any occasion. If you adore this recipe as much as we do, please take a moment to leave a five-star review below – your feedback is incredibly valuable! And don’t forget to help us spread the joy by sharing your creations and this amazing recipe on Facebook and Pinterest!
CONNECT WITH YUMMI HAUS FOR MORE DELICIOUS INSPIRATION!
Be sure to follow us on our social media channels and subscribe to our updates, so you never miss a post bursting with amazing recipes and creative baking tips!
Substack, FB, Pinterest, IG, Email Subscription
Rate this Recipe
Comic Book Cake
Ingredients
- ¼ sheet cake single-layer, pre-baked or homemade
- 4 cups buttercream frosting (your favorite recipe or store-bought)
- 24 oz white fondant (pre-made or homemade)
- 4.4 oz green fondant (or white fondant colored green)
- 4.4 oz navy blue fondant (or white fondant colored navy blue)
- 2 oz black fondant (essential for outlining)
- small cup of water (for adhering fondant)
- ¼ cup confectioner’s sugar (for dusting)
Instructions
Assemble the Cake Layers
-
Using a sharp serrated knife, carefully slice 3 identical triangle shapes from your single-layer sheet cake. You will end up with 4 pieces, but for this cake, you only need 3. *It is strongly recommended not to use a 4th layer, as it can make the cake less sturdy and more difficult to manage during decorating.*
-
Place your first cake triangle on your cake board. Apply a generous amount of buttercream frosting evenly between the layers. Carefully stack the second triangle on top, followed by more buttercream, and then the third triangle.
-
Chill the stacked cake in the refrigerator for at least 15-20 minutes, or even briefly in the freezer (about 10 minutes), if necessary. This step significantly helps to firm up the cake, reducing crumbs and making it much easier to frost smoothly.
-
Once chilled, apply a thin crumb coat of buttercream to the entire outside of the cake to seal in any loose crumbs. Chill again for 15 minutes, then apply a final, smooth layer of buttercream frosting.
-
Using an offset spatula, carefully smooth out the buttercream. If needed, use the frosting to gently correct or refine the overall triangular shape of the cake, creating a perfect canvas for your fondant.
Fondant Instructions for Paneling the Sides and Top Elements
-
Take your white fondant and knead it thoroughly until it is soft and pliable, much like playdough. The goal is to achieve a perfectly smooth texture, free of any cracks or creases.
-
Lightly dust your work surface with confectioner’s sugar to prevent the fondant from sticking.
-
Using a rolling pin, roll out the fondant to an even ¾ inch thickness. This thickness is ideal for covering the sides without being too delicate or too bulky. *Important: Only roll the fondant on one side; avoid flipping it over, as this helps maintain a smooth top surface.*
-
Carefully lay a piece of the rolled fondant against one side of your cold or frozen cake. This allows you to get an exact measurement for your panel.
-
Using an X-acto knife or sharp craft knife, precisely cut out the shape of the cake’s side from the fondant. This will be your first “panel.”
-
Repeat steps 2-4 for the remaining two sides of the cake, ensuring you have three perfectly shaped white fondant panels.
-
To adhere each panel, lightly mist either the back of the fondant panel or the buttercream on the corresponding cake side with a fine spray of water. You want it to be tacky, not wet.
-
Gently press each panel onto the cake. Apply a very small amount of water to the edges where the fondant panels meet each other to help them adhere securely, creating a seamless, clean look.
-
Dust your work surface again. Knead and roll out the green fondant into a long, somewhat irregular triangle shape. This will form the vibrant “icing” layer on top of your cake.
-
Carefully place this green fondant triangle over the top of the cake, allowing some of it to playfully overhang the sides.
-
Gently lift the overhanging portions of the green fondant. Add a small amount of water to the buttercream on the cake where you desire the “drips” to hang. This will create the necessary tackiness.
-
Using your X-acto knife, carefully carve squiggle lines into the green fondant, mimicking the natural, fun appearance of dripping icing. Press these carved “drips” onto the misted buttercream to secure their shape.
-
Roll the navy blue fondant into a thick log. This will represent the “filling” layers of your cake.
-
Press the blue fondant log down with two fingers, intentionally making it a bit imperfect. The more organic and irregular the shape, the better it will convey the cartoon “filling” in the slice of cake.
-
Lightly mist the back of the blue fondant strips with a very small amount of water to make them tacky, ensuring they are not wet.
-
Place these blue strips onto the long, cut sides of the cake. Repeat this process twice per side to create multiple distinct “filling” layers, enhancing the 2D effect.
-
Roll a thick, long log of white fondant. This will become your whimsical “swirl of icing” for the very top of the cake.
-
Carefully coil the white fondant log around itself to form a delightful swirl, resembling a dollop of soft-serve icing. Set this aside temporarily.
Outline in Black for that Signature Comic Book Look
-
Load your black fondant into the clay extruder. Select a small circle attachment – ensure it’s not the absolute smallest, but one that will create distinct, thin strips for your outlines.
-
Carefully extrude the black fondant strips and use them to outline every major edge of your cake. This includes the top perimeter, the base, all the edges of the fondant panels, the green “drips,” and the blue “filling” layers.
-
It’s best to apply the black fondant directly onto the cake and use a tiny amount of water to make it just tacky enough to stick firmly in place.
-
Don’t worry if a black line breaks or isn’t perfectly straight – that’s absolutely part of the charm! It’s *supposed* to look sketched. Broken or slightly irregular black lines actually help enhance the authentic cartoon effect, giving your cake a more playful and genuine comic book feel.
-
Once the main outlines are complete, feel free to add any additional embellishments using the black fondant, such as small dots for highlights or texture, to further define your comic masterpiece.
To Clean Up the Cake and Achieve a Polished Finish:
-
After all the fondant has been applied and has had a chance to slightly dry, you may notice some lingering traces of confectioner’s sugar on your vibrant fondant surfaces. To gently remove this, lightly brush the fondant with a food-grade paintbrush dipped in either vodka or lemon juice. The alcohol content in vodka, or the acidity in lemon juice, will quickly evaporate, taking the powdered sugar with it and leaving your fondant clean, smooth, and its colors brilliantly vivid without any sticky residue.
Notes
If you accidentally cut your cake layers too narrow or too wide, don’t fret! Buttercream is your secret weapon. You can easily use extra buttercream to build up and correct any imperfections in the cake’s shape. Just remember to freeze the cake between applications to keep everything firm.
Always keep any unused fondant tightly covered, ideally in plastic wrap and then sealed in Ziplock bags. This is crucial to prevent it from drying out and becoming unworkable, especially in drier environments.
Should an air bubble appear in your fondant after you’ve kneaded it and applied it, simply use a small stick pin or a clean push pin to carefully prick the air pocket. Gently rub the area with your finger to release the trapped air and smooth out the surface.
While water typically suffices to hold fondant pieces in place, if you find it isn’t quite strong enough, you can create a simple edible “glue.” Take a tiny bit of white fondant and mix it with a very small amount of water until it forms a thick paste. This paste will provide extra adhesion.
For the absolute strongest adhesion between fondant pieces, especially for more delicate work, if you have tylose powder on hand, mix 1 teaspoon with 1 teaspoon of water. This creates an incredibly effective edible glue that ensures your fondant elements stay perfectly in place.
Equipment
-
Serrated Knife (for precise cake cutting)
-
12 inch or 16 inch piping bag (optional, for buttercream application)
-
12 or 14 inch Cake Board (for sturdy cake base)
-
Clay Extruder (specifically for fondant, with various disc attachments)
-
Rolling Pin (for rolling fondant smoothly)
-
Offset Spatula (for effortless buttercream spreading)
-
Scissors (for general use with fondant or packaging)
-
Xacto Knife or Craft Knife (new blades for precise fondant cutting and carving)
-
Small Paint brush – food grade (for applying water/clean up)
-
Ruler, optional (for measuring if you prefer a highly precise design)
-
Small Spray Bottle (for misting water)
-
Plastic Wrap and Ziplock bags (for storing fondant)
Nutritional information for the recipe is provided as a courtesy and is approximate. Please double-check with your own dietary calculator for the best accuracy. We at Yummi Haus cannot guarantee the accuracy of the nutritional information given for any recipe on this site, as variations in ingredients and preparation methods can significantly alter results. This information should be used as a guideline only.