

Candy Cane Cookies are much more than just a festive treat; they are miniature works of art that capture the joyous spirit of the holiday season. These delightful peppermint cookies, skillfully shaped into iconic candy canes, bring a festive charm perfect for any gathering, from cozy family nights to bustling cookie exchanges and elegant holiday parties. Their vibrant red and white swirl and refreshing minty flavor make them an irresistible centerpiece on any dessert table.
As the holiday season approaches, candy canes become a universal symbol of winter wonder and festive cheer. This is precisely why these enchanting Candy Cane Cookies are an absolute essential to bake. They don’t just look adorable – making them ideal for spreading joy through cookie exchanges, thoughtful neighbor gifts, festive potlucks, and, of course, leaving out for Santa – but they are also incredibly delicious. Imagine a soft, chewy cookie with a subtle yet invigorating hint of peppermint, a taste sensation that truly embodies the magic of Christmas. And for the ultimate holiday experience, don’t forget a steaming mug of hot chocolate to pair with them!

Why You’ll Fall in Love with These Candy Cane Cookies
One of the most captivating aspects of these holiday cookies is their whimsical shape. Those signature red and white twists instantly bring a smile to anyone’s face, evoking nostalgic memories of Christmases past. But beyond their charming appearance, what truly elevates them to the top of my holiday baking list is how surprisingly quick and easy they are to prepare. They offer a delightful blend of visual appeal and simple execution, making them perfect for homemade gifts.
There’s something uniquely special about homemade gifts; they carry a personal touch that store-bought items simply can’t replicate. During this festive time of year, I find myself baking constantly anyway, so crafting a batch of these beautiful cookies is a heartfelt way to share joy. I genuinely guarantee that these delightful cookies will bring enormous smiles to everyone fortunate enough to receive them!
Candy Cane Sugar Cookies: A Holiday Baking Tradition
These aren’t just any sugar cookies; they are specifically crafted to embrace the iconic flavor and appearance of candy canes. The recipe combines classic sugar cookie fundamentals with a refreshing peppermint twist and the distinctive red-and-white striped design. They are tender, buttery, and infused with just the right amount of minty goodness, making them a perfect addition to your holiday cookie repertoire. Whether you’re a seasoned baker or just starting, these cookies offer a rewarding and delicious baking experience.

Commonly Asked Questions About Candy Cane Cookies
Baking can sometimes raise a few questions, especially when striving for perfection. Here are answers to some of the most frequently asked questions about making these delightful Candy Cane Cookies:
Do I Need a Stand Mixer, or Can I Make This Recipe by Hand?
This recipe truly benefits from the power of a mixer. Achieving the proper light and fluffy texture for the butter and dough requires high-speed whipping, which is difficult to replicate manually. While a stand mixer offers convenience, you don’t necessarily need one. These cookies can be just as successfully made using a hand mixer. The key is to ensure your butter and sugar are thoroughly creamed, incorporating enough air to give the cookies their desirable tender crumb.
Is Chilling the Dough Required for These Cookies?
Yes, chilling the dough is a crucial step for this particular cookie recipe, and here’s why. To achieve the signature candy cane shape, you need the dough to be firm enough to roll into smooth, even ropes without becoming overly sticky or difficult to handle. Chilling for at least 4 hours, as specified in the recipe instructions, allows the butter to solidify and the flour to fully hydrate, resulting in a dough that is pliable yet firm. This prevents the cookies from spreading too much in the oven, ensuring they maintain their distinct shape and beautiful stripes. While it adds a bit of waiting time, this step is essential for both the aesthetic and structural integrity of your candy cane masterpieces.
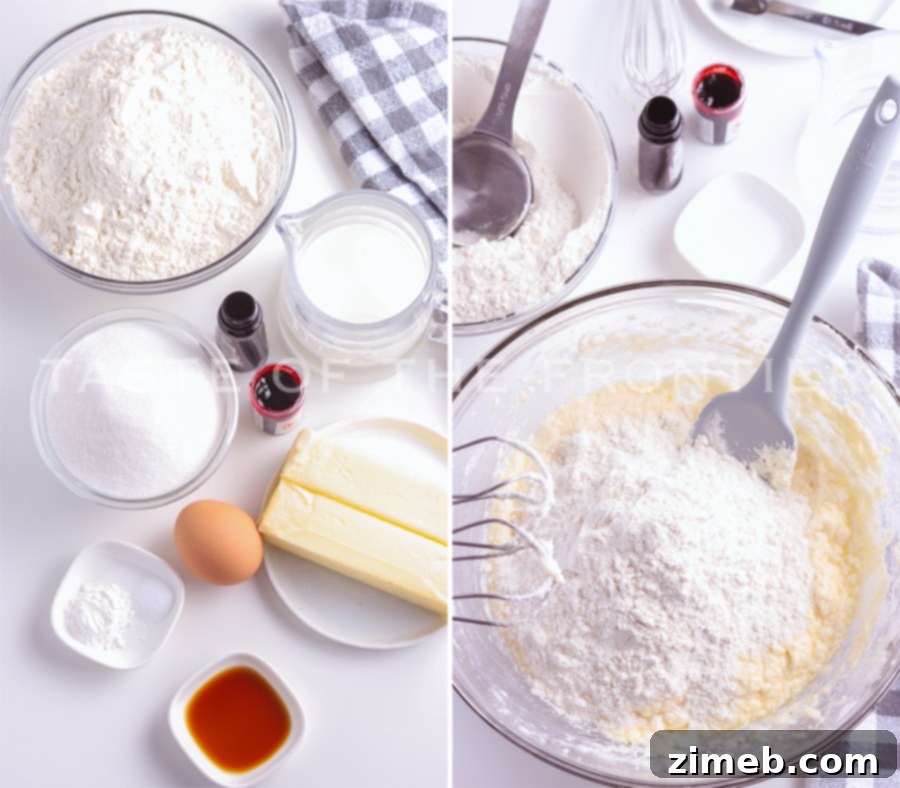
Ingredients for Crafting Festive Candy Cane Cookies
Gathering your ingredients ahead of time is the first step to a smooth and enjoyable baking process. For these delightful Candy Cane Cookies, you will need the following:
- Granulated sugar
- Unsalted butter – softened
- Milk – whole or 2%
- Vanilla extract
- Peppermint extract
- Large egg – room temperature
- All-purpose flour
- Baking powder
- Table salt
- Red paste food coloring
What Exactly Do You Mean by “Softened Butter”?
Softened butter is butter that has been left out at room temperature long enough to become pliable but not melted or greasy. It should yield slightly when pressed with a finger, but still hold its shape. Typically, this means removing your butter from the refrigerator about an hour before you plan to start baking. This temperature is crucial for proper creaming with sugar, which incorporates air and contributes to the cookies’ light and tender texture.

How to Make Candy Cane Cookies: A Simple Guide
Creating these festive Candy Cane Christmas Cookies is a rewarding experience. Follow these straightforward steps to bring your holiday cookie vision to life:
- In a medium bowl, thoroughly whisk together the all-purpose flour, baking powder, and salt. Set aside.
- In the bowl of a stand mixer fitted with the paddle attachment, or a large bowl with a hand mixer, beat together the granulated sugar and softened butter until the mixture is light, fluffy, and pale in color.
- Beat in the milk, vanilla extract, and peppermint extract until they are well combined and fully incorporated into the butter mixture.
- Add the room-temperature egg to the mixture and continue to beat until everything is thoroughly blended.
- Gradually add the dry flour mixture to the wet ingredients, mixing on low speed until just blended and no streaks of flour remain. Be careful not to overmix.
- Divide the cookie dough equally into two separate bowls.
- In one of the bowls, add several drops of red paste food coloring. Mix until the color is vibrant and evenly distributed throughout the dough.
- Cover both bowls with plastic wrap, ensuring they are airtight, and then place them in the refrigerator to chill for at least 4 hours. This chilling process is essential for making the dough firm and easy to handle for shaping.
- Once the dough has chilled, remove it from the refrigerator and preheat your oven to 375 degrees F (190 degrees C).
- Line your baking sheets with parchment paper or a silicone baking mat to prevent sticking and ensure even baking.
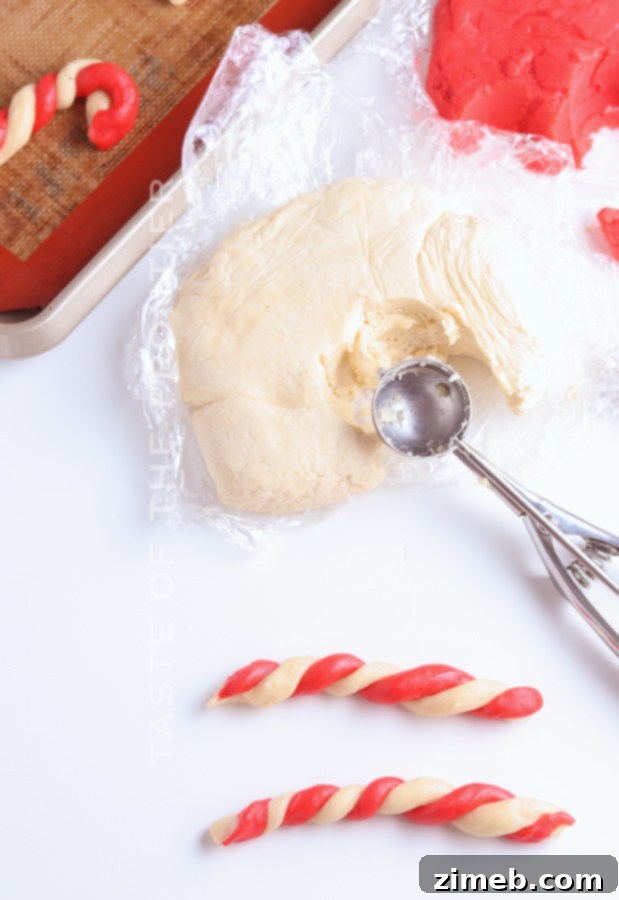
- For each candy cane cookie, scoop 1 rounded tablespoon of the white dough and roll it into a 6-inch rope. Repeat this process with 1 rounded tablespoon of the red dough, forming another 6-inch rope.
- Carefully place a white rope next to a red rope. Gently press them together along their length, then lightly twist them by holding each end and turning in opposite directions to create the classic spiral effect.
- Transfer the twisted dough rope onto the prepared cookie sheet. Gently curve one end of the rope to form the iconic “J” shape of a candy cane.
- Bake the cookies for 8-10 minutes, or until the edges are lightly browned and the cookies are set. Be careful not to overbake, as they will continue to firm up as they cool.
- Remove the baking sheets from the oven and transfer the hot cookies to a wire rack to cool completely.
- Once cooled, store your beautiful Candy Cane Cookies in an airtight container at room temperature to maintain their freshness.
Why Do Ingredients Need to Be at Room Temperature?
Using room temperature ingredients, especially butter and eggs, is a fundamental rule in baking for several reasons. Firstly, it ensures that all ingredients blend together seamlessly and evenly. Cold ingredients, particularly butter, can create pockets of unmixed components, leading to an inconsistent texture in your final product. When butter is softened, it’s capable of holding more air, which is crucial during the creaming process with sugar. This aeration creates an emulsion, a stable mixture where air is trapped. As the cookies bake, this trapped air expands, resulting in lighter, fluffier, and more tender cookies. Similarly, room temperature eggs emulsify better with other ingredients, creating a smoother batter and a more uniform bake. This attention to detail significantly impacts the overall texture and rise of your cookies.

Tips for Preparing Your Ingredients
How to Soften Butter to Room Temperature
Achieving perfectly softened butter is key for the best cookie texture. Here are a few reliable methods:
Method One: Natural Softening
The simplest way is to plan ahead. Take your butter (and any other ingredients that need to be at room temperature, like eggs and milk) out of the refrigerator and leave it on the counter for about 30 minutes to an hour. This allows it to soften naturally without melting. I typically gather all my chilled ingredients first and set them out while I prep other items, ensuring everything is ready by the time I need it.
However, winter temperatures can make this process take longer, or sometimes, we simply aren’t that organized. It happens to the best of us! So, here are a couple of quick tricks for those times.
Method Two: Microwave (Use with Caution!)
If you’re short on time, the microwave can be a quick solution, but it requires extreme caution. Place the butter, still wrapped in its paper (unless it’s foil-wrapped, which should never go in the microwave), into the microwave. Microwave for just 2 seconds, then flip it over. Repeat this process, microwaving for 2 seconds on each side, until it feels soft enough. You might stop before completing all sides if it reaches the desired softness. **A crucial warning: overly softened or melted butter from the microwave WILL significantly alter the end result of your recipe, often leading to flat, greasy cookies. Do NOT overdo it with this method.**
Method Three: Warm Water Bath
My preferred quick method is a warm water bath. Place the wrapped butter sticks in a zip-top bag to prevent water from seeping in. Then, place the bag into a bowl of warm (not hot!) water. I use this trick for eggs too. If the water isn’t excessively hot, this can be the perfect, gentle way to bring your ingredients to the ideal “room temperature” without compromising their integrity.
How Do I Properly Measure Flour?
Measuring flour correctly is vital to avoid dry, dense cookies. The generally accepted method is the “spoon and level” technique: fluff the flour in its container with a spoon, then gently spoon it into your dry measuring cup until it overflows. Use the back of a straight knife or a flat edge to level off the top, without packing the flour down. This ensures you’re using the precise amount needed, preventing an excess that would make your dough too dry. For this specific recipe, if you fluff your flour with a spoon and then gently scoop it into the measuring cup, being careful not to pack it, you should achieve a good result.
Why Do My Cookies Go Flat?
Flat cookies are a common baking frustration, and several factors can contribute to this issue. Often, it’s related to the temperature of your dough at the time of baking or an imbalance in leavening agents. Ensure you are measuring ingredients like eggs, baking soda, and baking powder precisely, as these are critical for rise. Also, check the freshness of your leavening agents; baking powder, for instance, can lose its effectiveness within a few months of opening. Most importantly, ensure your butter is at the correct room temperature when you begin mixing. If your kitchen is particularly warm, the butter in your dough might become too soft, leading to excessive spreading. If you suspect this is the case, chilling the dough for an additional 15-30 minutes before baking can often remedy the problem, helping the butter to firm up and the cookies to hold their shape better in the oven.
What is the Best Way to Store Candy Cane Cookies?
To keep your Candy Cane Cookies fresh and delicious, allow them to cool completely on a wire rack after baking. Once they’ve reached room temperature, transfer them to an airtight container. Stored properly at room temperature, these delightful treats will maintain their quality and flavor for up to five days. For longer storage, you can also freeze the baked cookies in an airtight container for up to 2-3 months.

Can This Candy Cane Cookie Recipe Be Doubled?
Absolutely, this recipe can be doubled, and it’s a practice we often employ, especially during the busy holiday season. In fact, some bakers find it even easier to work with a larger batch of dough. However, if you plan to double the recipe, ensure you have a sufficiently large stand mixer bowl to accommodate the increased volume of ingredients. Doubling is highly recommended if you’re preparing these cookies for a large cookie exchange, a school event, or making numerous batches to give as thoughtful gifts to neighbors, friends, and family. Just be mindful of oven space if you need to bake more trays.
Peppermint Christmas Cookies: A Festive Tradition
These peppermint-infused delights embody the essence of Christmas baking. Their vibrant colors and refreshing minty flavor are synonymous with the holidays, making them a cherished tradition in many homes. Beyond their taste, the act of making and sharing these Candy Cane Cookies creates lasting memories and spreads genuine cheer, solidifying their place as a true holiday staple.

Products We Love for Making Candy Cane Cookies
This peppermint cookie recipe is incredibly easy and yields delicious results. If you’re like me during this time of year, you might already have most of these items on hand. Or perhaps you’re new to homemade cookie baking and feeling a little nervous – but rest assured, you’re going to adore these! I’ve put together a list of the essential tools and ingredients I simply can’t do without when preparing this particular cookie recipe.
- Granulated Sugar
- Vanilla Extract
- Peppermint Extract
- All-Purpose Flour
- Baking Powder
- Table Salt
- Super Red Food Color
- Baking Sheet
- Parchment Paper
- Mixer (Stand or Handheld)
- Non-Stick Silicone Mats
- Spatula
- Cookie Scoop
- Measuring Cups
- Measuring Spoons

If you adore this Easy Candy Cane Cookies recipe, you’re sure to love these other fantastic holiday cookie ideas too. Click each link below to discover their easy, printable recipes!
Don’t Miss These Other Peppermint Flavored Favorites!
- Peppermint Hot Chocolate
- Chocolate Peppermint Bundt Cake
- No-Bake Peppermint Cheesecake
- Homemade Peppermint Patties
- Peppermint Chocolate Truffle Pancakes
- Chocolate Peppermint Shortbread Cookies
- Dark Chocolate Peppermint Cookies
Christmas Pinwheel Cookies
Christmas Pinwheel Cookies are so fun to make and are perfect for parties, gifts, or enjoying with your favorite holiday movie. Merry Christmas!
Check out this recipe

Ricotta Cookies
Ricotta Cookies are the tastiest cookies! This classic Italian treat is perfect for Christmas but so good that they’ll be on your cookie tray year round!
Check out this recipe

Whipped Shortbread Cookies
Whipped Shortbread Cookies are so festive! They are super easy to make, positively delicious, and are beautiful for the holidays.
Check out this recipe

Andes Mint Cookies
Andes Mint Cookies are super soft green cake mix cookies packed with your favorite Andes mint chocolate pieces and mint morsels. So good!
Check out this recipe

Melting Snowman Frosted Cookies
Melting Snowman Frosted Cookies are an adorable way to bring the magic of the season indoors using sugar cookies, ice cream, marshmallows, and more.
Check out this recipe

Peppermint Bark Cookies
Peppermint Bark Cookies are the perfect treat for the Holiday season. Made with Oreo Cookies, white chocolate, and crushed peppermint candies.
Check out this recipe

Chocolate Marshmallow Cookies
Classic Christmas cookie- chewy chocolate base, topped with marshmallow, frosting & sprinkles.
Check out this recipe

Santa’s Favorite Chocolate Chip Cookies
Santa’s Favorite Chocolate Chip Cookies are the perfect treat to leave out with a glass of milk on Christmas Eve.
Check out this recipe

Easiest Snowball Cookies
With just 6 simple ingredients, this is by far the Easiest Snowball Cookies recipe ever. Perfect for all your cookie platter gifts for friends & neighbors.
Check out this recipe


If you loved this recipe for Peppermint Candy Cane Shaped Cookies as much as I did, please consider leaving a five-star review below. Your feedback helps other bakers discover and enjoy this festive treat! And be sure to help us share the joy by posting your creations on Facebook and Pinterest!

CONNECT WITH YUMMI HAUS!
Be sure to follow me on social media, so you never miss a post!
Substack, Facebook, Pinterest, Instagram, Email Subscription


Candy Cane Cookies
Course: Dessert
Servings: 30 cookies
Candy Cane Cookies are peppermint cookies shaped like candy canes. Their festive look is perfect for a cookie exchange or holiday party.
Print Recipe
Pin Recipe
Prep Time: 20 minutes
Cook Time: 10 minutes
Total Time: 30 minutes
Ingredients
- 1 cup granulated sugar
- 1 cup unsalted butter (softened, 2 sticks)
- ½ cup milk (whole or 2%)
- 1 teaspoon vanilla extract
- 1 teaspoon peppermint extract
- 1 large egg (room temperature)
- 3 ½ cups all-purpose flour
- 1 teaspoon baking powder
- ¼ teaspoon salt
- Red paste food coloring
Instructions
- In a medium bowl, whisk together the flour, baking powder and salt.
- In a bowl of a stand mixer or a large bowl, beat together the sugar and butter until light and fluffy.
- Beat in the milk and extracts until well combined.
- Add the egg and beat well.
- Gradually add the flour mixture until well blended.
- Divide the dough in half.
- Place half of the dough in a separate bowl and color with food coloring.
- Cover both bowls with plastic wrap and then place them in the refrigerator to chill for at least 4 hours.
- Remove from the refrigerator and preheat the oven to 375 degrees F.
- Line the baking sheets with parchment paper or a silicone mat.
- For each candy cane, scoop 1 rounded tablespoon of each color of dough and then roll each into a 6 inch rope.
- Place a white rope next to a red rope, pressing together slightly and then lightly twist by holding each end and turning.
- Place on the prepared cookie sheet and then curve the top to form the cane.
- Bake 8-10 minutes or until the cookies are set and lightly browned.
- Remove from the oven and cool on a wire rack.
- Store in an airtight container.
Nutritional information for the recipe is provided as a courtesy and is approximate. Please double-check with your own dietary calculator for the best accuracy. We at Yummi Haus cannot guarantee the accuracy of the nutritional information given for any recipe on this site.
Love this recipe?
Follow @KleinworthCo for even more tasty recipes!