

Indulge in the ultimate summer treat with these irresistible Homemade Cookie Ice Cream Sandwiches! Featuring delightfully chewy, rich, and buttery chocolate chip cookies, generously filled with your favorite ice cream, and adorned with a colorful coating of sprinkles, these handheld desserts are an absolute dream. Prepare to fall in love!
Who doesn’t adore ice cream? It’s a universally beloved dessert, a symbol of joy, celebration, and pure, simple pleasure. Over the years, I’ve encountered only a handful of individuals who don’t share my profound appreciation for this frozen delight – a fact that continues to baffle me! And if you love ice cream, you’ll undoubtedly agree that an ice cream sandwich elevates the experience to an entirely new level. It’s the sheer genius of portable ice cream, perfectly contained and ready to enjoy anytime, anywhere. But how do we make this already fantastic creation even better? The answer is simple: craft them with our incredibly delicious homemade chocolate chip cookies! The result is a truly divine dessert that will have everyone reaching for more.
Craving more sweet treats? Don’t miss our Air Fryer S’mores Recipe!

These ice cream sandwiches are truly remarkable, primarily because they begin with the most exquisite homemade chocolate chip cookies. For any dessert enthusiast, a cookie-first approach is always a winning strategy, especially when those cookies are as phenomenal as ours. But the magic doesn’t stop there. We take these incredible cookies and lovingly sandwich them together with your favorite creamy ice cream, transforming them into the ultimate treat suitable for any occasion. Imagine serving these at your 4th of July barbecue, or simply unwinding on your back patio with one after a productive day in the garden. These delightful creations are always a perfect choice, bringing smiles and sweet satisfaction.
Crafting the Ultimate Homemade Ice Cream Cookies
The foundation of any exceptional ice cream sandwich lies in its cookies. For this recipe, we’re focusing on a classic chocolate chip cookie – but not just any cookie. We’re aiming for a cookie that is specifically designed to complement and cradle creamy ice cream. This means achieving a delicate balance: a cookie that is soft, chewy, and slightly pliable even when frozen, yet sturdy enough to hold its shape and contain the melting ice cream. The rich, buttery flavor of homemade cookies truly shines through, offering a delightful contrast to the cool sweetness of the ice cream. Forget store-bought varieties that often become rock-hard in the freezer; our recipe ensures a tender bite every time, making these ice cream cookies truly special.

Commonly Asked Questions About Cookie Ice Cream Sandwiches
How to Properly Store Cookie Ice Cream Sandwiches for Maximum Freshness
Effective storage is key to enjoying your homemade cookie ice cream sandwiches for an extended period. The best method involves the freezer, but a few specific steps will ensure they remain fresh and delicious. Once your assembled sandwiches have firmed up in the freezer, it’s crucial to prevent freezer burn and maintain their texture. To do this, remove them from the baking sheet and individually wrap each sandwich tightly in plastic wrap. For an extra layer of protection, you can then place the individually wrapped sandwiches into a large, freezer-safe zip-top bag or an airtight container. This double-layer approach helps to shield them from air and ice crystals. Stored this way, your delightful ice cream sandwiches can be kept in the freezer for up to one month, ready to be enjoyed whenever a craving strikes.
Can This Recipe Be Halved or Doubled?
Absolutely! This recipe is quite flexible and can certainly be adjusted to suit your needs. If you’re planning a smaller gathering or simply want to make fewer sandwiches, you can easily cut the recipe in half, yielding approximately 9 sandwiches. However, given how incredibly delicious these are and their excellent freezer-friendly qualities, we highly recommend making the full batch. As mentioned, these ice cream cookie sandwiches can be stored in the freezer for up to a month. Making a larger batch means you’ll have a delightful stash of homemade treats readily available for spontaneous cravings or unexpected guests. It’s always a good idea to have a freezer full of joy!
The Joy of Homemade Ice Cream Sandwiches
There’s something uniquely satisfying about creating homemade ice cream sandwiches from scratch. The process itself is a labor of love, from mixing the dough to carefully assembling each treat. The reward is a dessert that far surpasses any store-bought equivalent in flavor, texture, and personal touch. The ability to customize every element – from the specific type of chocolate chips to your favorite ice cream flavor and even the sprinkle choice – makes this recipe truly special. These aren’t just desserts; they are edible celebrations, perfect for sharing with family and friends or simply indulging yourself after a long day. The combination of warm, freshly baked cookie aroma with the cool embrace of ice cream is an experience that truly defines the homemade difference.

Can the Cookies Be Prepared in Advance?
Yes, absolutely! Preparing the cookies ahead of time is a fantastic way to streamline the assembly process for your ice cream sandwiches. If you choose this convenient option, allow your baked cookies to cool completely to room temperature. Once cooled, store them in an airtight container at room temperature for up to three days before you plan to assemble the sandwiches. This allows you to tackle the baking component when you have time, then focus on the fun part of assembly later.
Alternatively, you can also prepare the cookie dough itself in advance. Mix the dough according to the recipe, then cover it tightly and store it in the refrigerator for up to 24 hours. When you’re ready to bake, remember to let the dough come to room temperature before scooping and baking. Cold dough will spread less and may require an additional 1-2 minutes of baking time, so keep an eye on them for that perfect slightly underbaked finish.
What Makes a Truly Great Ice Cream Sandwich?
- Perfect Cookie Texture: The ideal cookie for an ice cream sandwich should possess a soft and chewy center, making it easy to bite into even when frozen. Yet, it must be sturdy enough to hold its shape and contain the creamy filling without crumbling. Our chocolate chip cookie recipe achieves this perfect balance, offering a delightful chewiness with a robust structure.
- Balanced Sweetness: The cookies and the ice cream should complement each other, creating a harmonious blend of sweetness. Neither component should overpower the other; instead, they should enhance the overall flavor profile, resulting in a perfectly balanced bite.
- Buttery Edges with a Slight Crunch: While the center should be soft, a subtle crunch on the edges of the cookie adds another layer of texture and an irresistible buttery flavor. This contrast creates a more dynamic and enjoyable eating experience.
- Quality Ice Cream: The choice of ice cream is paramount. Opt for a good quality, creamy ice cream that holds its shape well when scooped but softens beautifully for a smooth bite.
- Thoughtful Chocolate Chip Distribution: Using a combination of mini and regular chocolate chips prevents large, hard pockets of cold chocolate that can be difficult to chew when frozen. This ensures a smoother, more enjoyable texture throughout the cookie.
- Optimal Freezing Process: Freezing the cookies for about 30 minutes before adding the ice cream provides a firm base for assembly, preventing the cookies from breaking or becoming too soft. Adequate freezing time for the assembled sandwiches ensures they are firm and mess-free when served.
Perfecting Your Chocolate Chip Ice Cream Sandwiches
The journey to crafting the perfect chocolate chip ice cream sandwich is all about attention to detail. Every element, from the cookie’s bake to the ice cream’s softness, contributes to the final masterpiece. These tips are designed to guide you through creating a dessert that is not only visually appealing but also a delight to taste and eat. Consider this your roadmap to becoming an ice cream sandwich aficionado, ensuring each bite is a moment of pure, frozen bliss. The interplay of textures and temperatures, along with the rich flavors, makes this treat an enduring favorite, especially when made with a homemade touch.

Should I Use Light or Dark Brown Sugar in My Cookies?
When it comes to brown sugar, both light and dark varieties will work wonderfully in this frozen dessert recipe. The primary difference lies in the molasses content: dark brown sugar contains more molasses, giving it a deeper color, a stronger caramel flavor, and a slightly moister texture than light brown sugar. I personally tend to use light brown sugar for most of my recipes, especially since I often make my own. This provides a consistently sweet, subtly caramel note without overwhelming the other flavors.
If you’re interested in making your own brown sugar and having control over its intensity, you can learn how by visiting my Homemade Brown Sugar post here. Either way, the brown sugar will contribute significantly to the chewy texture and rich flavor of your chocolate chip cookies, making them ideal for these sandwiches.
Top Tips for Creating the Best Ice Cream Sandwiches Ever
- Quality Ice Cream is Key: Always opt for a good quality ice cream. A rich, creamy ice cream will not only taste better but will also have a better texture when frozen, making for a more enjoyable sandwich.
- Get Creative with Flavors and Sprinkles: Don’t be afraid to experiment! Mix and match different ice cream flavors with your cookies, or go wild with various colors and types of sprinkles. Making them unique adds to the fun!
- Slightly Under-Bake Your Cookies: This is a crucial tip for success. Because the cookies will be frozen, you want them to remain soft enough to bite into easily. Baking them just until the edges are set and the centers are still slightly doughy will ensure they retain that perfect chewiness after chilling.
- Vary Your Chocolate Chips: Use a combination of mini and regular chocolate chips in your cookies. This prevents overly large, hard chunks of cold chocolate that can make the frozen sandwich difficult to chew. It ensures a more consistent and pleasant texture.
- Store-Bought Cookies as a Time-Saver: If you’re short on time, store-bought cookies can be a convenient alternative. However, be aware that purchased cookies are typically baked fully, meaning they will be firmer and potentially harder to bite into once frozen compared to our intentionally underbaked homemade version.
- Pre-Freeze Your Cookies: Before assembling, freeze your baked and cooled cookies for about 30 minutes. This step firms them up, making them easier to handle and preventing them from breaking or becoming too soft as you scoop and press the ice cream between them.
- Keep Chocolate Chips on the Inside: While it’s tempting to add extra chocolate chips to the tops of warm cookies for aesthetics, resist the urge for these sandwiches. For a finger-food dessert, having chocolate chips on the outside can lead to a messier eating experience. Keep the chocolatey goodness contained within the sandwich.
- Allow Ample Freezing Time: Once assembled, do not rush the final freezing process. Give your ice cream sandwiches sufficient time to set in the freezer (at least 2-4 hours, or ideally overnight) to ensure the ice cream is firm and the cookies are well integrated. This prevents them from turning into a melty, crumbly mess when people try to eat them.
The Classic Chocolate Chip Cookie Ice Cream Sandwich
There’s a reason the chocolate chip cookie ice cream sandwich remains a timeless favorite. It’s the perfect marriage of comfort and cool refreshment, a simple yet profoundly satisfying dessert. The rich, sweet chew of a classic chocolate chip cookie combined with the creamy, cool embrace of ice cream creates a symphony of textures and flavors that is hard to beat. This recipe not only delivers on that classic appeal but elevates it with thoughtful preparation and expert tips, ensuring that every homemade sandwich is a memorable delight. It’s a true testament to the power of simple ingredients combined with a little love and attention.
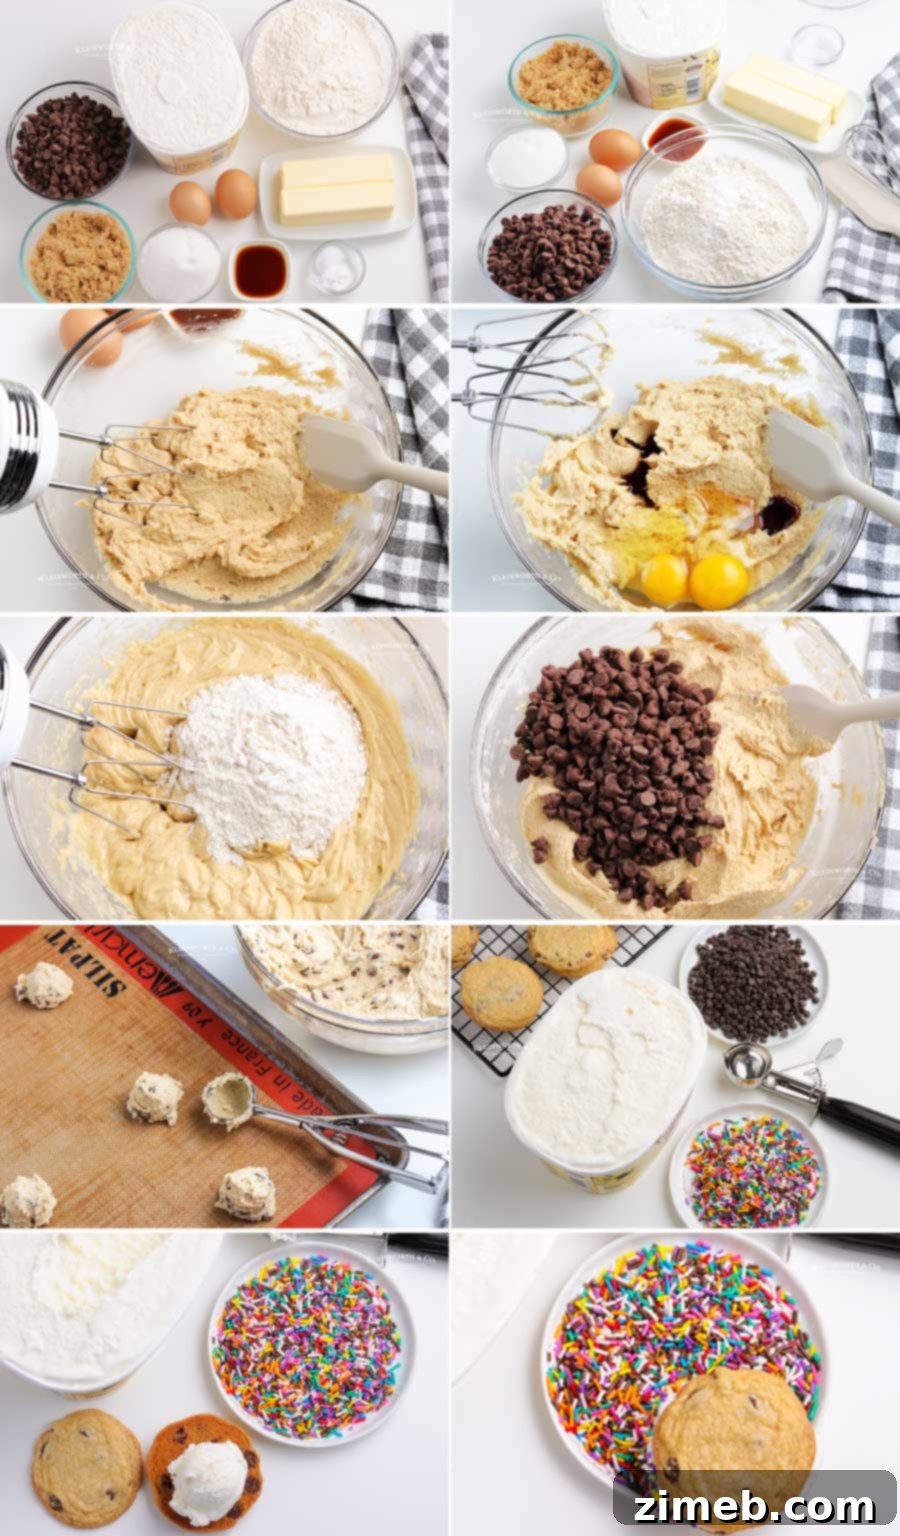
How to Make Homemade Cookie Ice Cream Sandwiches
Cookies
- Preheat your oven to 350 degrees Fahrenheit (175 degrees Celsius).
- Line your baking sheets with parchment paper or a silicone baking mat to prevent sticking and ensure even baking.
- In a large mixing bowl, cream together the softened unsalted butter, granulated sugar, and packed brown sugar until the mixture is light, fluffy, and well combined. This step incorporates air, contributing to a softer cookie texture.
- Beat in the room temperature eggs one at a time, followed by the vanilla extract, mixing until everything is fully incorporated and smooth.
- In a separate medium bowl, whisk together the dry ingredients: all-purpose flour, baking soda, and salt. Whisking ensures these ingredients are evenly distributed.
- Gradually add the dry flour mixture to the wet butter and sugar mixture, beating on low speed until just combined. Be careful not to overmix, as this can lead to tough cookies.
- Gently fold in the chocolate chips until they are evenly distributed throughout the dough.
- Using a cookie dough scoop (approximately 1.5-2 tablespoons) or a tablespoon, drop rounded portions of dough onto the prepared baking sheets, ensuring they are spaced about 2 inches apart to allow for spreading.
- Bake for 10-12 minutes. Remember, for ice cream sandwiches, you want the cookies to be slightly underbaked, with edges just set and centers still soft, so they remain chewy when frozen.
- Once baked, remove the cookies from the oven and transfer them to a wire rack to cool completely. This prevents them from continuing to bake on the hot sheet.
Assemble the Ice Cream Sandwiches
- Remove your chosen ice cream from the freezer and let it soften slightly at room temperature for about 10-15 minutes. This makes it much easier to scoop and spread.
- Take one scoop of the slightly softened ice cream and place it onto the flat bottom of one cooled cookie.
- Gently top the ice cream with another cookie of similar size, pressing down softly to spread the ice cream to the edges. Be careful not to press too hard, or the cookies might break.
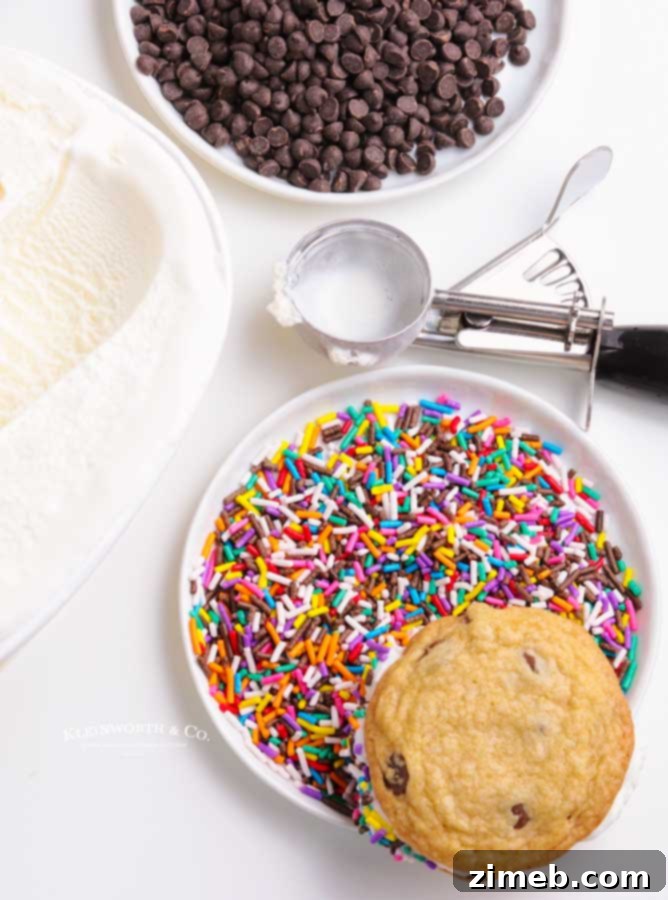
- If desired, roll the sides of the assembled cookie sandwich in mini chocolate chips or colorful sprinkles for an extra festive touch and texture.
- Place the assembled sandwiches back onto a baking sheet and return them to the freezer. Freeze for at least 2-4 hours, or until thoroughly firm, before serving.
- Store any leftover cookie ice cream sandwiches individually wrapped in plastic wrap and then in an airtight container in the freezer for up to one month.
The Ultimate Ice Cream Sandwich Cookie Recipe
Creating your own ice cream sandwiches from scratch allows for unparalleled customization and freshness. This specific ice cream sandwich cookie recipe is designed to give you perfectly chewy, flavorful cookies that hold up beautifully to freezing, making them the ideal vehicle for your favorite ice cream. The satisfaction of biting into a homemade treat, knowing every ingredient that went into it, is truly unmatched. Whether you’re a seasoned baker or just starting out, this recipe provides clear, simple steps to achieve a dessert that will impress and delight everyone. It’s an excellent project for a sunny afternoon and an even better reward for your efforts.

What Are the Best Sprinkles for This Recipe?
The choice of sprinkles might seem minor, but it’s actually quite important for the success and appearance of your cookie ice cream sandwiches. Just because a package is labeled “sprinkles” doesn’t necessarily mean it contains the right type for frozen applications.
Many products marketed as sprinkles are actually colored sanding sugar. While lovely on fresh-baked goods, sanding sugar is not ideal for recipes involving moisture or refrigeration/freezing. When sanding sugar comes into contact with moisture (like from ice cream or a slightly moist cookie dough, or the condensation that forms in a cold environment), it tends to “sweat” and the color will bleed out. This can result in a muddy, unattractive appearance rather than vibrant, distinct colors.
For these ice cream sandwiches, you’ll want to use actual “jimmie” sprinkles or nonpareils, which are typically made from a different confectionary glaze that is more resistant to moisture and color bleeding. These types of sprinkles will hold their shape and vibrant color much better in the freezer, ensuring your finished sandwiches look as good as they taste.
Can I Use a Vanilla Substitute Instead of Vanilla Extract?
Yes, you can certainly use a vanilla substitute or vanilla essence in place of pure vanilla extract. While vanilla essence may not provide the exact same depth and complexity of flavor as high-quality vanilla extract, it is a perfectly acceptable alternative and will still contribute a pleasant vanilla note to your cookies. If you have it on hand, using pure vanilla extract is recommended for the best flavor, but don’t let its absence stop you from making these delicious treats.
Crafting the Best Ice Cream Sandwiches: A Culinary Delight
The quest for the “best ice cream sandwiches” ends here. These homemade treats are a symphony of textures and flavors, meticulously designed to offer an unparalleled dessert experience. From the first chewy bite of the chocolate chip cookie to the creamy burst of vanilla ice cream, every element is chosen and prepared to perfection. The sprinkle coating adds not only a playful visual appeal but also a subtle textural contrast. They are perfect for cooling down on a hot day, celebrating a special occasion, or simply treating yourself to a moment of sweet indulgence. Make a batch today and discover why homemade truly is the best.
Ingredients for Homemade Cookie Ice Cream Sandwiches
- 1 cup unsalted butter (2 sticks), softened
- ½ cup granulated sugar
- 1 cup brown sugar, packed
- 2 tsp vanilla extract
- 2 large eggs, at room temperature
- 2 ½ cups all-purpose flour
- ½ tsp salt
- ½ tsp baking soda
- 12 ounces chocolate chips (semi-sweet or milk chocolate)
- ½ gallon vanilla ice cream (or your favorite flavor)
Optional Toppings
- Mini chocolate chips
- Sprinkles (jimmie style or nonpareils for best results)
Embracing the Classic Ice Cream Sandwiches
There’s an undeniable charm to a classic ice cream sandwich. It evokes childhood memories, sunny days, and simple pleasures. Our homemade version takes that nostalgic feeling and elevates it with superior flavor and texture. By using your own freshly baked chocolate chip cookies, you’re not just making a dessert; you’re crafting an experience. Each sandwich is a testament to the fact that some of the best treats are born from humble ingredients and a touch of homemade magic. Get ready to create new cherished memories with these delightful frozen desserts.

Creative Uses for Rainbow Sprinkles Beyond Ice Cream Sandwiches
Rainbow sprinkles are a fantastic way to add a pop of color and fun to countless desserts. While they shine brightly on our cookie ice cream sandwiches, their versatility extends far beyond. Here are some other delightful treats where you can incorporate these cheerful confections:
- St. Patrick’s Day Hot Chocolate Bombs: Add a festive touch to your hot cocoa bombs.
- Funfetti Cake Batter Dip: Essential for that celebratory cake batter aesthetic and flavor.
- Edible Sugar Cookie Dough: Mix them in for a playful, no-bake treat.
- Frozen Bananas: Dip chocolate-covered bananas in sprinkles for a colorful crunch.
- Lofthouse Sugar Cookies: A classic pairing for soft, frosted sugar cookies.
- Cake Batter Frosting: Fold them into frosting for a fun, confetti-like effect.
- Birthday Sugar Cookie Bars: Sprinkle generously over frosted bars for an instant party dessert.
- Homemade Funfetti Cake: Integrate into the cake batter for a true funfetti experience.
- Rainbow Cake: Use them to enhance the vibrant layers of a rainbow cake.
Homemade Ice Cream Sandwiches Made with Love
There’s an unparalleled satisfaction that comes from creating something truly special in your own kitchen. These ice cream sandwiches, crafted with care from homemade chocolate chip cookies, embody that feeling. They’re more than just a dessert; they’re a project that brings joy, a delicious outcome of effort, and a treat that tastes unequivocally better because it’s made with love. Share them with loved ones, enjoy them solo, or bring them to a gathering – they are guaranteed to be a hit every single time. The simple act of combining two beloved classics results in an extraordinary frozen dessert.

How Do I Properly Measure Flour for Baking?
Accurate flour measurement is critical in baking, as too much or too little can drastically alter the texture of your cookies. The most commonly recommended method for proper flour measurement is the “spoon and level” technique. Here’s how to do it:
- **Fluff the Flour:** Before scooping, use a spoon or whisk to lightly fluff up the flour in its container. This aerates it and prevents it from being densely packed.
- **Spoon into Measuring Cup:** Gently spoon the flour into your dry measuring cup until it’s overflowing. Do not pack it down or tap the cup against the counter.
- **Level Off:** Use the straight edge of a knife or a similar flat utensil to level off the excess flour from the top of the measuring cup.
This method ensures that you’re adding the correct amount of flour, preventing your cookie dough from becoming too dry and resulting in cookies that are tough or crumbly. While some bakers simply scoop directly from the bag, this can compact the flour and add significantly more than intended. The spoon and level method is the best way to achieve consistent results for soft, chewy cookies perfect for your ice cream sandwiches.
How to Soften Butter to Room Temperature
Having butter at the correct room temperature is vital for creaming with sugar, which incorporates air and creates a light, fluffy texture in your cookies. There are several effective ways to achieve this, even if you’re short on time.
Method One: Natural Softening (The Ideal Way)
The simplest and most recommended method is to plan ahead. Take your butter (and any other chilled ingredients like eggs) out of the refrigerator and leave it on the counter for approximately 30-60 minutes before you begin baking. This allows the butter to soften naturally and evenly, reaching a temperature where it’s pliable but still cool to the touch – it should yield slightly when pressed but not be greasy or melted. I typically pull out all my chilled ingredients at the start of my prep, ensuring everything is ready when I need it.
Method Two: The Microwave Trick (Use with Caution)
Sometimes, planning ahead isn’t an option, or it’s winter and your kitchen is too cold for natural softening. In such cases, the microwave can be a quick fix, but it requires extreme care. Place the butter, still wrapped in its paper (unless it has foil), in the microwave. Microwave it for 2 seconds, then flip it over. Microwave for another 2 seconds, flip again, and continue this process. Stop as soon as it feels soft enough to gently indent. The goal is softened, not melted. **Beware:** Over-softened or melted butter from the microwave will negatively alter the final texture of your cookies, making them flatter and potentially greasy. Err on the side of caution and stop when it’s just pliable.
Method Three: Warm Water Bath (A Gentle Approach)
My third preferred method, which I also use for quickly bringing eggs to room temperature, involves a warm water bath. Place the wrapped butter sticks in a zip-top bag (to protect them from water) and submerge the bag in a bowl of warm (not hot) water. This gentle, indirect heat will soften the butter evenly without melting it. If the water isn’t excessively hot, this can be the perfect way to achieve ideal room-temperature ingredients for baking.

If you love this Homemade Cookie Ice Cream Sandwich recipe as much as we do, you’re going to adore these other delectable treats too. Click each link below to discover easy, printable recipes that will sweeten your day!
More Delicious Dessert Recipes to Try
-
Banana Split Cake
An easy no-bake dessert that’s perfect for any occasion. Quick to make, great for birthdays, BBQs, game day & more!

-
Cookie Dough Dip
A quick and easy dessert recipe that’s perfect for dipping when served with cookies, fresh fruit, or pretzels. Ready in 5 minutes! It’s ultra-creamy, egg-free, no-bake, and has a rich, sweet flavor that keeps you coming back for more!
-
Banana Caramel Ice Box Cake
This Banana Caramel Ice Box Cake is just like grandma used to make. No baking required for this delicious summer treat. This one is so easy.
-
S’mores Bar Recipe
This s’mores bar recipe bakes graham cracker, chocolate, and marshmallow together to create your favorite summer treat, no campfire required.
-
Peanut Butter Brownie Dip
Peanut butter dessert dip & brownie batter dip swirled together for dessert heaven!
-
Easy Lemon Bars
Easy Lemon Bars are the perfect spring dessert straight from grandma’s recipe box. Great for brunches, bake sales, bridal showers & more.
-
Chocolate Malted Crunch Ice Cream
Chocolate Malted Crunch Ice Cream, just like your favorite childhood Thrifty Ice Cream flavor. This easy summer dessert is simply the best homemade ice cream flavor EVER!
-
Blueberry Pie Bars
This Blueberry Pie Bars Recipe is the perfect dessert recipe for blueberry lovers. Loaded with fresh blueberries, these buttery bars are great for any occasion.
-
Dirt Cake Recipe
This Dirt Cake Recipe is made with crushed Oreo cookies layered with a luscious pudding mixture. It’s the easiest no-bake dessert around!
-
Homemade Cherry Slurpee
Cool off with this refreshing Homemade Cherry Slurpee! Made with just a few simple ingredients, it’s icy, sweet, and bursting with bold cherry flavor—perfect for hot summer days.
-
Frozen Bananas
It’s time for all your favorite summer foods. Things like these chocolate covered Frozen Bananas top the favorites list for sure.










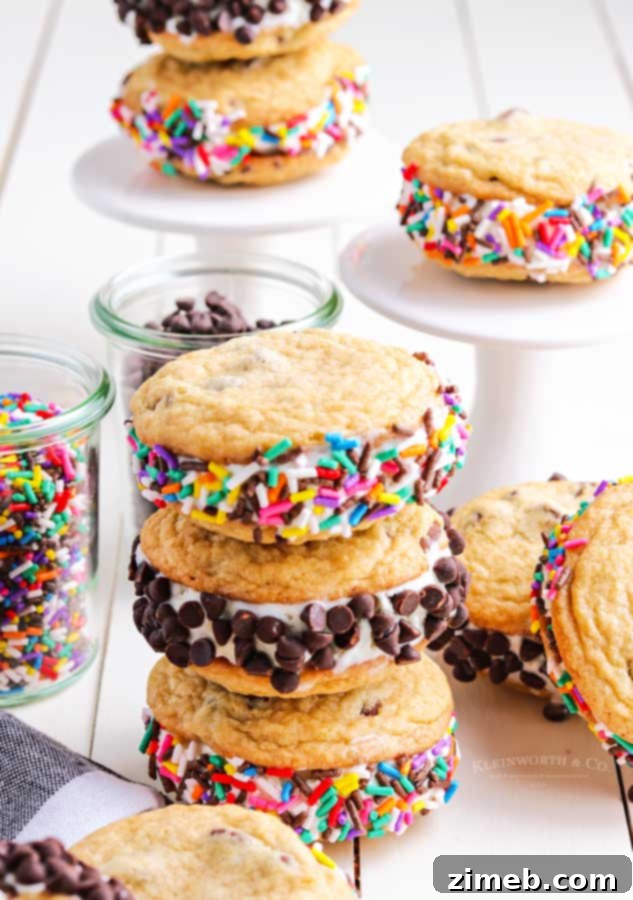
If you’ve enjoyed making and savoring this incredible recipe for Homemade Cookie Ice Cream Sandwiches as much as I do, please take a moment to share your experience! A five-star review would be immensely appreciated, and don’t forget to help spread the word by sharing this delicious creation on Facebook and Pinterest! Your support helps us continue to bring you more delightful recipes.
CONNECT WITH YUMMI HAUS!
Be sure to follow me on my social media, so you never miss a post!
Substack, Facebook, Pinterest, Instagram, Email Subscription


Homemade Cookie Ice Cream Sandwiches
Course: Dessert, Snack
Servings: 18 sandwiches
Homemade Cookie Ice Cream Sandwiches start with deliciously chewy, buttery chocolate chip cookies, then they’re sandwiched together with ice cream & coated with sprinkles! So good!
Print Recipe | Pin Recipe
Prep Time: 15 mins
Cook Time: 12 mins
Total Time: 27 mins
Ingredients
- 1 cup unsalted butter, softened (2 sticks)
- ½ cup granulated sugar
- 1 cup brown sugar, packed
- 2 tsp vanilla extract
- 2 large eggs, room temperature
- 2 ½ cups all-purpose flour
- ½ tsp salt
- ½ tsp baking soda
- 12 ounces chocolate chips, semi-sweet or milk
- ½ gallon vanilla ice cream
Toppings (Optional)
- Mini chocolate chips
- Sprinkles
Instructions
Cookies
- Preheat the oven to 350 degrees Fahrenheit (175 degrees Celsius).
- Line baking sheets with parchment paper or a silicone mat.
- In a large bowl, cream together the butter, granulated sugar, and brown sugar until fluffy.
- Add the eggs and vanilla extract and mix until well combined.
- In a medium bowl, whisk together the flour, baking soda, and salt.
- Gradually add the flour mixture to the butter/sugar mixture and beat until combined. Do not overmix.
- Fold in the chocolate chips until well combined.
- Divide the batter using a cookie dough scoop or tablespoon and place on the prepared baking sheets about 2 inches apart.
- Bake for 10-12 minutes. You want the cookies slightly underbaked for ice cream sandwiches.
- Remove from the oven and place on a wire rack to cool completely.
Assemble the Ice Cream Sandwiches
- Remove the ice cream from the freezer and let it soften slightly.
- Take 1 scoop of ice cream and place it on the bottom of one cookie, then top with another cookie that is similar in size, and gently press them together.
- Dip the sides of the cookie sandwich in mini chocolate chips or sprinkles, if desired.
- Place on a baking sheet and return to the freezer until ready to serve (at least 2-4 hours).
- Store leftovers in the freezer, individually wrapped.
Nutritional information for the recipe is provided as a courtesy and is approximate. Please double-check with your own dietary calculator for the best accuracy. We at Yummi Haus cannot guarantee the accuracy of the nutritional information given for any recipe on this site.
Love this recipe? Follow @YummiHaus for even more tasty recipes!