
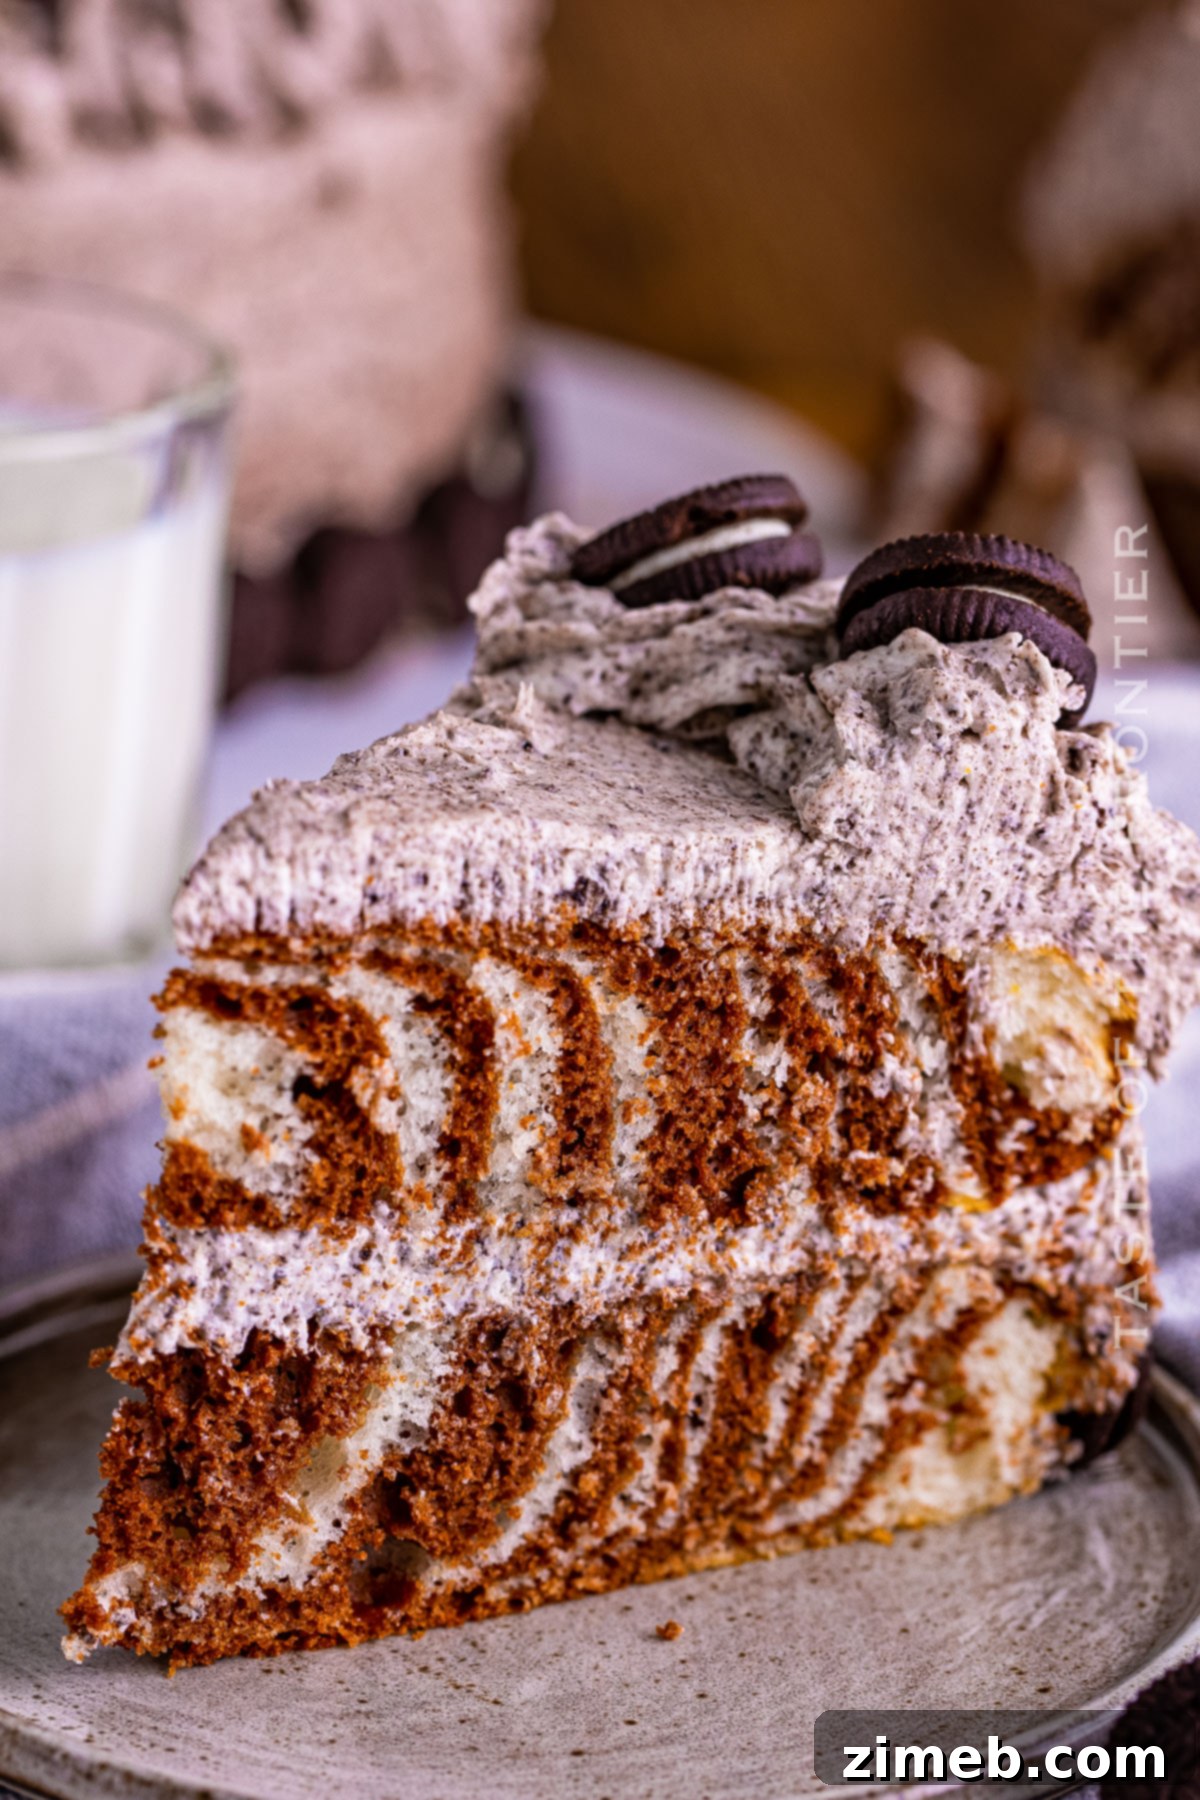
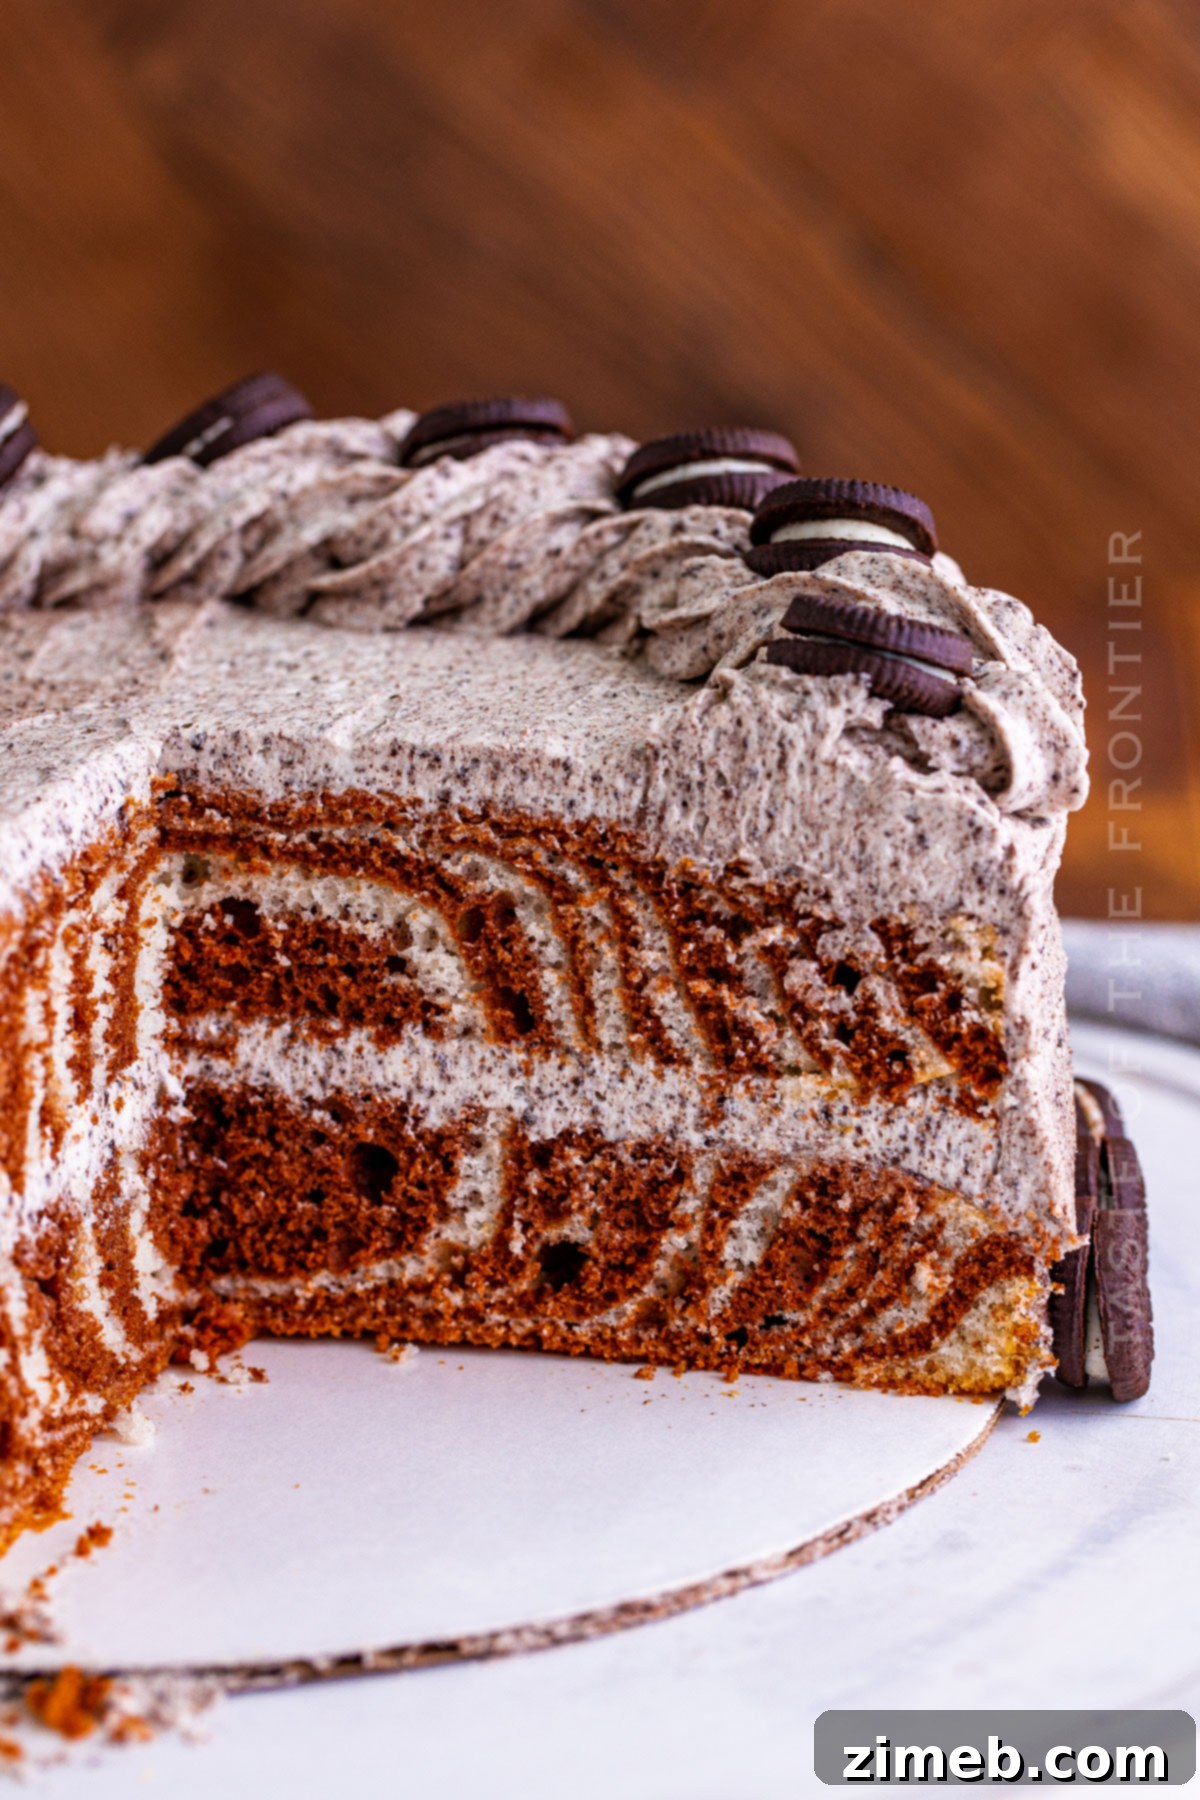
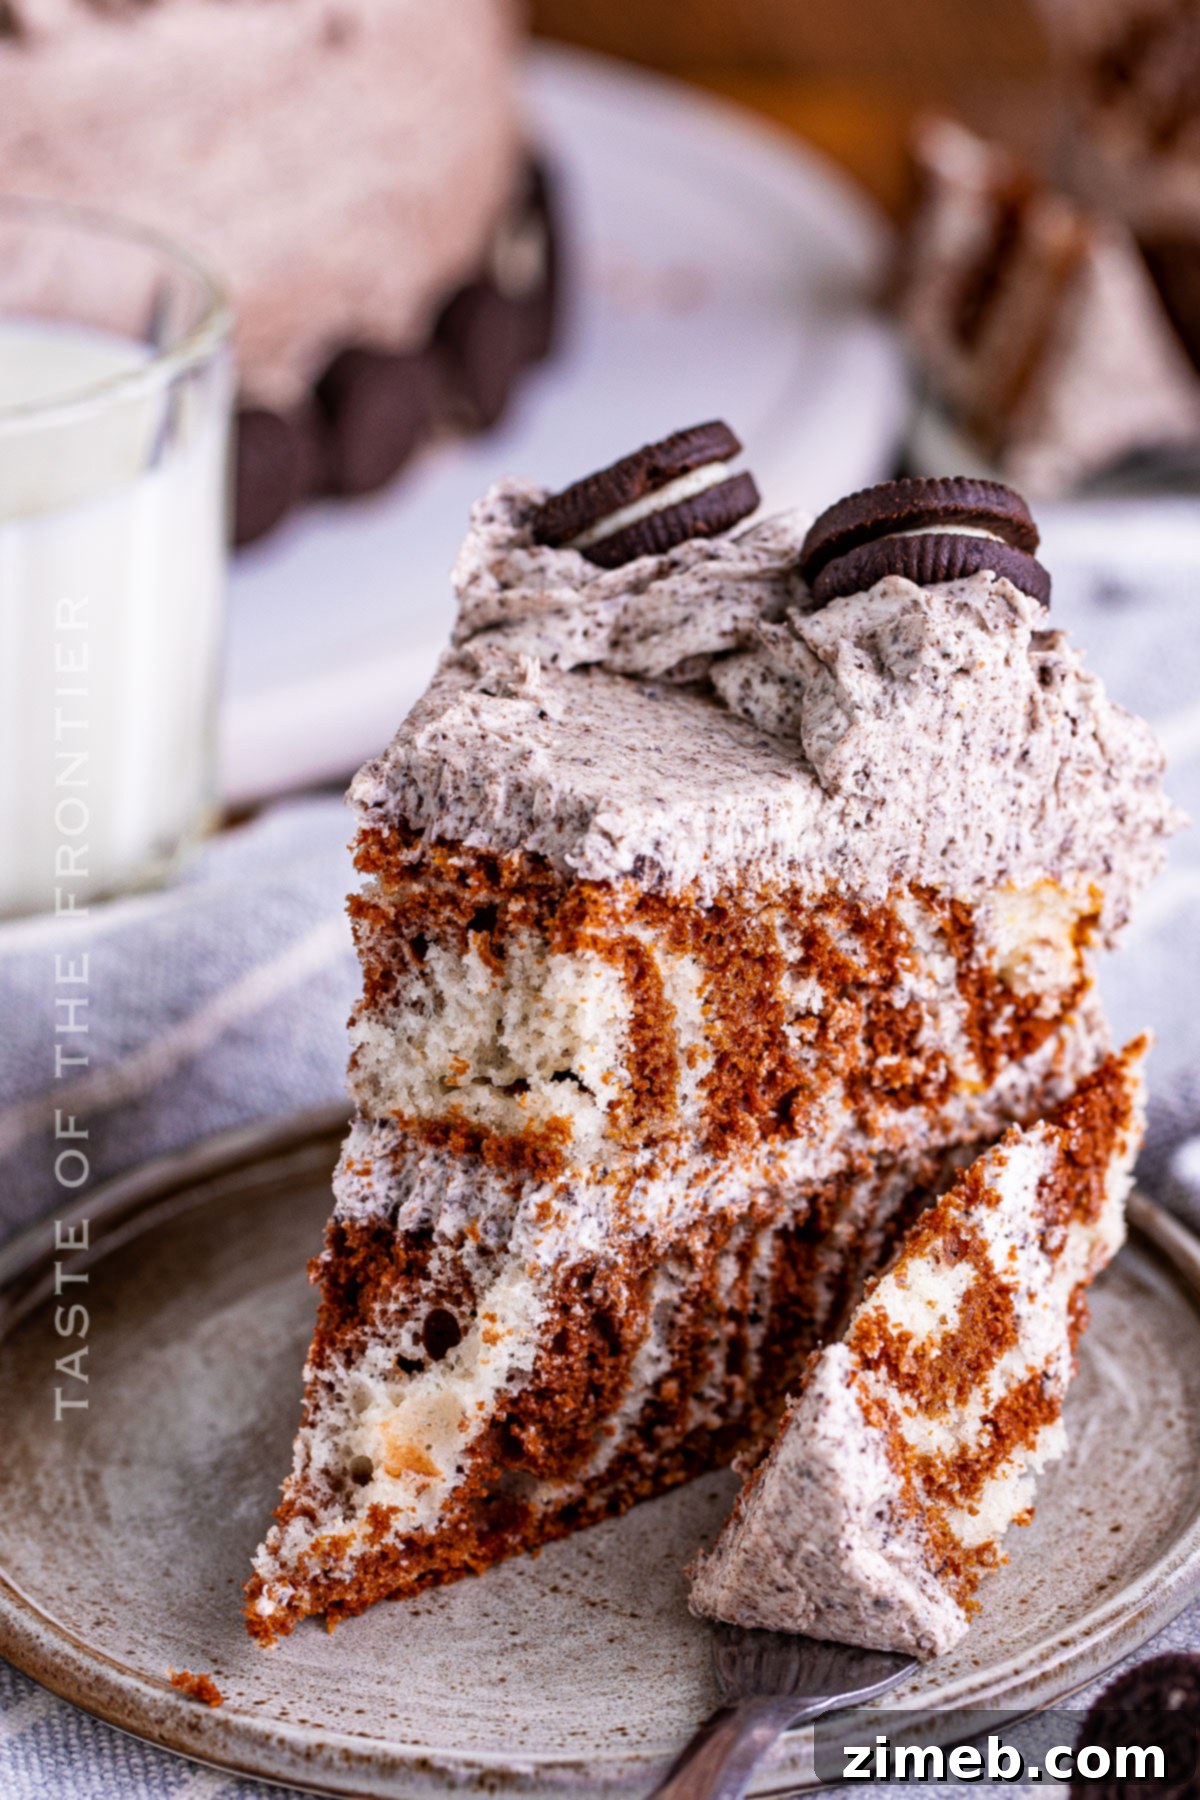
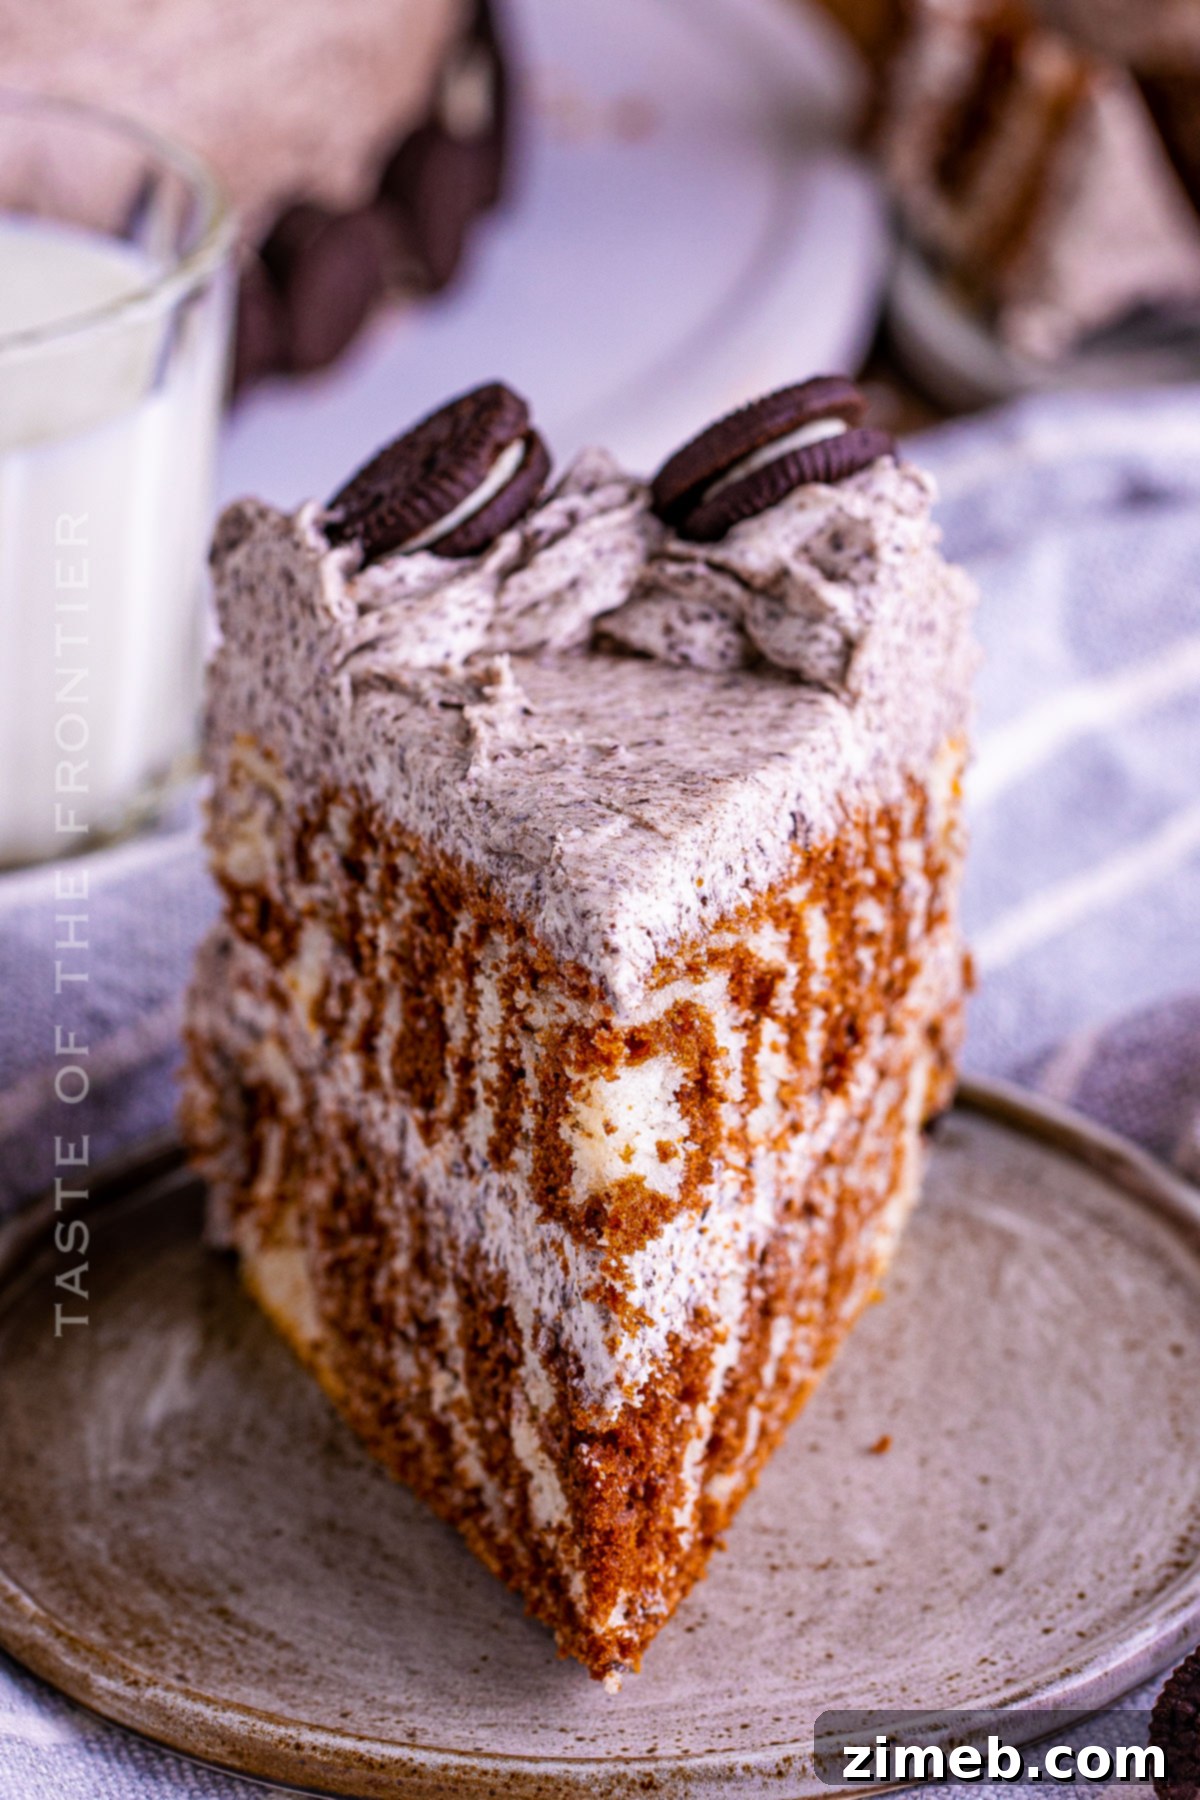
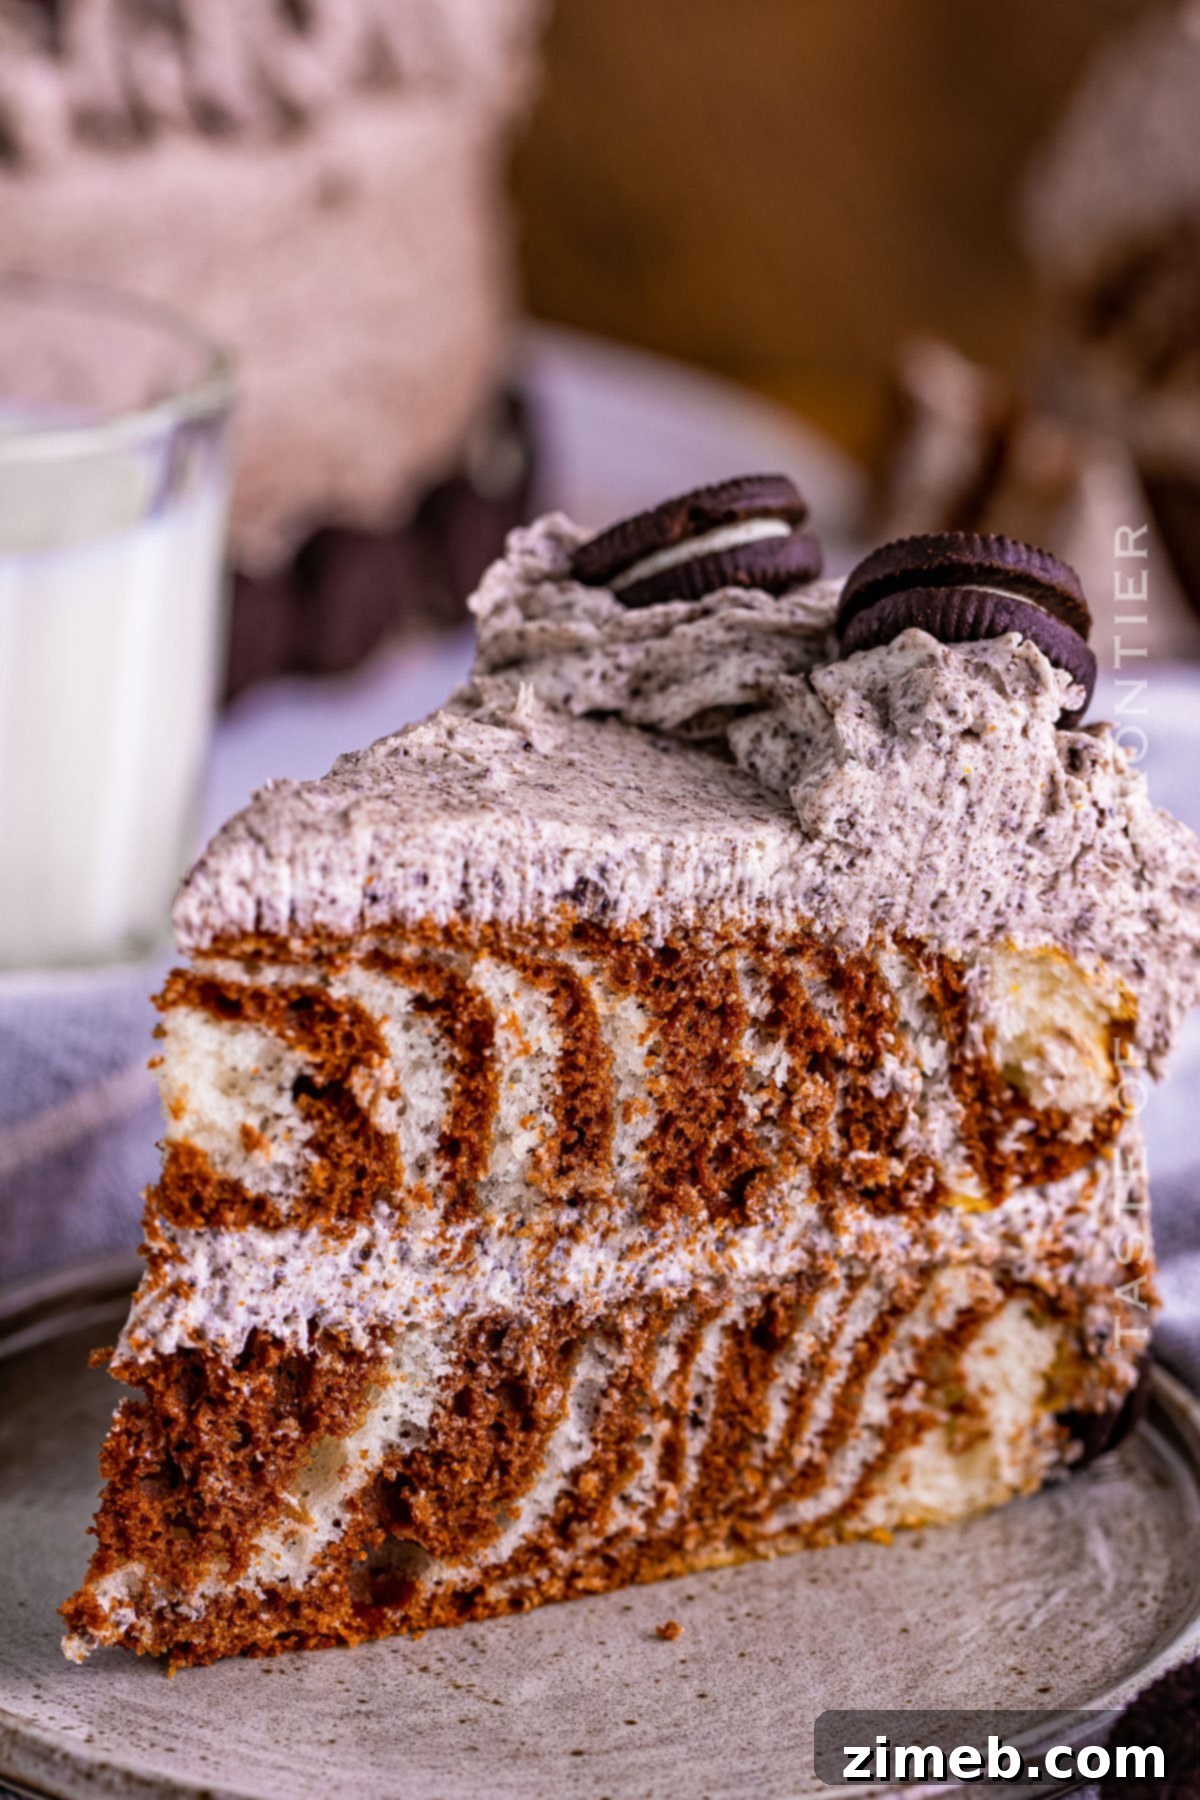
Prepare to impress your guests with this stunning Zebra Cake, a truly magnificent marble cake featuring elegant vanilla and rich chocolate stripes. More than just a dessert, this cake is a captivating centerpiece that promises to be the highlight of any celebration. Its striking appearance belies its surprisingly simple creation process, making you look like a seasoned baker without the fuss. Coupled with a luscious Cream Cheese Oreo Frosting, this Zebra Cake delivers an unforgettable taste and a visual experience that will leave everyone in awe.
Crafting the distinctive zebra stripe effect is far easier than you might imagine. You don’t need advanced baking skills or complex tools to achieve this show-stopping pattern. By simply following our clear and concise instructions, you’ll create a cake that looks professionally made and tastes absolutely divine. The combination of moist vanilla and decadent chocolate cake layers, perfectly complemented by the creamy, cookie-filled frosting, ensures every bite is a delightful journey of flavors and textures.
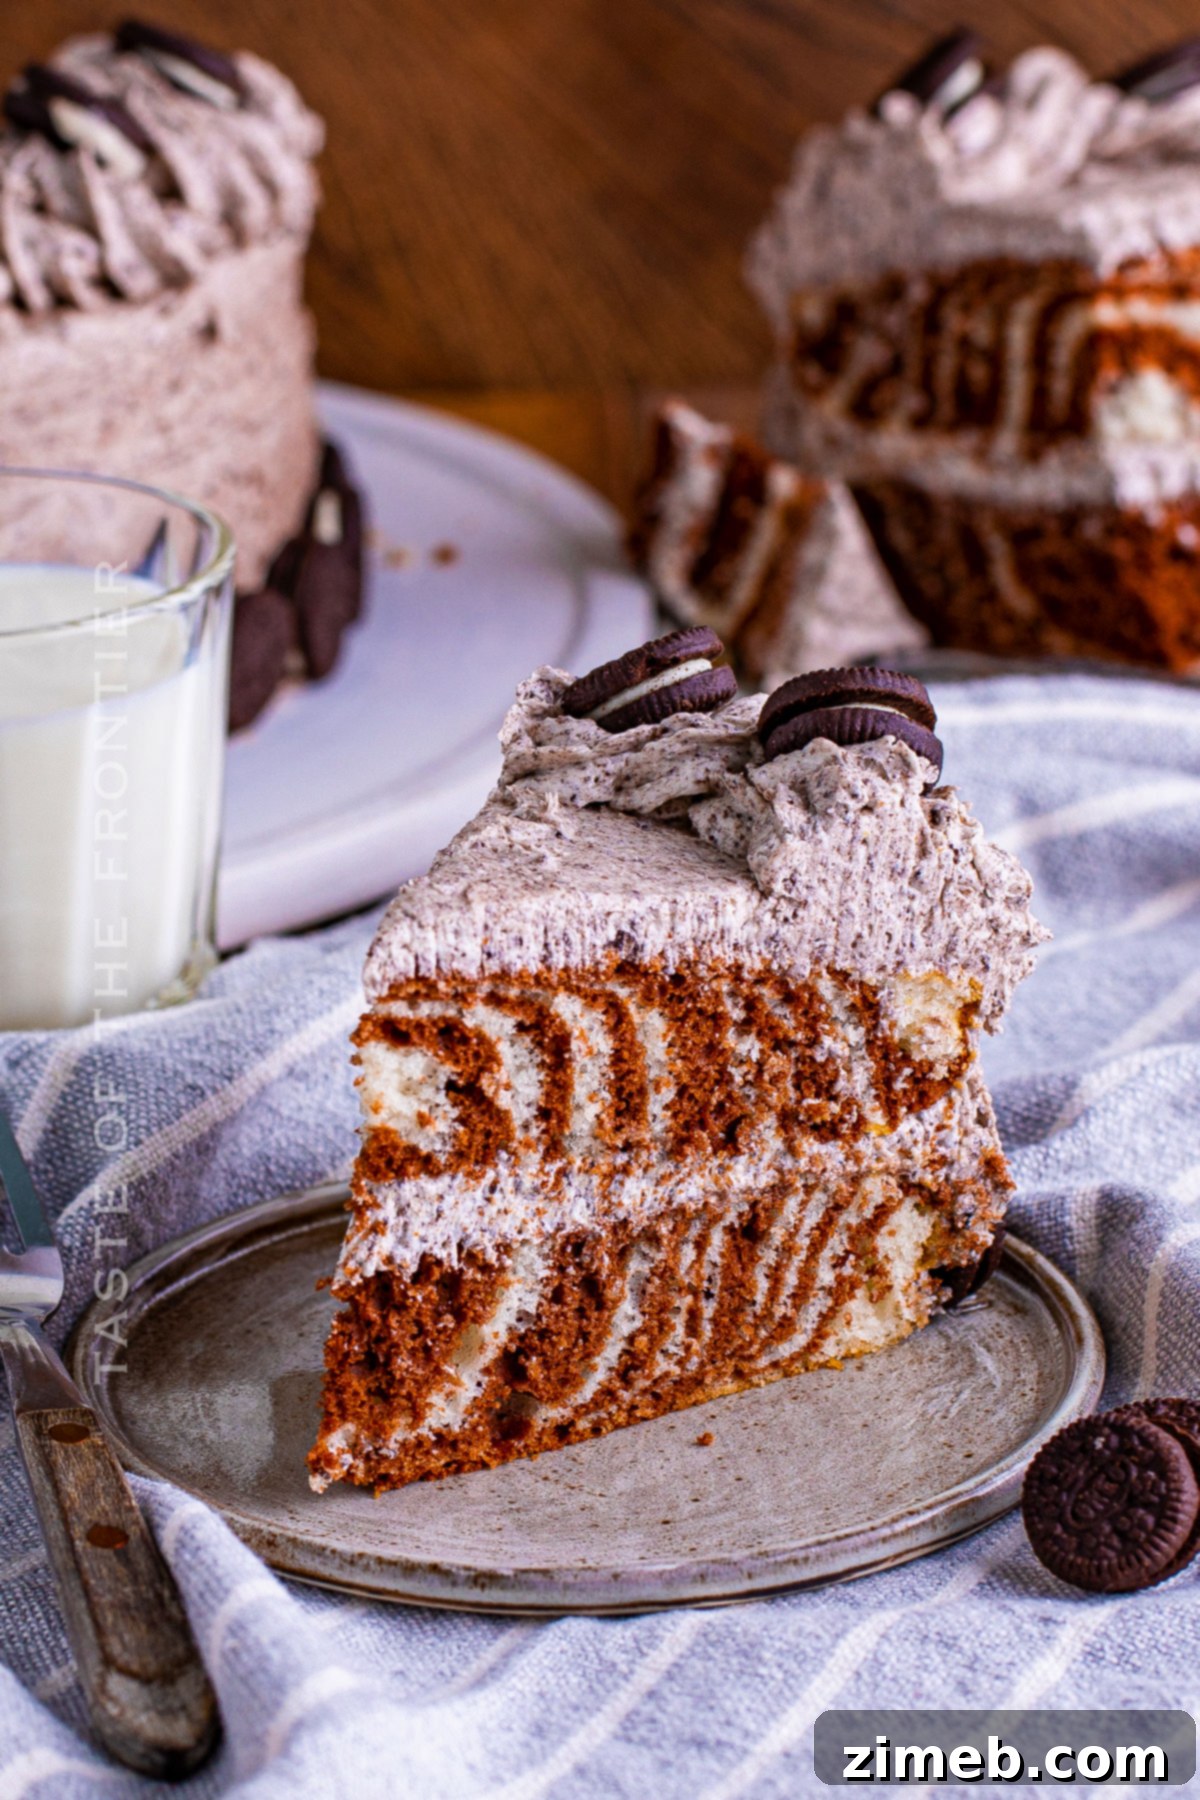
If you’re searching for a dessert recipe that guarantees a “wow” factor, this Zebra Cake with its luxurious Cream Cheese Oreo Frosting should be your ultimate choice. It’s not just a cake; it’s an experience, offering both an artistic visual and an exquisite taste that will have everyone asking for the recipe. Imagine the delight on your guests’ faces when you slice into this beauty, revealing its perfectly striped interior. It’s a moment of pure culinary magic.
Frequently Asked Questions About Zebra Cake
What is a Zebra Cake?
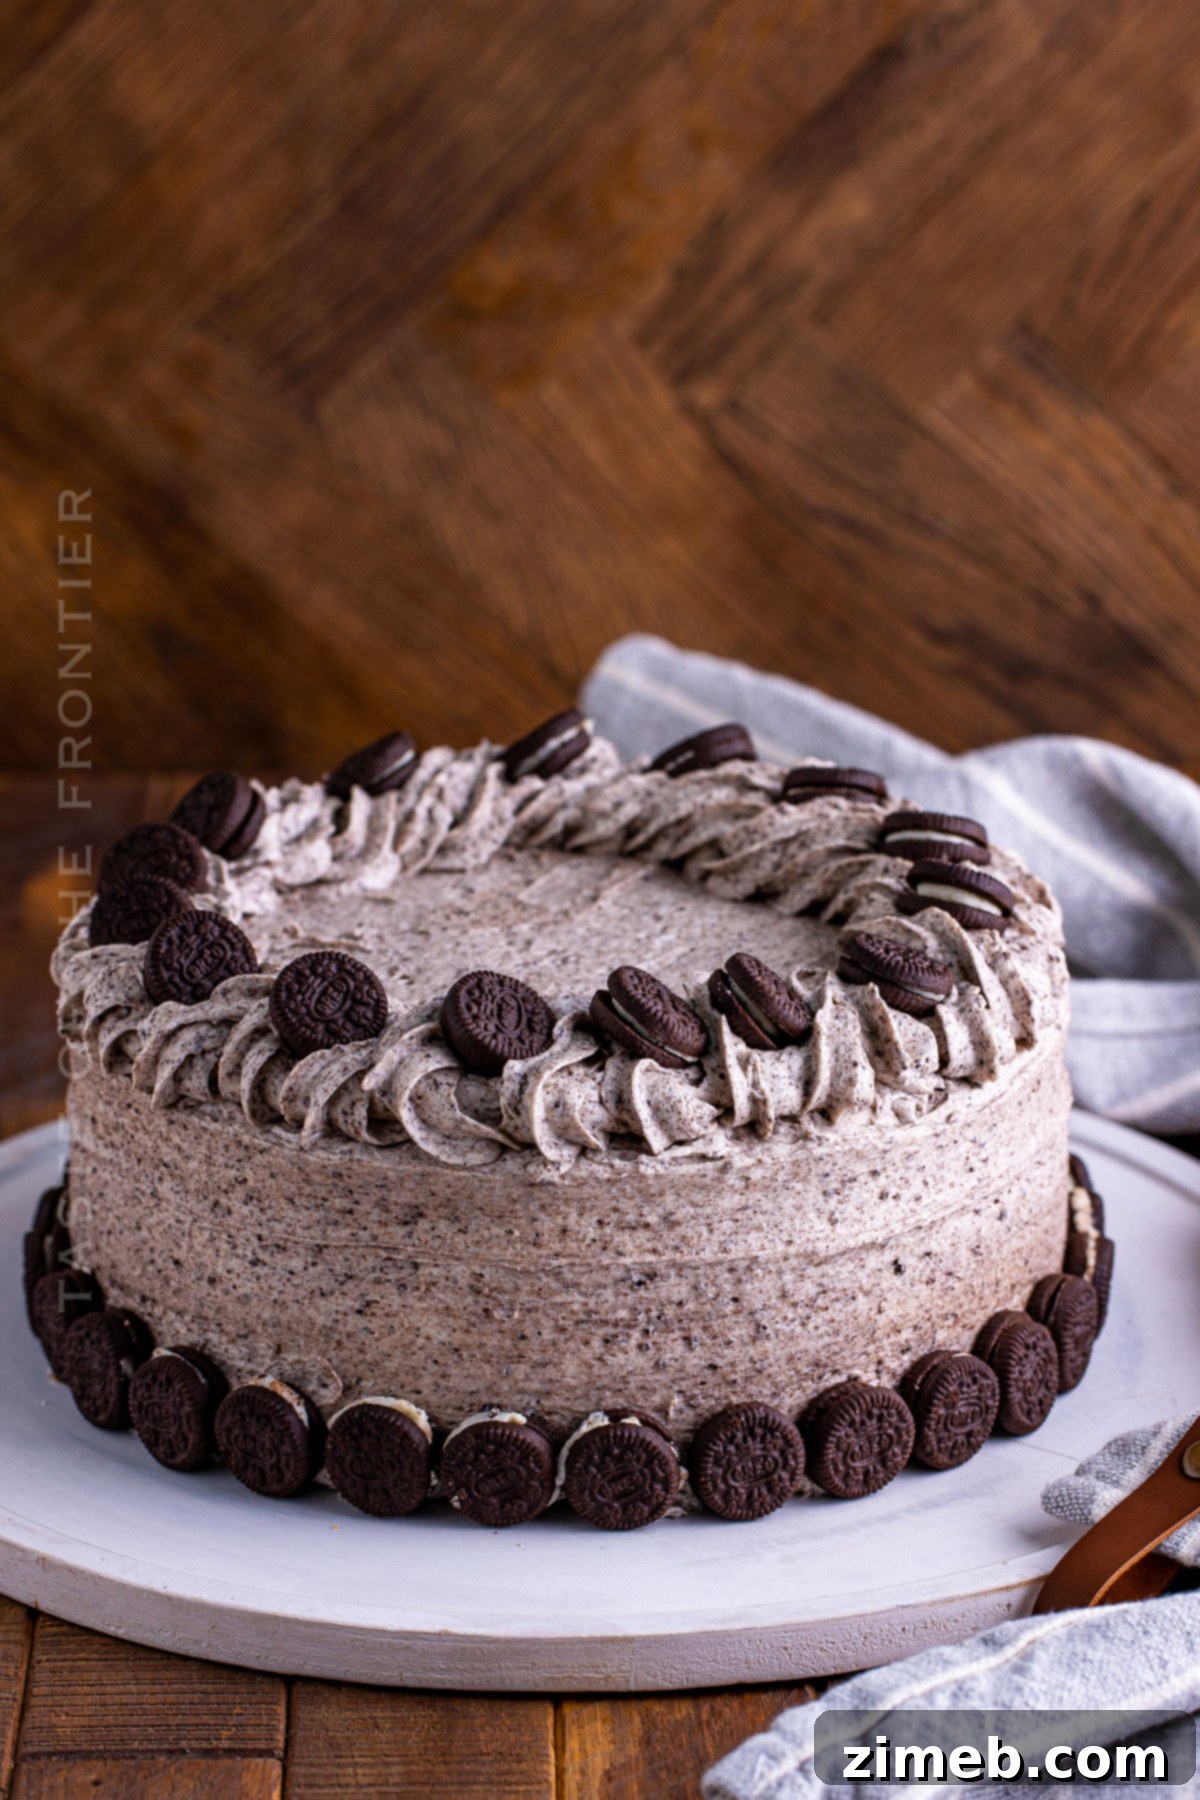
A Zebra Cake is a captivating type of layer cake renowned for its distinctive striped pattern, which elegantly mimics the stripes of a zebra. This striking effect is achieved by artfully pouring alternating layers of contrasting cake batters – typically vanilla and chocolate – into a prepared cake pan. As the cake bakes, these batters meld just enough to create beautiful, concentric rings or stripes that become visible when the cake is sliced. It’s a visually stunning dessert that combines classic flavors with an impressive presentation, making it ideal for birthdays, holidays, or any special gathering where you want to make a statement.
What Does Zebra Cake Taste Like?
Beyond its eye-catching appearance, Zebra Cake offers a truly delightful culinary experience. It typically boasts a wonderfully moist and tender texture, with a soft, fluffy crumb that practically melts in your mouth. The interplay between the distinct vanilla and rich chocolate flavors is perfectly balanced, creating a harmonious taste that isn’t overly sweet but deeply satisfying. The vanilla batter contributes a sweet, buttery essence, while the chocolate batter provides a deep, rich cocoa taste. When savored together, these complementary flavors create a symphony of deliciousness that appeals to nearly everyone. The addition of our Cream Cheese Oreo Frosting elevates this cake even further, introducing a creamy, tangy, and subtly crunchy element that perfectly complements the cake’s balanced flavors and moist texture.
Storage Tips for Optimal Freshness
Due to its luxurious cream cheese frosting, proper storage is crucial to maintain the freshness and delightful taste of your Zebra Cake. Handle and store it with care to ensure every slice remains as perfect as the first.
Refrigerator: To keep this cake at its best, store it in the refrigerator. Wrap the entire cake tightly with aluminum foil or plastic wrap to prevent it from drying out and absorbing other odors from the fridge. Alternatively, if you have already sliced the cake, place individual slices in an airtight container, separating layers with parchment paper to prevent sticking. Stored correctly, your Zebra Cake will remain fresh and delicious for 3-4 days.
Freezing: For longer storage, Zebra Cake freezes exceptionally well. You can freeze the whole cake (unfrosted or fully frosted, though unfrosted layers are often easier to manage) or individual slices. Wrap cake layers or slices tightly in plastic wrap, then an additional layer of aluminum foil. This double layer helps prevent freezer burn. Freeze for up to 3 months. When ready to enjoy, thaw overnight in the refrigerator, then bring to room temperature before serving for the best flavor and texture.
Expert Tips for a Flawless Zebra Cake
Achieving the perfect Zebra Cake is surprisingly straightforward with a few key techniques. These tips will help you create a moist, flavorful cake with beautifully defined stripes every time, even if you’re a beginner baker.
- Room Temperature Ingredients: Always ensure your butter, cream cheese, milk, and eggs are at room temperature. This allows them to cream together more easily and evenly, resulting in a smoother batter and frosting, which contributes to a more tender cake and a light, fluffy frosting.
- Avoid Over-mixing: Once you add the dry ingredients to the wet ingredients for the cake batter, mix only until just combined. Over-mixing develops the gluten in the flour, leading to a tough, dry cake. A light hand will ensure your Zebra Cake remains wonderfully moist and tender.
- The Art of the Stripes: For perfectly distinct zebra stripes, alternate pouring the vanilla and chocolate batters precisely in the center of the pan. Start with one color, let it spread slightly, then pour the other color directly into the center of the first. Continue this process, allowing each new pour to push the previous layer outward, creating concentric rings.
- Prepare Pans Properly: Grease and flour your cake pans thoroughly, or line them with parchment paper (greased on top) to prevent sticking. This ensures your beautiful cake layers release cleanly and easily after baking.
- Don’t Rush Cooling: Allow the cakes to cool completely in their pans on a wire rack before attempting to frost them. Warm cakes will cause the frosting to melt and slide off, ruining your decorative efforts. Patience is key!
- Sift Confectioner’s Sugar: For the smoothest, lump-free frosting, always sift your confectioner’s sugar. This simple step makes a significant difference in the final texture of your Cream Cheese Oreo Frosting.
Essential Ingredients for Your Zebra Cake
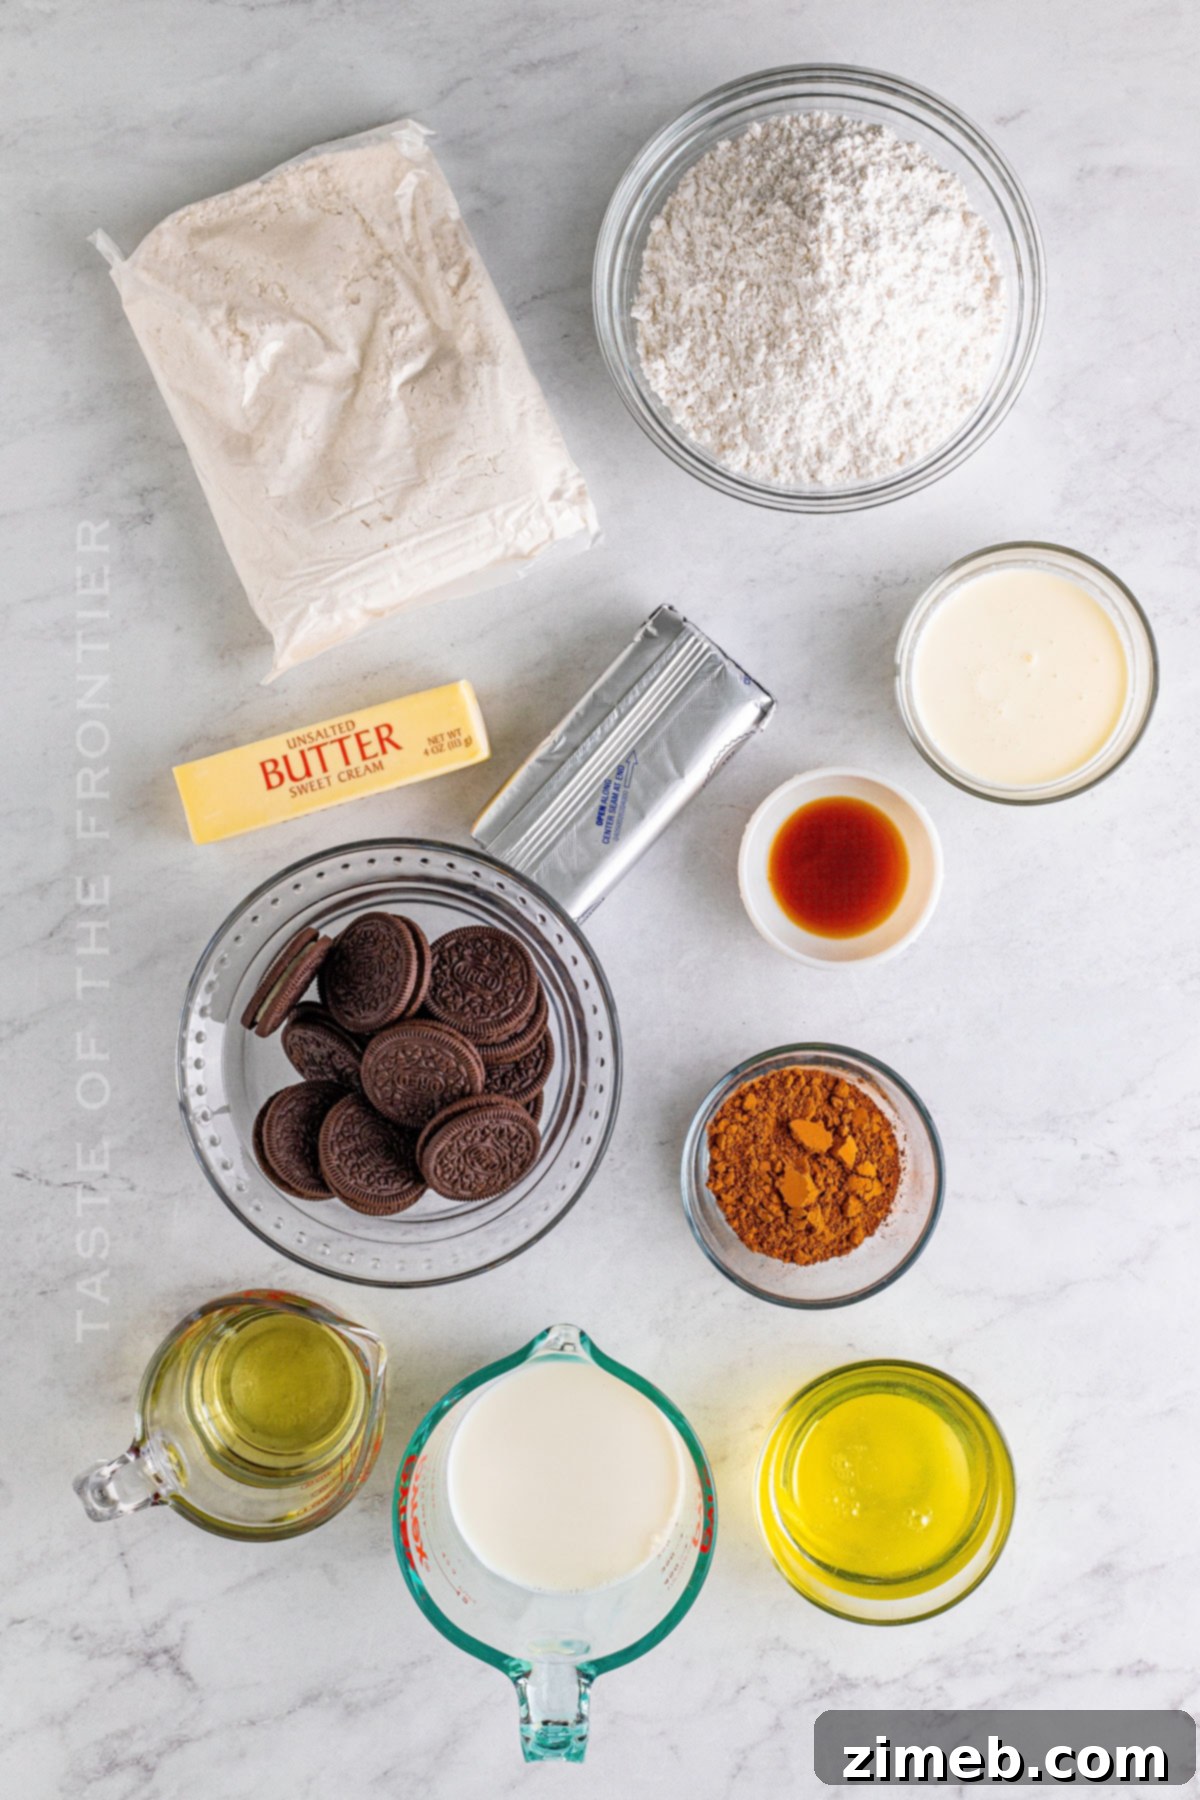
Gathering these simple ingredients is the first step towards creating your spectacular Zebra Cake. Most items are likely staples in your pantry, with others easily found in the baking or refrigerated sections of your local grocery store. Quality ingredients contribute significantly to the cake’s overall flavor and texture.
For the Cake Layers:
- White cake mix (15.25 ounces, 1 box) – A convenient base for a consistent texture.
- Whole milk (1 cup) – Adds richness and moisture compared to water.
- Vegetable oil (½ cup) – Contributes to the cake’s tender crumb.
- Egg whites (4 large) – Provides structure and lightness without the added richness of yolks, allowing the vanilla flavor to shine in one portion.
- Unsweetened cocoa powder (¼ cup) – Essential for the deep chocolate flavor and color in the striped layers.
For the Decadent Cream Cheese Oreo Frosting:
- Oreo cookies (16 cookies) – Crushed, these provide the signature cookie crunch and flavor.
- Unsalted butter (1 cup, softened) – The base for a rich, creamy frosting.
- Cream cheese (8 ounces, softened) – Adds tanginess and a smooth texture that balances the sweetness.
- Confectioner’s sugar (8 cups, sifted) – For sweetness and body, sifting ensures a silky smooth frosting.
- Heavy cream (6 tablespoons) – Helps achieve the perfect consistency and adds richness.
- Vanilla extract (2 teaspoons) – Enhances all the flavors in the frosting.
For Garnish:
- Mini Oreos or extra crushed Oreos – Optional, for a decorative finish.
Kitchen Supplies You’ll Need
Making this impressive cake requires only a handful of common kitchen tools. Having these ready before you begin will streamline your baking process, making it a truly enjoyable experience.
- Cake pans (Two 9-inch round pans): Essential for baking perfectly sized cake layers.
- Electric Mixer (Handheld or Stand Mixer with Paddle Attachment): Indispensable for effortlessly combining ingredients and achieving a smooth batter and fluffy frosting.
- Mixing Bowls (Large and Medium): For separating batters and preparing frosting ingredients.
- Cooling Rack: Crucial for allowing your cake layers to cool evenly and prevent condensation.
- Food Processor: For finely crushing the Oreo cookies for your frosting.
- Rubber Spatula: For scraping down bowls and gently folding ingredients.
- Parchment Paper: To line cake pans for easy release.
- Measuring Cups and Spoons: For accurate ingredient measurements.
- Toothpicks: To test the doneness of your cake.
- Offset Spatula (Optional): For professional-looking frosting application.
How to Make Your Show-Stopping Zebra Cake
Creating this stunning Zebra Cake is surprisingly easy, and the impressive results will make everyone believe you spent hours in the kitchen! Here’s your step-by-step guide to baking this beautiful dessert.
Cake Preparation:
- Preheat Oven & Prepare Pans: Preheat your oven to 350°F (175°C). Take two 9-inch round cake pans. Lightly spray them with cooking spray. Cut two circles of parchment paper to fit the bottom of each pan, place them in, and spray the parchment paper with more cooking spray. Set aside.
- Mix White Cake Batter: In a large mixing bowl, combine the white cake mix, whole milk, vegetable oil, and egg whites. Using an electric hand mixer, blend on low speed for 30 seconds until the ingredients are just moistened, then increase to medium speed and mix for 2 minutes until smooth and well combined. Be careful not to overmix.
- Divide Batter: Carefully divide the prepared cake batter in half, pouring one half into a separate medium-sized bowl. This will be your vanilla portion.
- Create Chocolate Batter: To the remaining half of the batter in the large bowl, add the unsweetened cocoa powder. Gently stir until the cocoa powder is just incorporated and the batter is uniformly chocolate-colored. Again, avoid over-mixing.
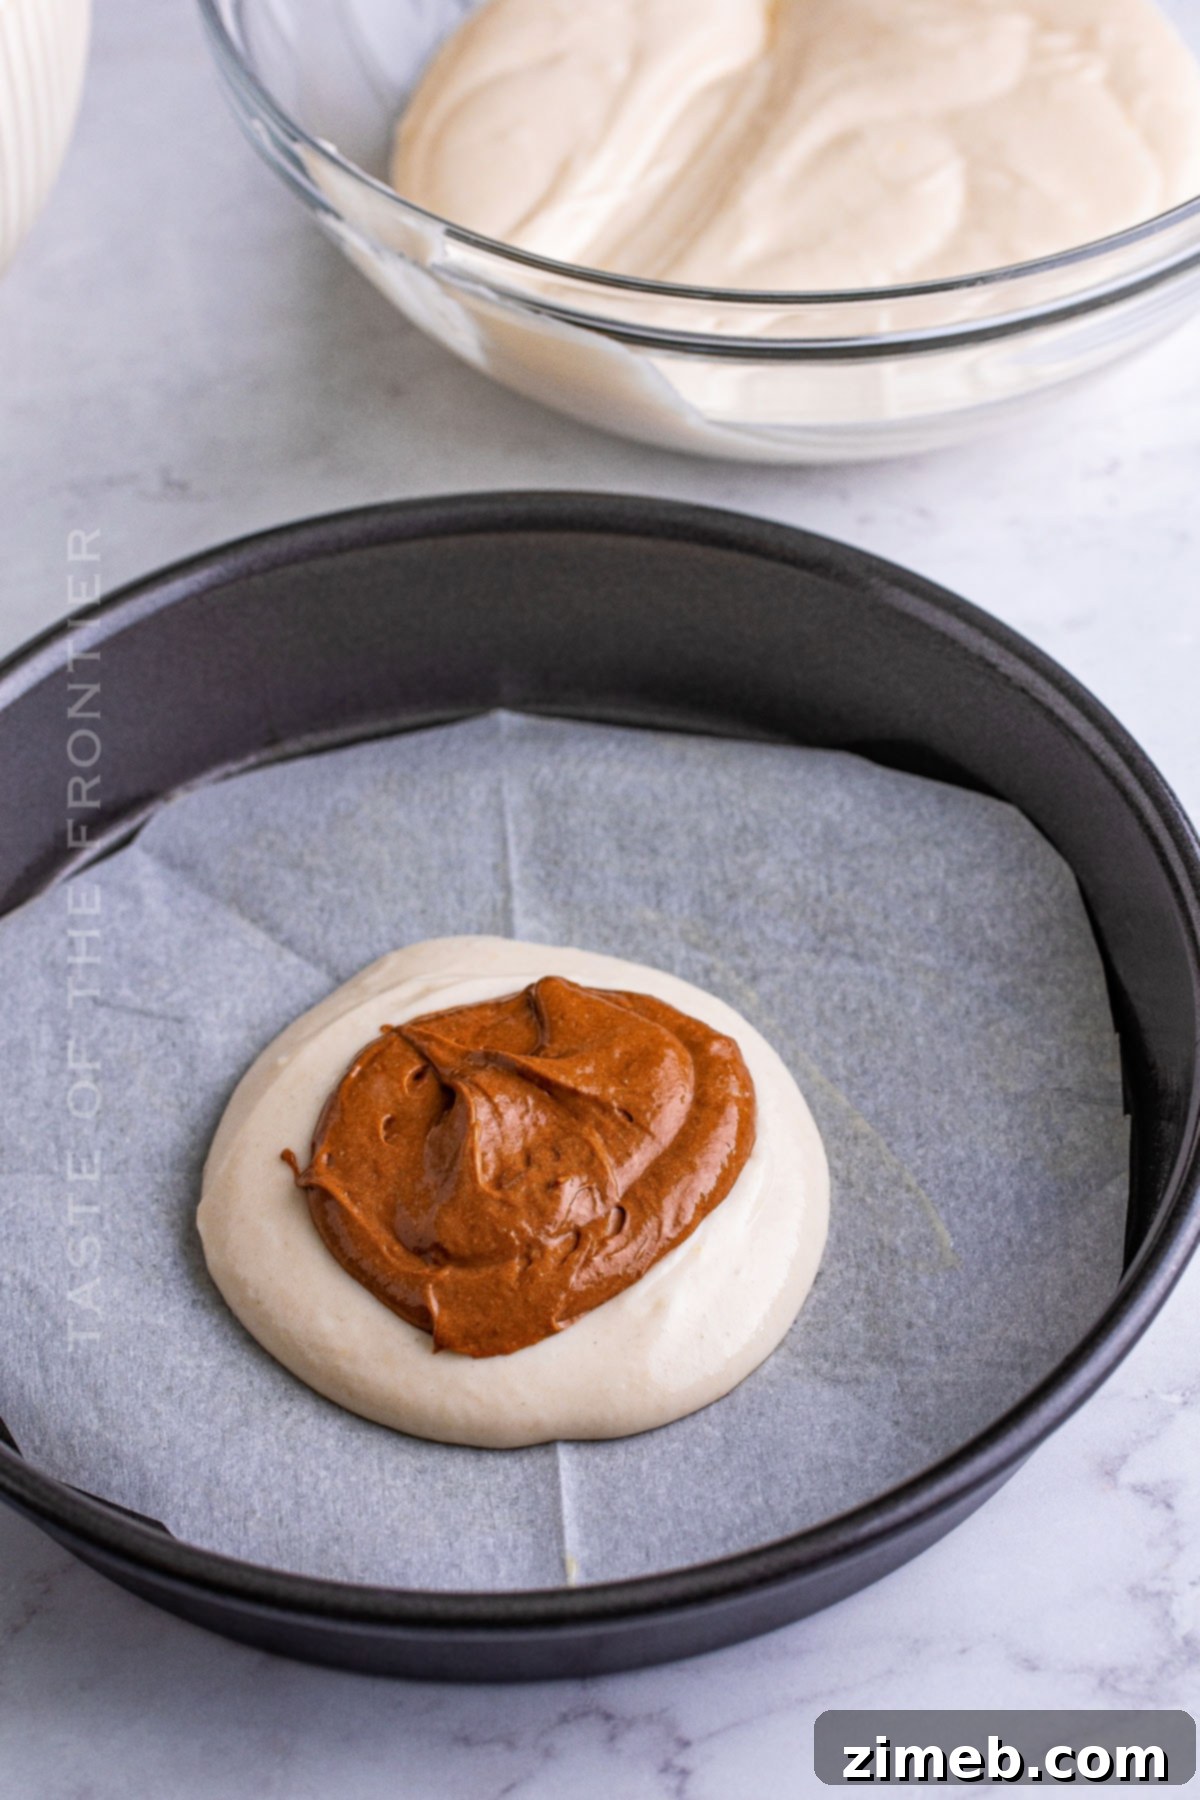
- Forming the Zebra Stripes: Now for the magic! Working with both prepared cake pans simultaneously, pour approximately ¼ cup of the white cake batter directly into the center of each pan. Allow it to spread slightly.
- Layering the Colors: Next, pour approximately ¼ cup of the chocolate cake batter directly into the center of the white batter in each pan. This new layer will naturally push the white batter outwards, beginning to form the rings.
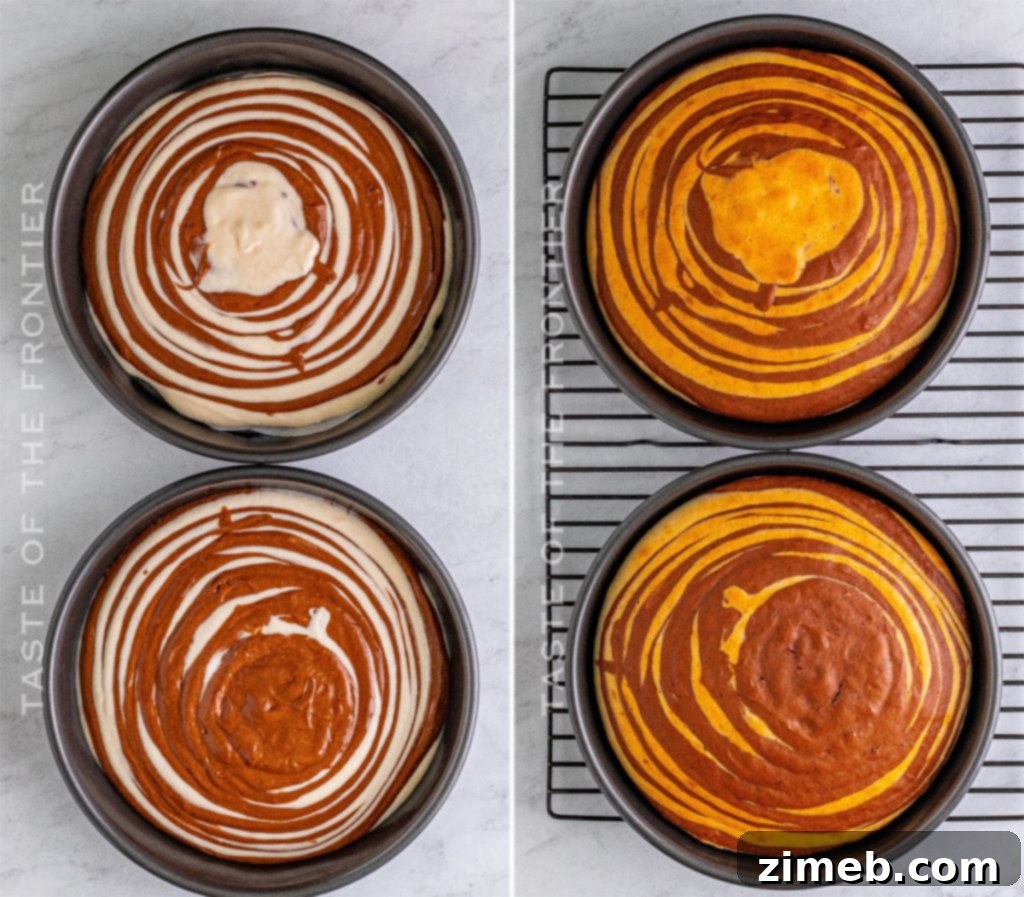
- Repeat until Depleted: Continue alternating between white and chocolate batters, pouring into the center of the previous color in each pan, until all the batter is used up. Ensure both pans have roughly an even amount of batter.
- Gentle Spreading (Optional): If you find the batter isn’t spreading sufficiently to fill the bottom of the pan, you can gently tilt and rotate the baking pan. This will not disturb the zebra pattern.
- Bake to Perfection: Place the pans in the preheated oven and bake for 22-25 minutes, or until a wooden toothpick inserted into the center of the cakes comes out clean.
- Cool Completely: Remove the cakes from the oven and let them cool in their pans on a wire rack for about 10-15 minutes. Then, carefully invert them onto the wire rack, remove the parchment paper, and allow them to cool completely to room temperature before frosting. This step is crucial for crumb-free frosting!
Cream Cheese Oreo Frosting:
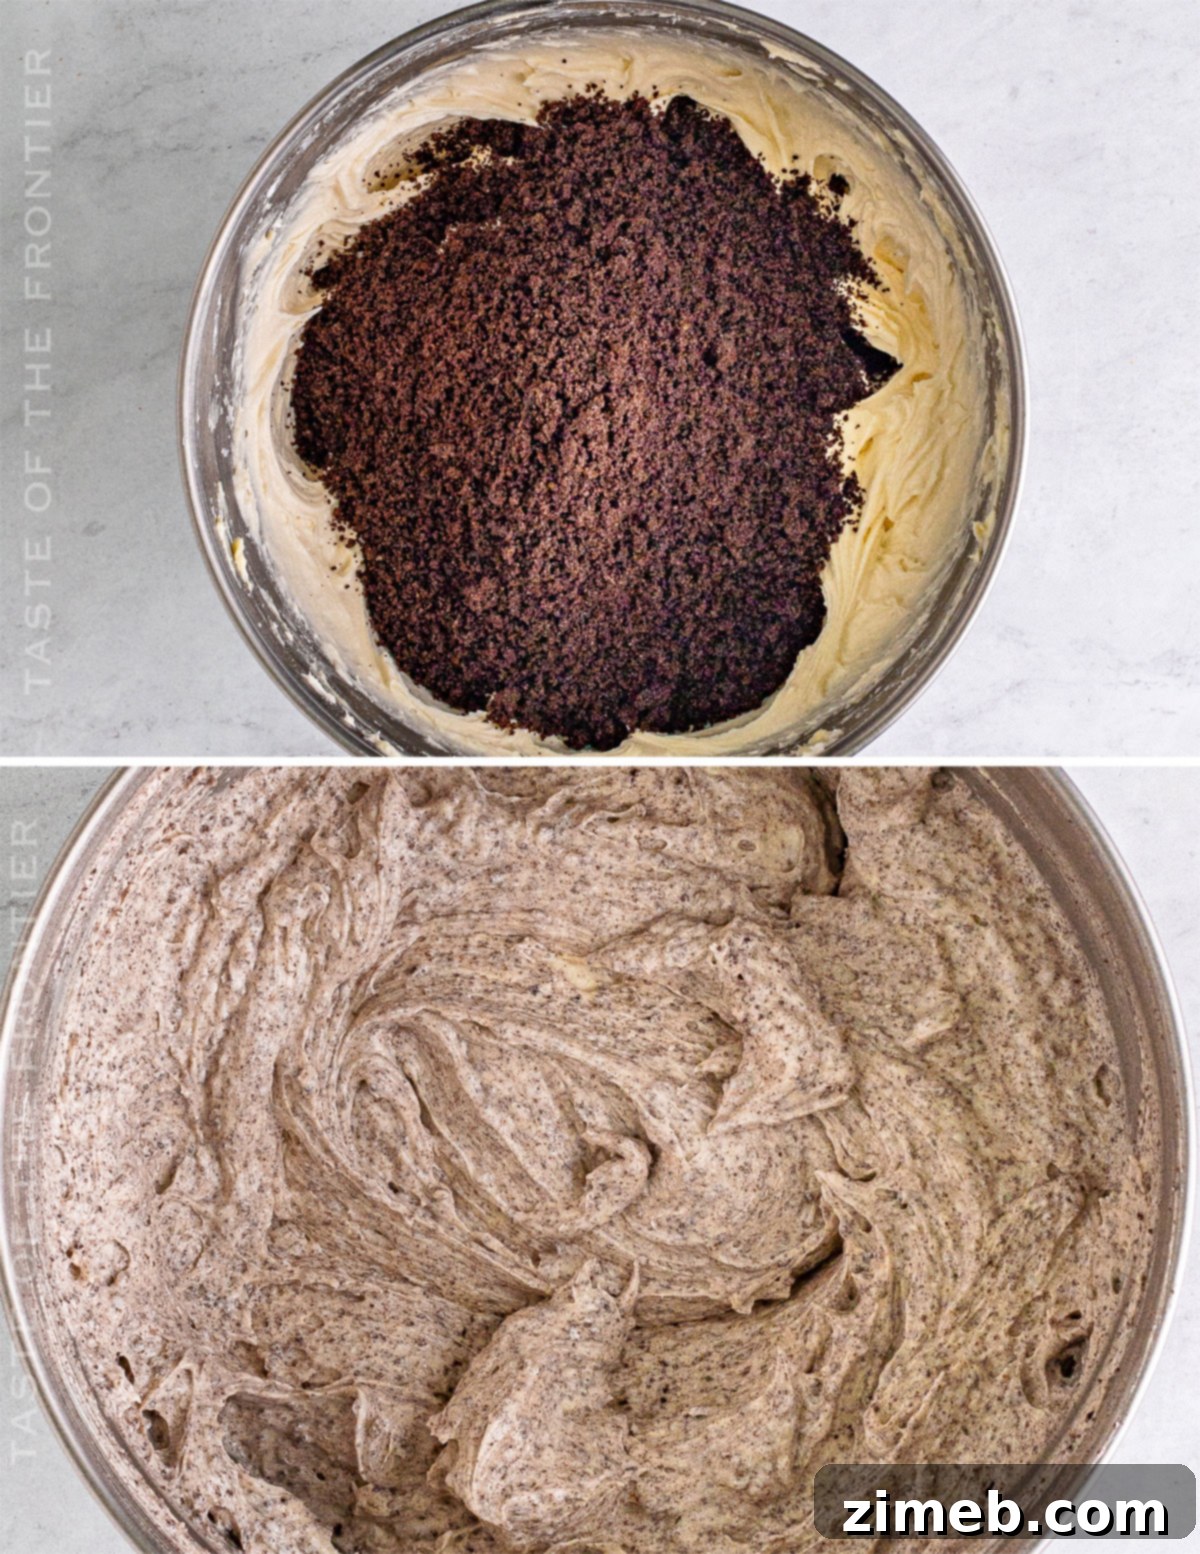
- Crush Oreos: While your cakes are cooling, prepare the frosting. Place the Oreo cookies into a food processor and pulse until they are finely ground into crumbs. Set aside.
- Cream Butter and Cream Cheese: In the large bowl of a stand mixer fitted with the paddle attachment (or using a hand mixer), cream together the softened unsalted butter and softened cream cheese until the mixture is smooth, light, and fluffy.
- Gradually Add Sugar: With the mixer on low speed, gradually add the sifted confectioner’s sugar, about a cup at a time, until it is fully incorporated. Scrape down the sides of the bowl as needed to ensure everything is mixed.
- Add Liquids & Flavor: Pour in the heavy cream and vanilla extract. Mix on low speed until just combined.
- Whip to Fluffy: Increase the mixer speed to medium-high and whip the frosting for about 3 minutes until it becomes light, airy, and truly fluffy.
- Fold in Cookie Crumbs: Gently fold in the crushed Oreo cookie crumbs using a spatula. Mix just until they are evenly distributed throughout the frosting. Over-mixing here can break down the cookie pieces too much.
Assembly:
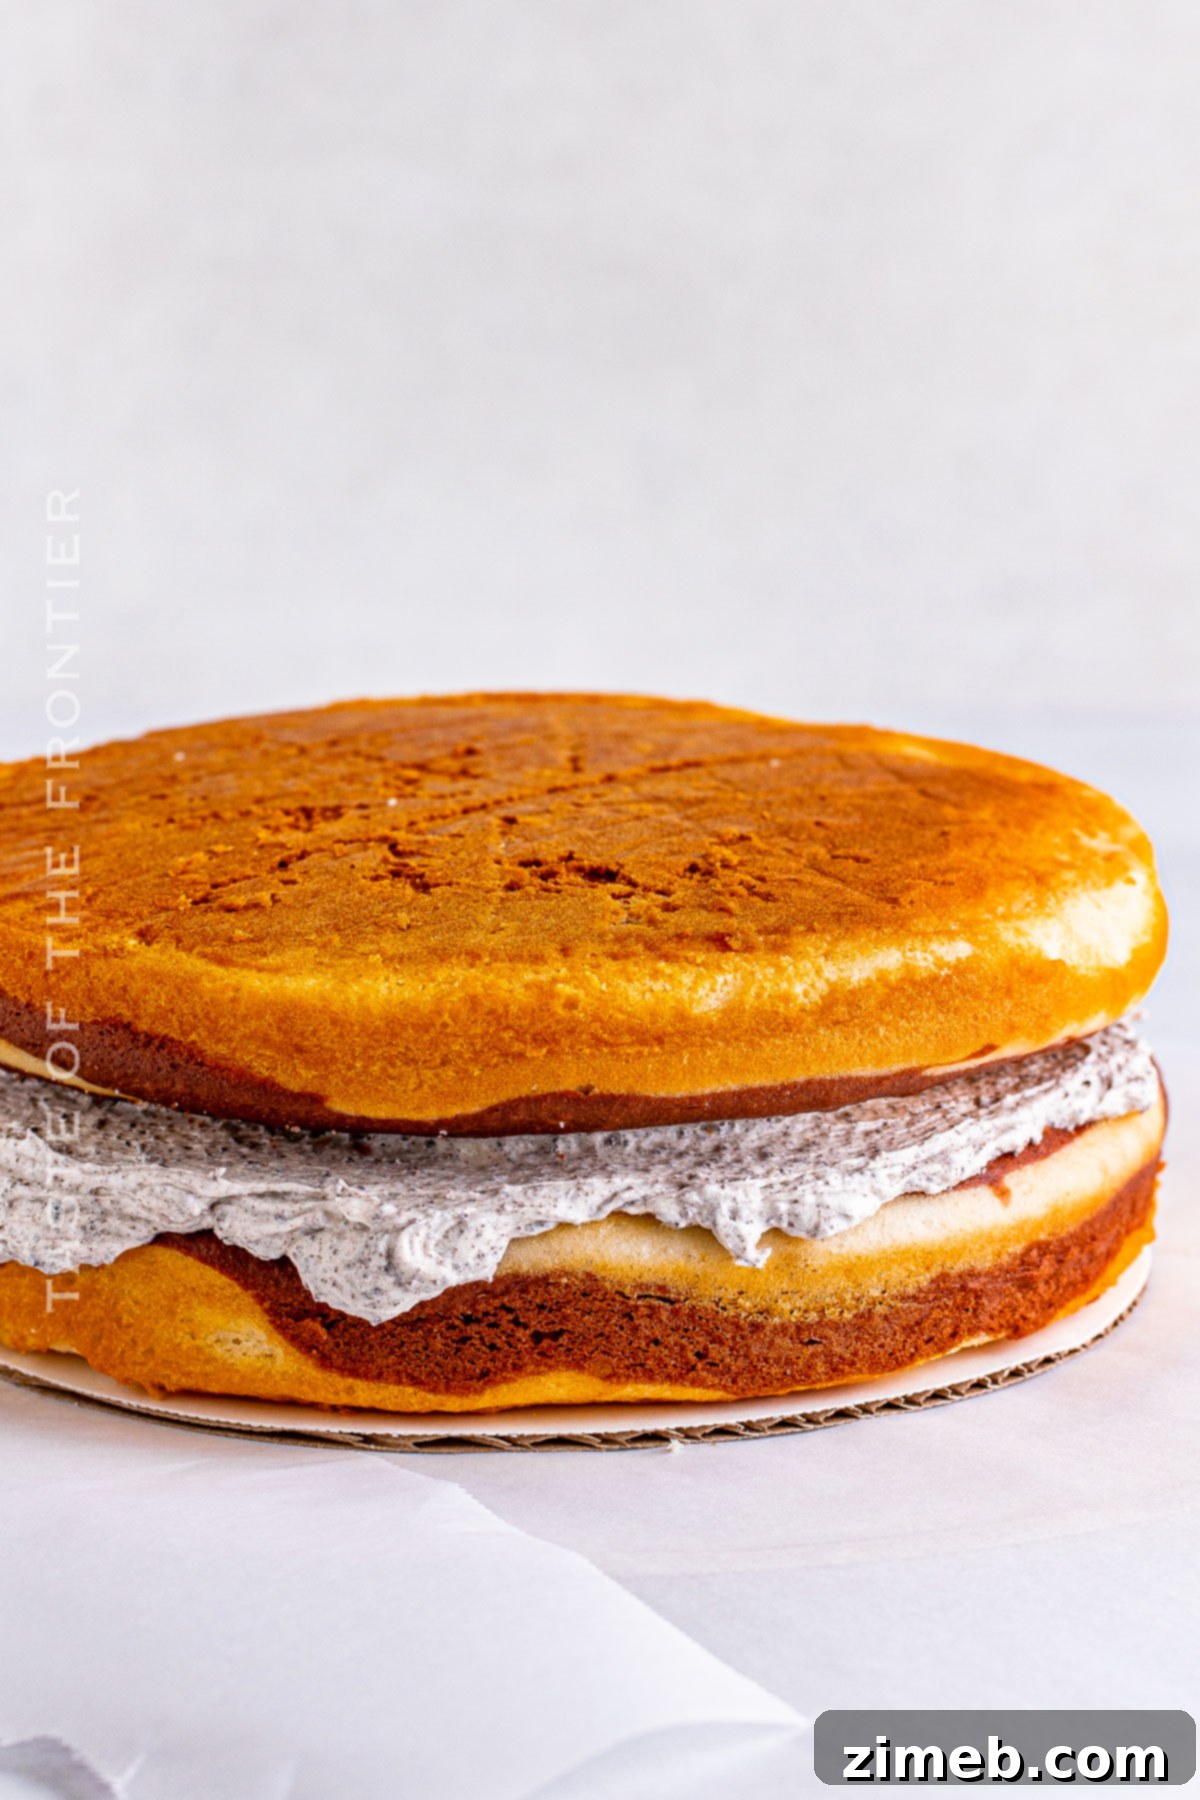
- Level Your Cakes: Once your cake layers are completely cool, use a serrated knife or a cake leveler to carefully slice off any domed tops, making them perfectly flat. This ensures your cake layers stack evenly.
- First Layer & Frosting: Place one cake layer (bottom side down) onto your chosen serving platter or cake stand. Spread about 1 cup of the Cream Cheese Oreo Frosting evenly over the top, extending it to the edges.
- Second Layer & Crumb Coat: Carefully place the second cake layer (top side down, so the flat, cut side is facing up) onto the frosted first layer. Apply a thin, even layer of frosting over the entire cake – top and sides. This is your “crumb coat,” which traps any loose crumbs and creates a smooth base for your final frosting layer.
- Chill the Cake: Place the crumb-coated cake in the refrigerator for 1-2 hours. This chilling time allows the crumb coat to set, making it much easier to apply the final layer of frosting without pulling up crumbs.
- Final Frosting & Decorate: Once the crumb coat is firm, apply the remaining frosting generously around the entire cake. Use an offset spatula or a cake scraper to achieve a smooth finish. For extra flair, decorate the cake with any remaining frosting using a piping bag, and adorn with mini Oreos or extra crushed cookies if desired.
- Serve & Enjoy: Slice and serve your magnificent Zebra Cake immediately.
What to Serve With Your Exquisite Zebra Cake
While this delicious Zebra Cake is a star on its own, pairing it with certain beverages or accompaniments can elevate the entire dessert experience. Here are some perfect partners to complement its rich chocolate and vanilla flavors and creamy frosting:
- Coffee: A classic pairing! A warm cup of freshly brewed coffee, whether regular or decaffeinated, provides a delightful contrast to the cake’s sweetness. An espresso or cappuccino would also be a sophisticated choice.
- Milk: For a comforting and timeless combination, a tall, cold glass of milk is simply perfect with any rich dessert, especially one with Oreo frosting.
- Whipped Cream: A dollop of freshly whipped cream, lightly sweetened, swirled gracefully on top of each slice adds an extra layer of lightness and creaminess.
- Ice Cream: Nothing quite beats cake and ice cream. A scoop of vanilla bean, chocolate, or even a complementary flavor like coffee or mint ice cream would make this a truly indulgent treat.
- Fresh Berries: The tartness of fresh raspberries, strawberries, or blueberries can cut through the richness of the cake and frosting, adding a refreshing burst of flavor and a beautiful splash of color.
- Chocolate Drizzle: For the ultimate chocolate lover, a warm drizzle of melted dark chocolate or chocolate ganache over each slice adds an extra layer of decadence.
- Aromatic Tea: For those who prefer tea, a mild black tea or a herbal tea blend can offer a soothing counterpoint to the cake’s flavors.
Why You Should Absolutely Make This Zebra Cake
If you’re still contemplating whether to bake this Zebra Cake, the real question is, why wouldn’t you? It offers an array of benefits that make it an undeniable choice for any occasion, combining visual appeal with incredible taste and flexibility.
- Visually Stunning: This cake is undeniably gorgeous. The moment you slice into it and reveal those captivating black and white stripes, it creates a dramatic “wow” factor that’s perfect for celebrations, impressing guests, or simply making a special treat feel even more extraordinary. It’s a true conversation starter!
- Incredibly Delicious: Beyond its beauty, this cake is a feast for the taste buds. It boasts a harmonious blend of rich chocolate and sweet vanilla flavors, all perfectly complemented by the creamy, tangy, and subtly crunchy Cream Cheese Oreo Frosting. From its moist texture to the delightful cookie bits, every mouthful is pure indulgence.
- Remarkably Versatile: The Zebra Cake is perfect for nearly any occasion. Whether it’s a birthday party, a holiday gathering, a casual family dessert, or just a weekend baking project, its universal appeal and impressive presentation make it a fitting choice. Plus, its components can be easily customized to suit different preferences or seasonal themes.
- Easier Than It Looks: Despite its sophisticated appearance, the technique for creating the zebra stripes is surprisingly simple and requires no special artistic skills. This means you can achieve professional-looking results with minimal effort, boosting your confidence in the kitchen.
- Crowd-Pleaser: Combining the beloved flavors of vanilla, chocolate, and Oreos, this cake is guaranteed to be a hit with both kids and adults alike. It’s a dessert that caters to various palates, ensuring everyone finds something to love.
Creative Variations and Add-ins to Personalize Your Zebra Cake
This Zebra Cake recipe is a fantastic canvas for your creativity! Feel free to experiment with these variations and add-ins to make it your unique signature dessert, tailored to your taste and the occasion.
- Flavorful Extracts: Easily change the flavor profile of your cake or frosting. Instead of vanilla, try almond extract for a delicate nuttiness, peppermint for a festive twist, or a hint of coffee extract to intensify the chocolate flavor. Lemon or orange zest could also be folded into the vanilla batter for a citrusy hint.
- Alternative Candies and Cookies: Don’t limit yourself to Oreos! Crushed Biscoff cookies, peanut butter cups, chopped chocolate bars, or even M&M’s can be incorporated into the frosting or sprinkled on top for different textures and flavors. Imagine a snickerdoodle-flavored frosting with cinnamon sugar sprinkled on top.
- Miniature Versions for Portions: For individual servings or a dessert bar, use smaller cake pans or even muffin tins to create delightful mini cakes or cupcakes. If making cupcakes, you could even use a piping bag to insert a creme filling into the center for an extra surprise. Adjust baking times accordingly for smaller sizes.
- Elegant Garnishes: Elevate the presentation with sophisticated garnishes. Add dark chocolate chips, white chocolate chips, or a striking chocolate drizzle over the top of the cake. Fresh berries, edible flowers, or a dusting of cocoa powder or powdered sugar can also add a beautiful finishing touch.
- Different Frosting Flavors: While our Cream Cheese Oreo Frosting is a winner, you can certainly change things up! Consider a classic vanilla buttercream, a rich chocolate frosting, peanut butter frosting, or even a salted caramel frosting to create entirely new flavor combinations that complement the zebra stripes.
- Colorful Zebra: For a fun twist, consider using food coloring to dye your vanilla batter a vibrant color like pink, blue, or green to create a “rainbow zebra” or themed cake for specific holidays or parties.
Discover More Delicious Homemade Cake Recipes!
If you loved making this Zebra Cake, you’re in for a treat! Explore these other fantastic homemade cake recipes from our collection, each offering unique flavors and delightful baking experiences. Click each link below to find the easy, printable recipe and expand your baking repertoire!
- Salted Caramel Mocha Sheet Cake: A coffee and caramel lover’s dream, perfect for feeding a crowd.
- Red Velvet Bundt Cake with Kahlua Ganache: A sophisticated twist on a classic, with a rich coffee liqueur ganache.
- Blueberry Swirl Pound Cake: A moist and dense pound cake with bursts of blueberry and a beautiful swirl.
- Brownie Cookie Dough Freak Cake: An over-the-top indulgence for those who can’t choose between brownies and cookies.
- Homemade Funfetti Cake: A cheerful and vibrant cake, perfect for birthdays and celebrations.
- Slow Cooker Carrot Cake: A surprisingly easy and incredibly moist carrot cake, made conveniently in your slow cooker.
- Lemon Pound Cake: A bright and zesty pound cake, perfect for springtime or a refreshing dessert.
- Best Yellow Cake Recipe: A foundational recipe for a classic, fluffy yellow cake that pairs well with any frosting.
- Spring Cake Roll: A light and airy cake roll, perfect for elegant gatherings.
If you adore this Zebra Cake recipe as much as we do, we’re confident you’ll love these other fantastic cake ideas too. Don’t miss out on more delicious inspiration – simply click each link below to find the easy, printable recipe and add more joy to your baking!
Check out this recipe
Check out this recipe
Check out this recipe
Check out this recipe
Check out this recipe
Even More Creative Cake Recipes to Explore
If you’re eager to continue your baking adventure, here are a few more delectable cake recipes that are sure to inspire and delight. Each offers a unique flavor profile and a rewarding baking experience.
- Peanut Butter Cupcakes: A dream come true for peanut butter enthusiasts, these cupcakes are rich and satisfying.
- Chocolate Raspberry Cake: A classic pairing of rich chocolate and tart raspberries, creating a sophisticated dessert.
- Rum Cake: A wonderfully moist and flavorful cake with a delightful hint of rum, perfect for special occasions.
- Easy Strawberry Cake: A light and refreshing cake bursting with fresh strawberry flavor, ideal for spring and summer.
If you cherish this incredible recipe for Zebra Cake as much as we do, please consider showing your support by writing a five-star review and helping us spread the word! Share this delightful creation with your friends and family on Facebook and Pinterest so more people can experience the magic of this stunning dessert!
CONNECT WITH YUMMI HAUS!
Be sure to follow us on our social media channels, so you never miss a post and stay updated with our latest delicious creations!
Substack, Facebook, Pinterest, Instagram, Email Subscription
Rate this Recipe
Zebra Cake with Cream Cheese Oreo Frosting
Ingredients
Cake
- 15.25 ounces white cake mix (1 box)
- 1 cup whole milk
- ½ cup vegetable oil
- 4 large egg whites
- ¼ cup unsweetened cocoa powder
Frosting
- 16 Oreo cookies
- 1 cup unsalted butter (softened)
- 8 ounces cream cheese (softened)
- 8 cups confectioner’s sugar (sifted)
- 6 tablespoons heavy cream
- 2 teaspoons vanilla extract
Mini Oreos for garnish
Instructions
Cake
-
Preheat the oven to 350°F.
-
Spray TWO 9-inch cake pans with cooking spray.
-
Add a circle of parchment paper to the bottom and spray the top with more cooking spray, set aside.
-
In a large bowl with an electric hand mixer, mix the cake mix, milk, oil, and egg whites for 30 seconds until it comes together. Mix on medium speed for 2 minutes.
-
Take half of the cake batter and put it into a medium-sized bowl.
-
To the remaining cake batter, add the cocoa powder and stir it in until just combined.
-
Working with both cake pans, add about ¼ cup of the white cake batter to the center of each pan.
-
Add about ¼ cup of the chocolate batter into the center of the white batter in each pan. Keep doing this until all of the batters are used up and the cakes should have an even amount of cake batter in each pan.
-
If you find the batter isn’t spreading you can tilt the baking pan until it fills out the bottom of the pan, this will not mess up the zebra design.
-
Bake for 22-25 minutes until a toothpick inserted into the center comes out clean. Let the cakes cool completely in the pans.
Frosting
-
While the cakes are cooling, make the frosting by placing the Oreos into a food processor and process into crumbs, set aside.
-
Place the softened butter and cream cheese into the bowl of a stand mixer with the paddle attachment, and cream together until smooth.
-
Add the confectioner’s sugar a little at a time until fully combined, and scrape down the sides as needed.
-
Add the heavy cream and vanilla, and stir it in until combined.
-
Place the mixer on medium-high speed and whip for 3 minutes until light and fluffy.
-
Add the cookie crumbs and stir them in until combined. I like to then use a spatula to mix it a little more by hand to make sure the cookie crumbs are evenly distributed.
-
Cut any doming off the cakes so the tops are flat.
-
Place one of the cakes – bottom side down – onto your serving platter or cake plate.
-
Add about 1 cup of the frosting on top and smooth it out to the edge.
-
Place the second cake – top side down – onto the frosting.
-
Add a thin layer of frosting over the whole cake for the crumb coat.
-
Place it in the fridge for 1-2 hours to set up.
-
Add another layer of frosting around the whole cake.
-
Take any remaining frosting and decorate the cake as you wish, and add mini Oreos if desired. Cut and serve immediately.
Notes
- Flavor-wise the star of this cake is the cookies and cream frosting. The cake itself is moist and flavorful with a subtle chocolate flavor. The frosting is very rich and addictive! You can really taste the Oreo and the cream cheese in the frosting.
- If you are making this ahead of time, I would not add the cookie crumbs into the frosting until you are ready to assemble the cake. If you add them too soon, they will soften in the frosting and will end up combining with the frosting completely making it look grey instead of speckled as shown.
- If you don’t want to make the frosting these are other good options: vanilla buttercream, chocolate buttercream, plain cream cheese frosting, peanut butter frosting, caramel frosting, pretty much any frosting you like since the real wow factor of the cake is when you cut it to see the pretty zebra design inside.
- Some other fun toppings instead of mini Oreos, more crushed Oreos, chocolate sprinkles, chocolate shavings, or a melted chocolate drip.
- The frosting recipe makes enough to generously frost the cake plus decorating it. If you do not plan on decorating it and just want to frost the cake completely, you can use half of the recipe for the frosting.
- This cake needs to be refrigerated since it has dairy in the frosting. It is best served at room temperature and it is safe to sit out to come to room temperature to enjoy it then place it back in the fridge. Keeps in the fridge for up to 7 days, freeze for up to 3 months.
- Take this basic concept and use it with other colors and cake flavors!
Nutrition
Nutritional information for the recipe is provided as a courtesy and is approximate. Please double-check with your own dietary calculator for the best accuracy. We at Yummi Haus cannot guarantee the accuracy of the nutritional information given for any recipe on this site.