
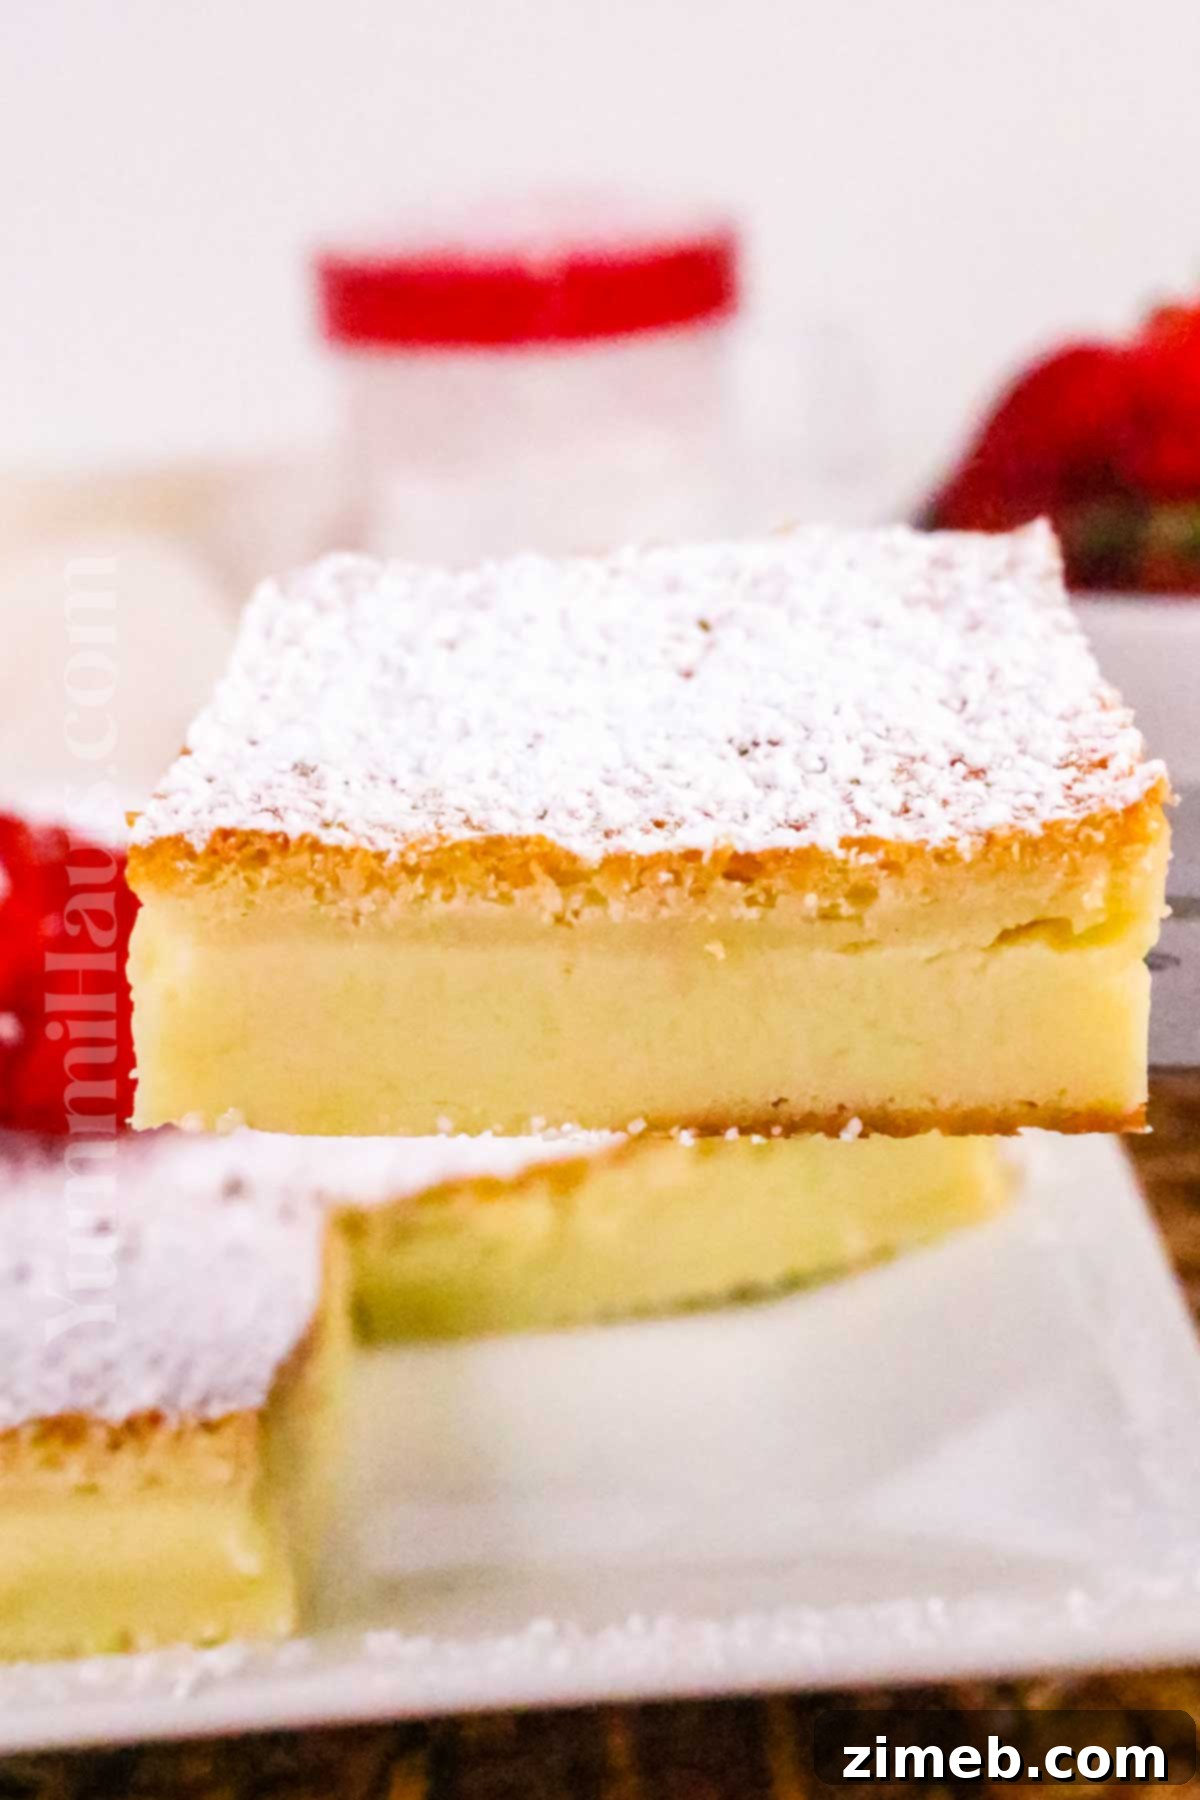
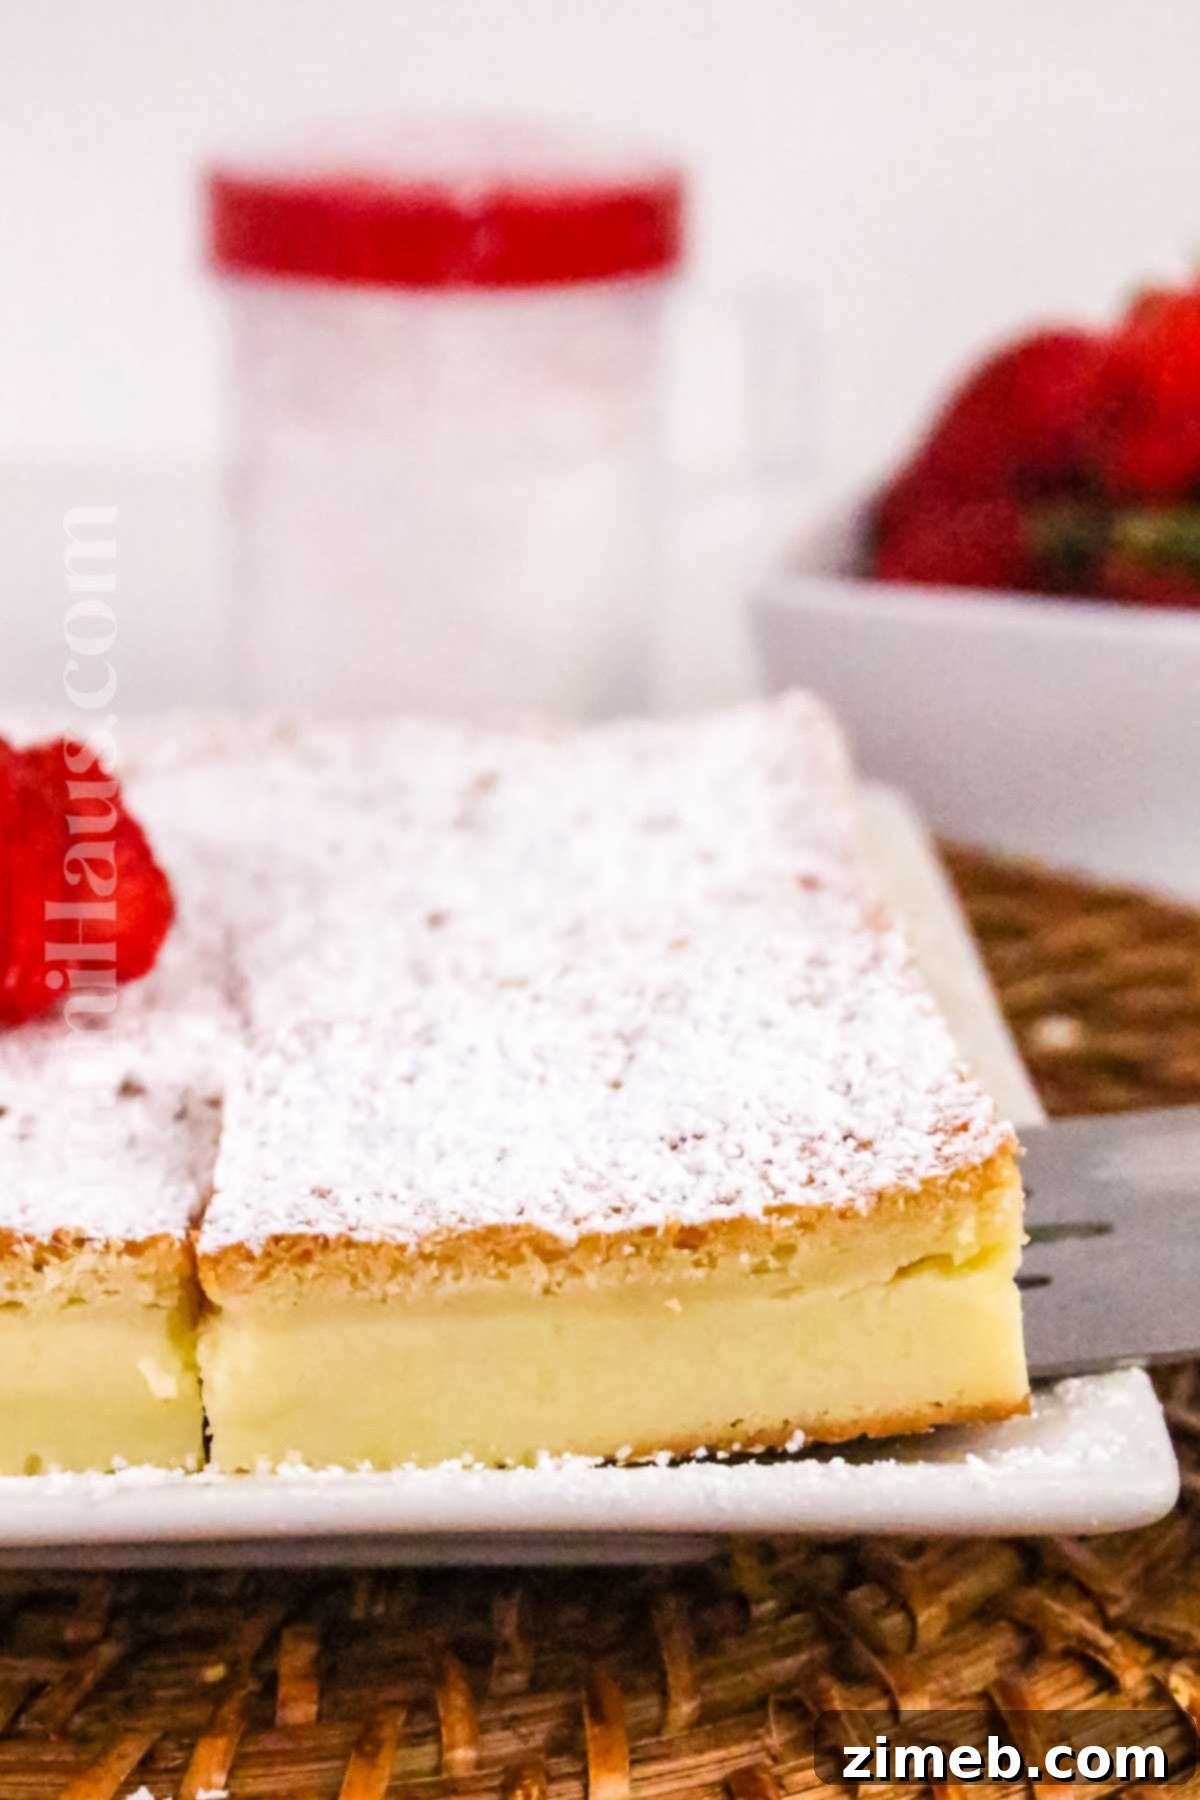
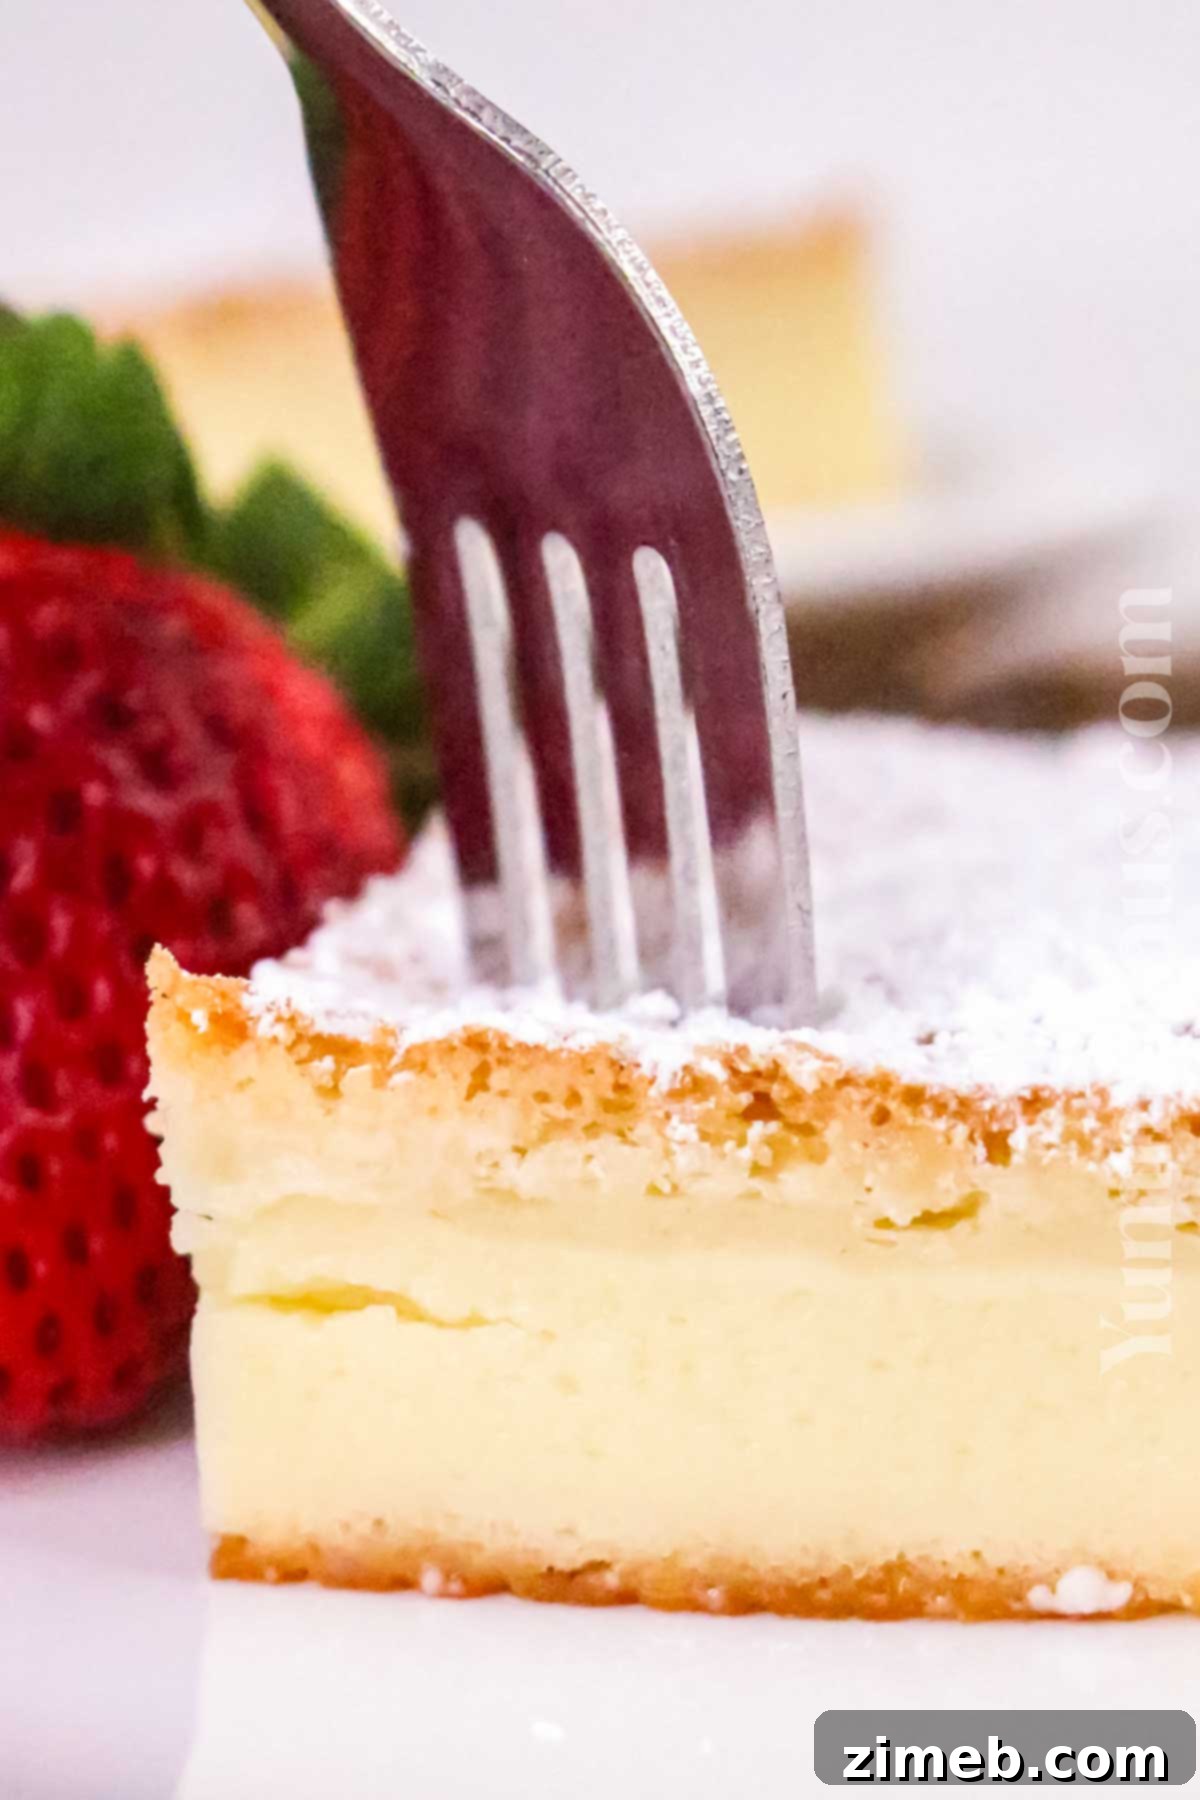
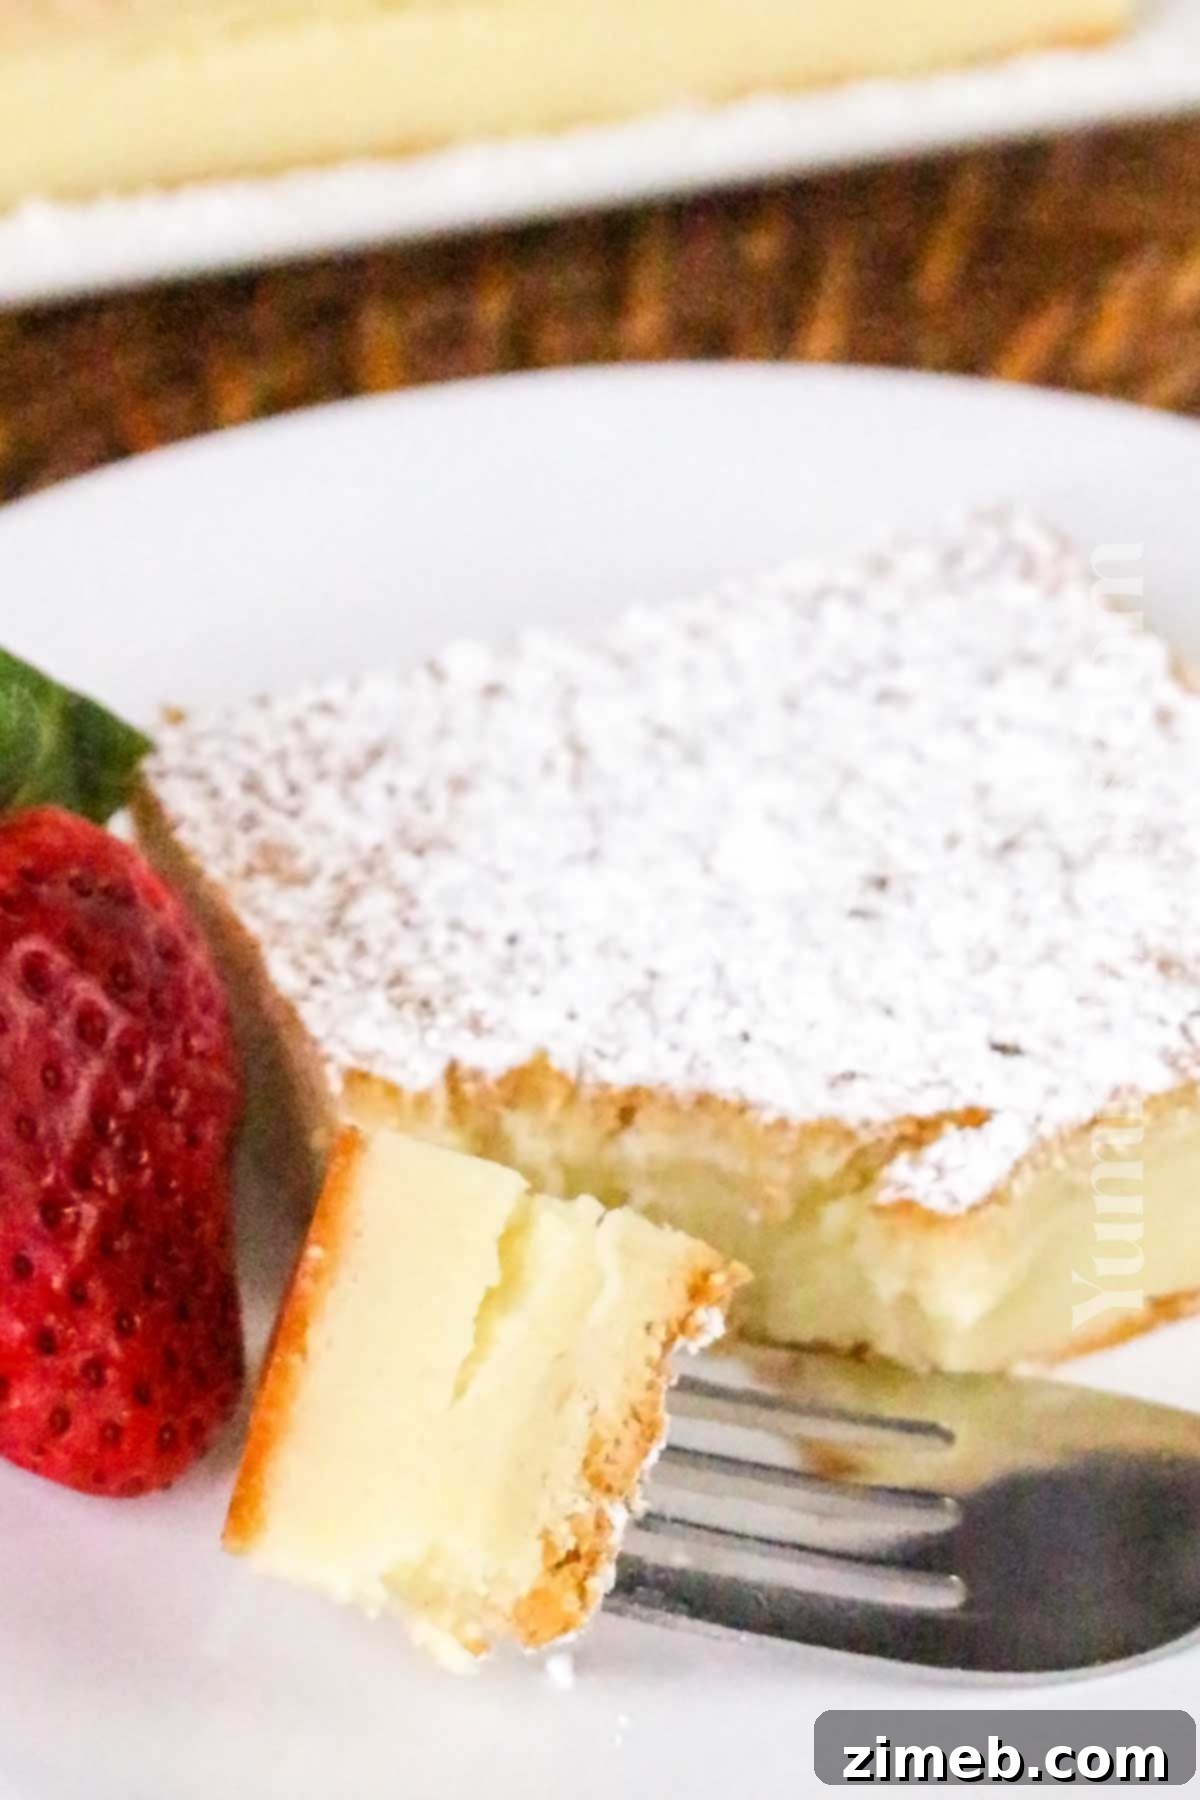
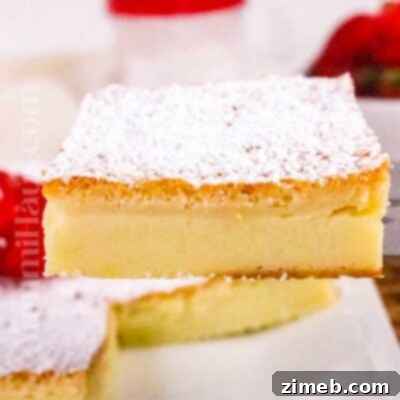
Indulge in the extraordinary delight of a homemade **Magic Custard Cake**, a dessert so enchanting it creates three distinct layers from a single, simple batter. This elegant treat, crafted with just six core ingredients, features a smooth vanilla custard at its base, a tender, baked cake layer in the middle, and a delicate, golden crust on top. Each slice offers a symphony of textures and flavors that will captivate any dessert lover.
You might gaze at the photos and wonder how such a marvelously layered cake could possibly emerge from one initial mixture. But trust the process – the magic truly happens in the oven. Through a slow baking technique, the batter miraculously separates into these beautiful, defined layers, justifying its well-deserved nickname: the “Magic Custard Cake.” It’s a testament to simple ingredients working in harmony to create something truly spectacular.
Discover the Magic: Recipe Rundown
Texture: A delightful interplay of textures, starting with a tender, vanilla-infused cake layer, transitioning to a luxurious, flan-like custard center, and crowned with a light, golden crust. It’s a melt-in-your-mouth experience that surprises and delights with every forkful.
Taste: Elegantly smooth and not excessively sweet, this cake offers a rich, buttery profile complemented by a gentle whisper of pure vanilla. It’s a sophisticated flavor that appeals to both adults and children alike.
Ease: Remarkably easy to prepare, this custard cake recipe is a one-pan wonder. No complicated layering, no elaborate decorating – just simple mixing and baking for a stunning result.
Why We Adore It: This recipe is an absolute dream for anyone who appreciates the rich, creamy goodness of custard. It’s a unique take on classic custard, presented in a cake form that’s both impressive and comforting.
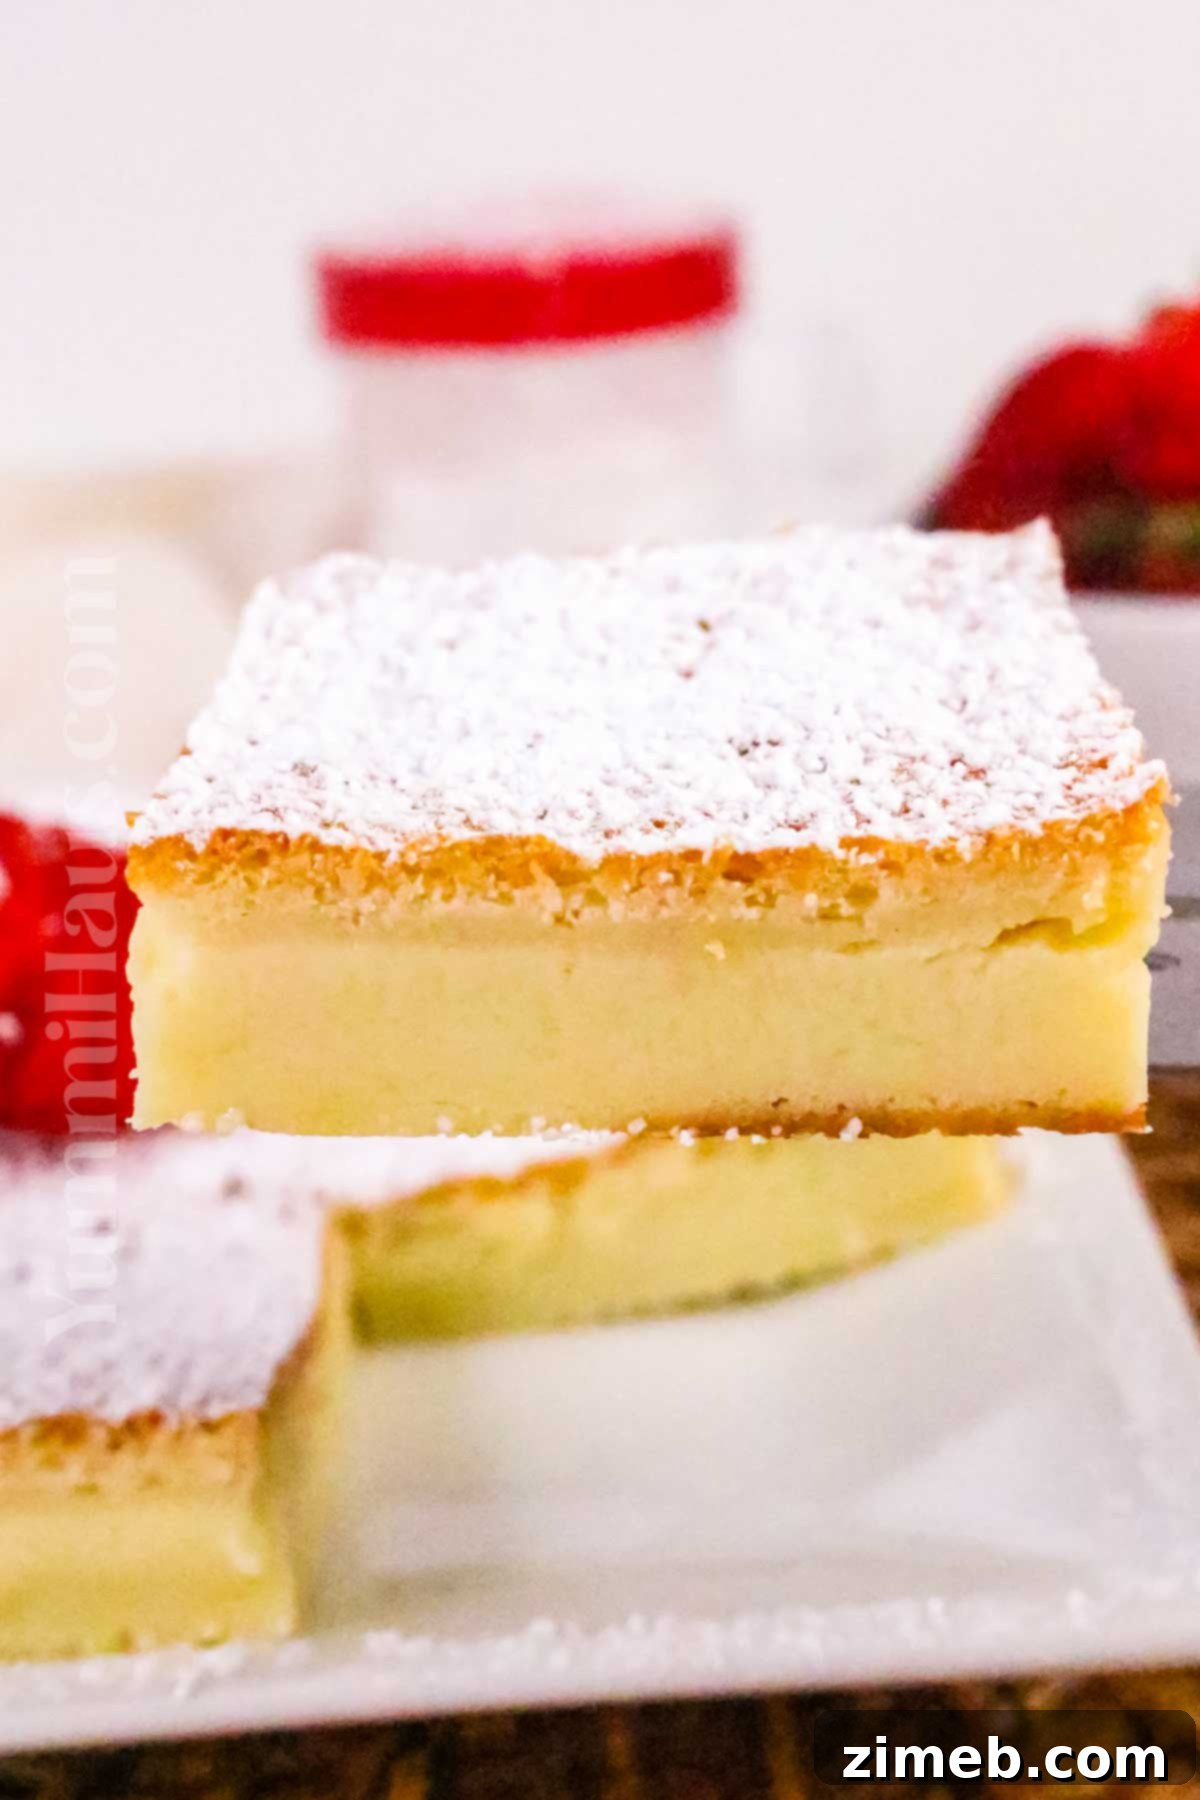
For truly exceptional results with your Magic Custard Cake, a key tip from our kitchen is to incorporate the egg whites. While many custard recipes might overlook them, beating the egg whites until stiff peaks form and then gently folding them back into the batter is the secret to achieving that wonderfully light and fluffy cake layer on top. This crucial step elevates the cake from merely good to absolutely magical.
If you’re a true devotee of custard, you’ll be thrilled to explore more of our favorite custard-infused creations! Dive into refreshing frozen desserts with custard, savor the classic comfort of this Banana Cream Pie, or indulge in the decadent Croissant French Toast, lovingly soaked in a rich custard.
Why This Magic Custard Cake Will Become Your New Favorite
There are countless reasons to fall in love with this unique and delicious custard cake. It’s more than just a dessert; it’s an experience that brings a touch of magic to your table. Here’s why you’ll find yourself reaching for this recipe again and again:
- Perfect for Any Occasion: Whether you’re celebrating a special milestone, hosting a dinner party, or simply craving a delightful treat on a lazy weekend afternoon, this cake fits the bill perfectly. Its elegant appearance belies its simple preparation, making it suitable for both casual and formal settings.
- Effortless Preparation: Forget complex baking techniques or intricate layering. This recipe is designed for ease. You’ll simply mix the ingredients in stages, pour the batter into a single pan, and let the oven do its wonder. It’s an ideal recipe for beginner bakers and seasoned pros looking for a fuss-free dessert.
- Visually Stunning & Intriguing Textures: While the initial batter might appear homogenous, the transformation in the oven is truly captivating. The final result is a beautiful cake showcasing three distinct layers: a dense cake base, a creamy, flan-like custard middle, and a light, airy top crust. Each layer offers a unique textural experience, combined with subtle, sweet vanilla flavors that are simply irresistible.
- Budget-Friendly Ingredients: You don’t need exotic or expensive items to create this masterpiece. All the required ingredients are common pantry staples, making this an economical choice. Chances are, you already have everything you need in your kitchen, making spontaneous baking sessions entirely possible.
- A True Conversation Starter: The “magic” behind this cake often sparks curiosity and conversation among guests. Explaining how one batter yields three layers is always a fun part of serving this dessert!
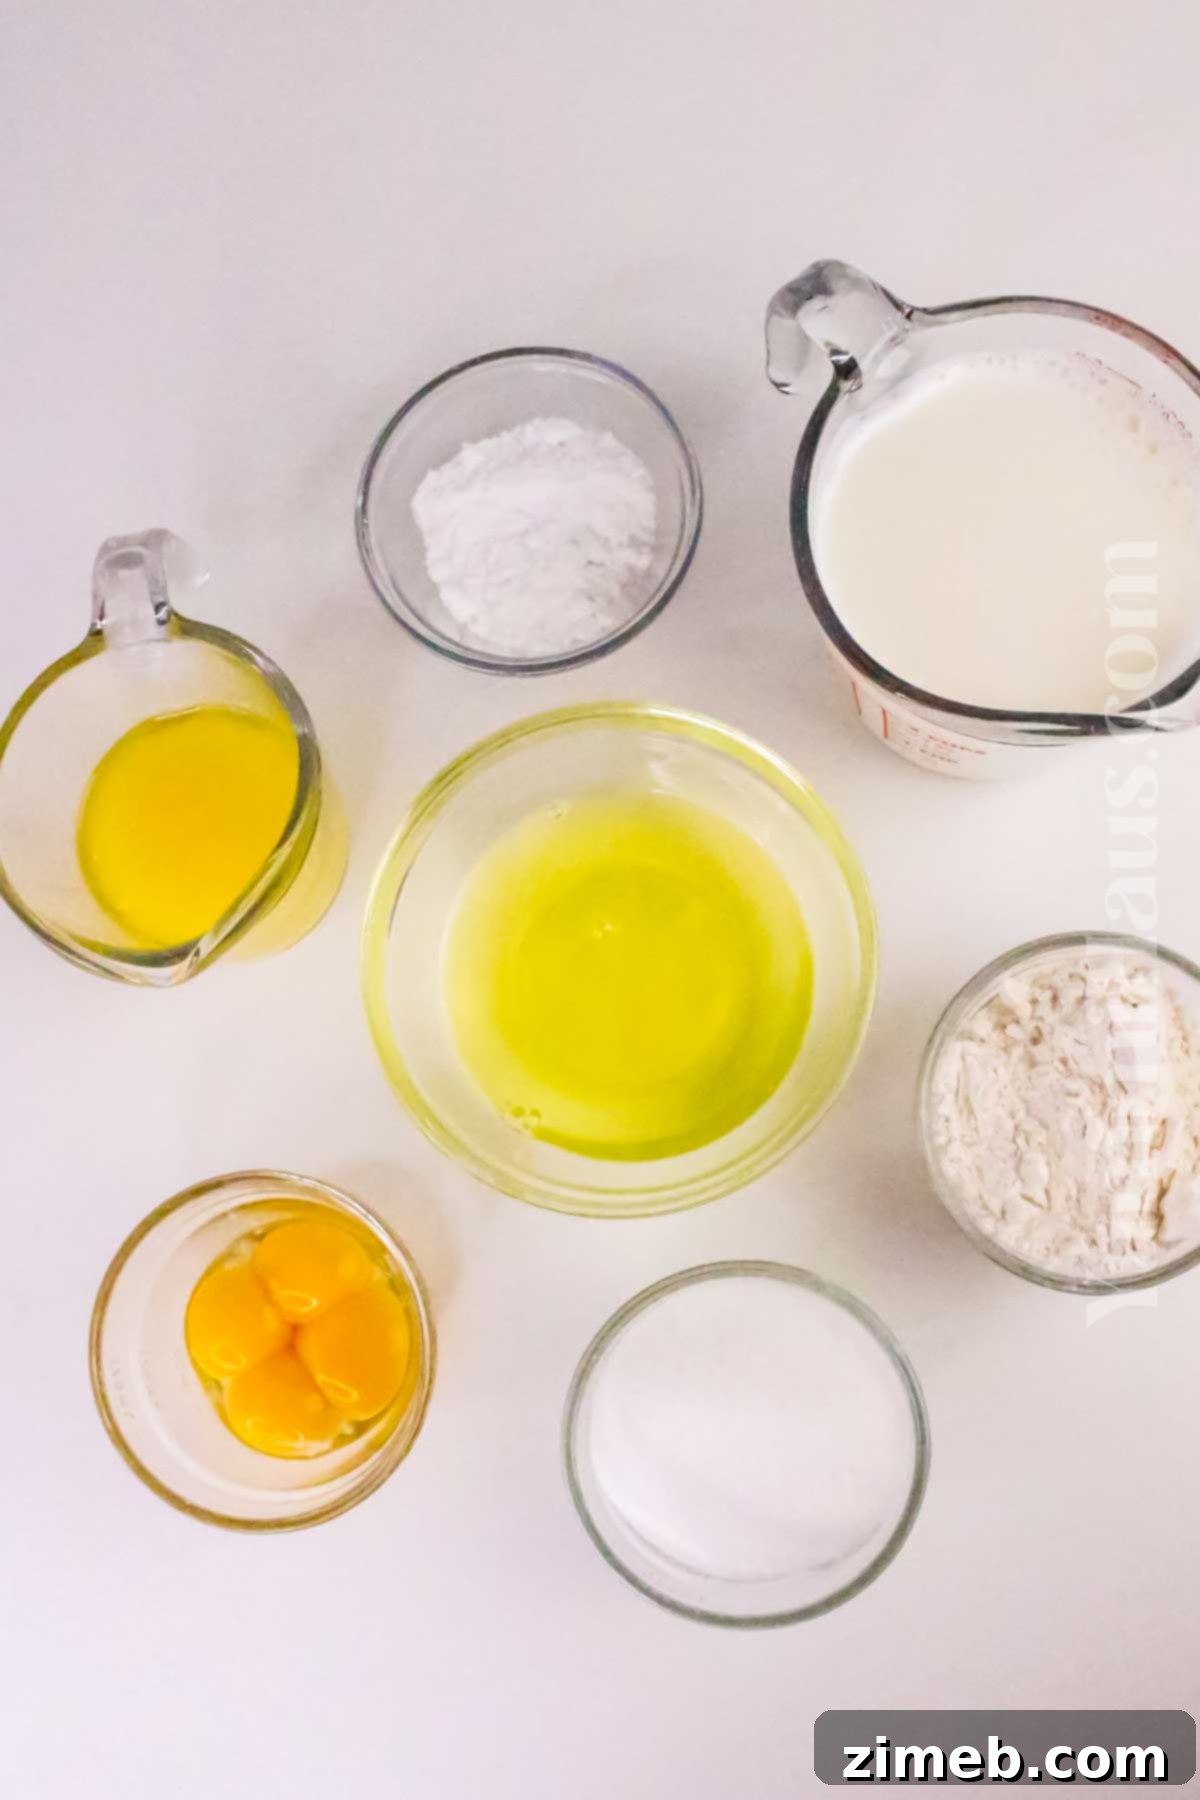
Essential Ingredients for Your Magic Custard Cake
Creating this delightful three-layer vanilla custard cake requires a handful of everyday ingredients. While simple, the quality and preparation of each component play a vital role in achieving the perfect texture and flavor. You’ll find the exact quantities in the recipe card located at the bottom of this page, but here’s a closer look at what makes this cake so special:
- Eggs: You will need to carefully separate the egg yolks from the egg whites. The egg yolks are fundamental to the rich, creamy consistency of the custard layer, so ensure you use fresh, high-quality eggs. It’s also crucial for the eggs to be at room temperature; this helps them emulsify better with other ingredients, leading to a smoother, more uniform batter.
- Granulated Sugar: This provides the perfect level of sweetness, balancing the richness of the custard without being overpowering. It also aids in creating the structural integrity of the cake.
- Unsalted Butter: Melted and then slightly cooled, unsalted butter contributes significantly to the cake’s luxurious, buttery flavor and tender texture. Using unsalted butter allows you to control the overall saltiness of the dessert.
- Vanilla Extract or Vanilla Bean Paste: For an authentic and exquisite vanilla flavor, always opt for pure vanilla extract or high-quality vanilla bean paste. Artificial vanilla simply won’t yield the same depth of taste that makes this cake truly shine.
- All-Purpose Flour: This is what gives the cake its structure, particularly the fluffy layer that forms on top. Interestingly, for this specific recipe, you won’t need any additional baking powder or salt, as the magic relies on the careful balance of other ingredients. Gluten-free flour blends or cake flour can also be used, though results may vary slightly.
- Warm Milk: Full-fat (whole milk) or 2% milk is highly recommended for the richest, creamiest custard. Dairy-free alternatives may not provide the same decadent results due to differences in fat content and protein structure. The milk should be lukewarm (ideally between 98-105°F / 37-40°C), but never boiling or hot. Extremely hot milk can inadvertently cook the eggs, ruining the delicate texture of your custard.
- Confectioner’s Sugar (Powdered Sugar): A simple dusting of this fine sugar before serving adds an elegant finish and a touch of extra sweetness.
Essential Kitchen Equipment
You won’t need an arsenal of specialized gadgets for this recipe, but having a few key tools on hand will make the baking process smooth and enjoyable:
- 8×8-inch Baking Dish or Cake Tin: This size is ideal for achieving the perfect layer separation. Make sure to grease it thoroughly or line it with parchment paper for easy removal.
- A Stand Mixer or Electric Mixer: Essential for beating the egg yolks until creamy and, more importantly, for whipping the egg whites to stiff peaks, which is crucial for the cake’s structure. You’ll also need a spacious mixing bowl to accommodate the batter.
How to Make Magic Custard Cake: A Step-by-Step Guide
Creating this captivating three-layer dessert is simpler than you might imagine. Follow these steps carefully to unlock the magic and enjoy a perfectly baked vanilla custard cake.
Step 1: Prepare Your Workspace and Custard Base
Begin by preheating your oven to 325°F (160°C). This ensures a consistent baking temperature from the moment your cake enters the oven. Prepare an 8×8-inch baking dish by greasing it well, or line it with parchment paper to prevent sticking and ensure easy removal later. Set it aside.
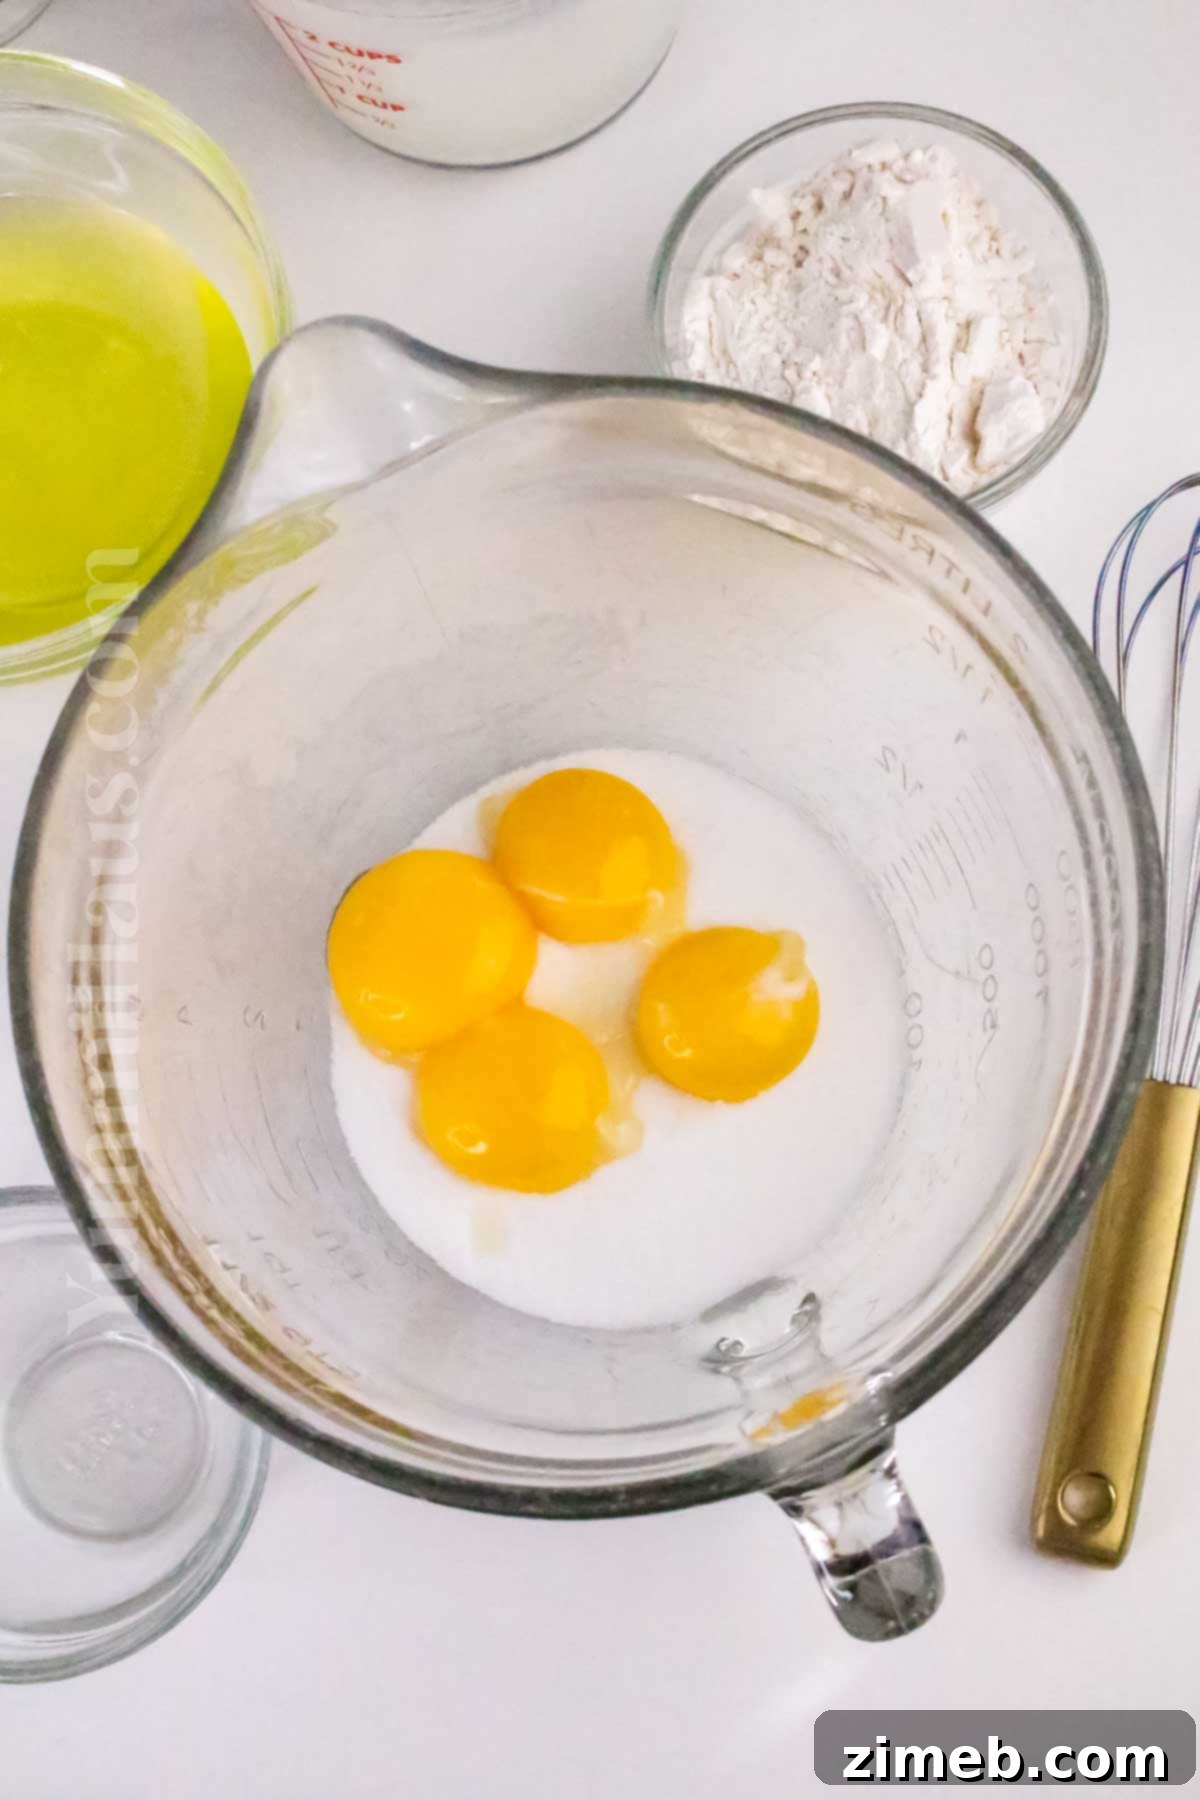
Carefully separate the egg yolks from the whites, placing the yolks in a large mixing bowl and the whites in a separate, smaller, very clean bowl (free from any grease). Gently warm your milk until it is lukewarm, being careful not to let it boil. In a separate small saucepan or microwave-safe bowl, melt the unsalted butter and allow it to cool slightly while you proceed with the next steps.
In the bowl with the egg yolks, add the granulated sugar. Using a stand mixer or an electric hand mixer, beat the egg yolks and sugar together on medium-high speed until the mixture becomes pale in color and has a creamy, thick consistency. This step is crucial for incorporating air and dissolving the sugar, which contributes to the custard’s smooth texture.
Once the egg yolk mixture is pale and creamy, pour in the slightly cooled melted butter and the pure vanilla extract. Continue to stir on low speed or whisk by hand until all ingredients are thoroughly combined and the mixture is smooth and fragrant.
Step 2: Create the Unique Cake Batter
Gradually add the all-purpose flour to the egg yolk, sugar, butter, and vanilla mixture. Mix on low speed or fold gently with a spatula until the flour is just combined. Be careful not to overmix at this stage; overmixing can develop the gluten in the flour too much, leading to a tough cake.
Next, slowly whisk in the warm milk. Continue whisking until the batter is thin, completely smooth, and uniform. The batter will appear quite liquidy at this point, which is exactly what you want for the magic to happen.
Now, turn your attention to the egg whites. Using a clean stand mixer bowl or another clean bowl with an electric hand mixer, beat the egg whites on high speed until stiff peaks form. The egg whites should be glossy and hold their shape when the beaters are lifted. This incorporation of air is vital for the top cake layer.
Gently fold the whipped egg whites into the thin batter in three separate additions. The key here is gentleness; you want to preserve as much air as possible in the egg whites. Use a rubber spatula to carefully incorporate them, lifting the batter from the bottom of the bowl over the egg whites until just combined. Do not deflate them.
Step 3: Bake and Cool to Perfection
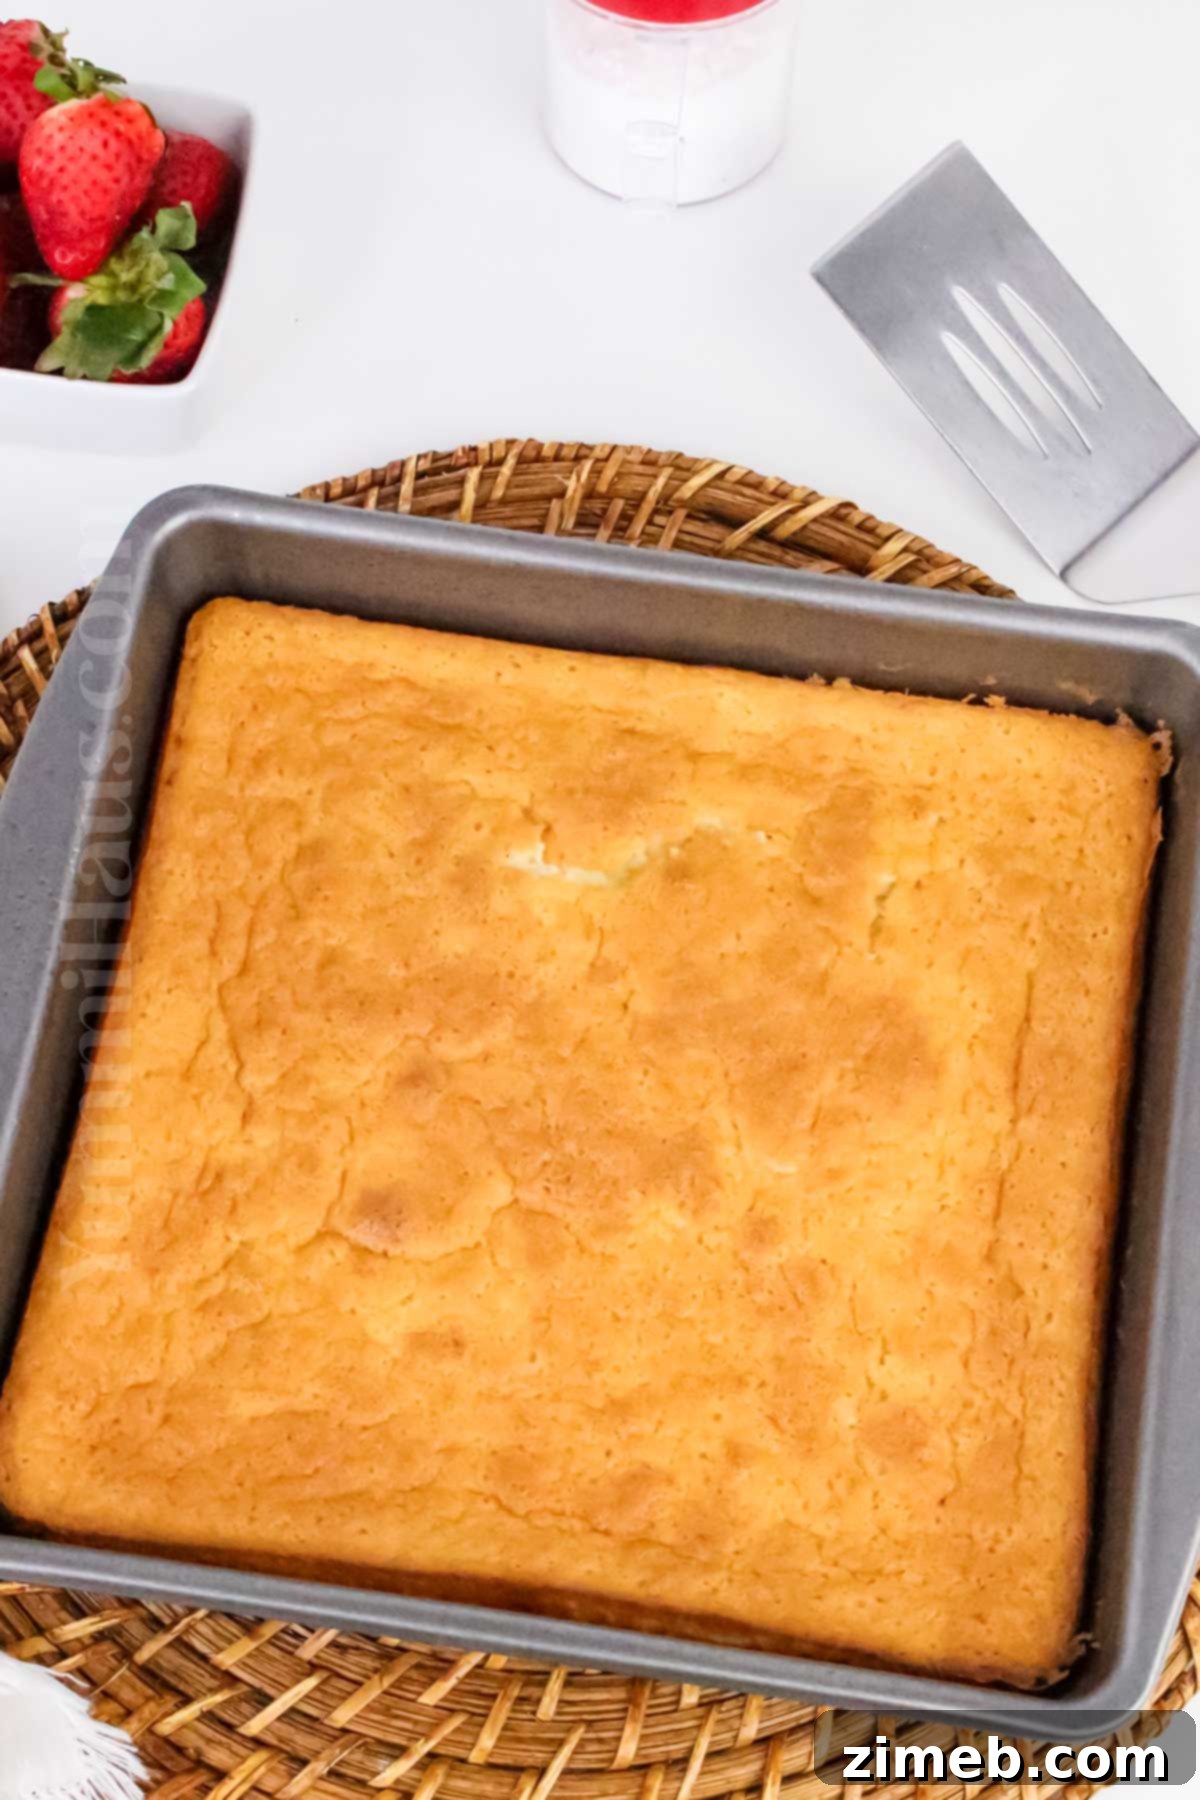
Carefully pour the now slightly thicker, yet still pourable, batter into your prepared 8×8-inch baking dish. The batter might look lumpy or separated, but this is completely normal and part of the magic!
Place the baking dish on the middle rack of your preheated oven. Bake for approximately 50-55 minutes, or until the top of the cake is beautifully golden brown and set. The center of the cake may still have a slight jiggly consistency when gently shaken; this indicates the custard layer is perfectly tender and not overbaked, so don’t worry if it’s not completely firm.
Once baked, remove the cake from the oven and place it on a wire rack to cool completely at room temperature. This cooling process is important for the layers to fully set. After it has cooled to room temperature, transfer the cake to the refrigerator for at least 2 hours, or ideally overnight, before slicing. Chilling allows the custard layer to firm up beautifully and enhances the overall flavor and texture. In fact, many find this cake tastes even better the next day!
Before serving, generously dust the entire surface of the finished cake with confectioner’s sugar. For an extra touch of indulgence, serve your Magic Custard Cake with fresh berries, a scoop of vanilla ice cream, or a dollop of freshly whipped cream. Enjoy!
Storage and Make-Ahead Tips
Proper storage ensures your Magic Custard Cake remains delicious for days, while make-ahead options offer convenience for entertaining:
Storage: Any leftover custard cake should be stored in an airtight container in the refrigerator. It will maintain its exquisite taste and texture for up to 3 days. For the best flavor and creamy consistency, allow the cake to come to room temperature for about 15-20 minutes before serving.
Make Ahead: This cake is an excellent make-ahead dessert. Simply bake it according to the instructions, allow it to cool completely, and then refrigerate it overnight. This extended chilling time actually improves the texture and allows the flavors to meld beautifully, making it taste even more delicious the following day.
Freezing: Unfortunately, this delicate custard cake does not freeze well. The custard layer tends to change texture when thawed, losing its signature creaminess. It’s best enjoyed fresh within a few days of baking.
Delicious Substitutions & Creative Variations
While the classic vanilla Magic Custard Cake is undeniably divine, this versatile recipe can be easily adapted to suit your taste preferences or to introduce new exciting flavors. Don’t hesitate to get creative with these delicious variations:
- Add Fresh Berries or Nuts: For a burst of freshness and added texture, consider folding a cup of fresh blueberries into the cake batter before baking. The vanilla flavor beautifully complements juicy berries. Alternatively, you can decorate the cooled cake with fresh strawberries, raspberries, or a sprinkle of crushed nuts (like almonds, pecans, or walnuts) for an elegant presentation and satisfying crunch.
- Caramel Custard Cake: Transform your cake into a rich caramel delight by topping it with a homemade caramel glaze instead of confectioner’s sugar. To make a simple caramel glaze, gently heat granulated sugar in a saucepan over medium heat, stirring occasionally until it melts into a golden-amber liquid. Drizzle this warm caramel over the cooled cake for an irresistible finish.
- Almond or Coconut Infusion: Swap the vanilla extract for a teaspoon of almond extract to give the cake a lovely nutty aroma and flavor. For a tropical twist, you could also try using a combination of vanilla and a touch of coconut extract, or even use coconut milk (full-fat canned) in place of regular milk for a creamier, coconut-infused custard layer.
- Chocolate Magic Custard Cake: If chocolate is more your style, this cake can easily be made into a rich chocolate version. Simply sift in 1/4 to 1/2 cup of unsweetened cocoa powder along with the all-purpose flour. To deepen the chocolate flavor, you can also add a tablespoon of strong brewed coffee or espresso powder to the custard mixture.
- Zesty Lemon or Orange Custard Cake: Brighten up your cake with a refreshing citrus twist. Incorporate 1-2 tablespoons of fresh lemon juice and a teaspoon of lemon zest into the cake batter. You can experiment with other citrus fruits as well, such as orange zest and a splash of orange juice, for a fragrant and vibrant dessert.
- Classic Layer Cake Approach: For those who prefer distinct, more pronounced layers, you can adapt this concept. Bake your favorite sponge cake or chiffon cake as a bottom layer. Once cooled, prepare a traditional homemade custard filling (which often includes cornstarch for a firmer set) and spread it over the cake. You can even use milk-soaked cookies or ladyfingers as a quick and easy bottom layer for a no-bake variation.
Expert Tips for the Best Magic Custard Cake
Achieving the perfect Magic Custard Cake is all about understanding a few key techniques and avoiding common pitfalls. These expert tips will help you bake a flawless and delicious dessert every time:
- For a Thicker Custard (Optional): While our recipe yields a custard with a perfect, delicate consistency, some prefer a slightly firmer, more pastry-cream-like texture. If you desire this, you can add 1-2 tablespoons of cornstarch along with the flour. This will help thicken the custard layer, giving it a consistency closer to a vanilla pastry cream.
- Easy Cake Removal: To ensure your beautiful cake comes out of the pan cleanly, run a thin butter knife or offset spatula carefully along all edges of the cooled cake before attempting to invert or lift it. This helps release any sections that might have stuck to the pan.
- Consider a Water Bath: For an exceptionally creamy and uniformly baked custard layer, you can optionally bake the cake using the water bath method (bain-marie). Place your baking dish inside a larger roasting pan, then fill the roasting pan with about an inch of hot water before placing it in the oven. This creates a moist environment that prevents cracking and ensures gentle, even cooking.
- Avoid Custard Packets: For the best flavor and texture, always make your custard from scratch using fresh ingredients. Pre-made custard packets or custard powder often contain artificial flavors and thickeners that can result in an inferior taste and a powdery mouthfeel in your finished cake.
- Don’t Overbeat the Batter: After adding the flour and then the warm milk, mix only until just combined and smooth. Similarly, when folding in the whipped egg whites, be gentle and stop as soon as they are incorporated. Overmixing can deflate the egg whites, leading to a less airy top layer, and over-developing gluten can make the cake tough. A slightly lumpy appearance before baking is perfectly acceptable.
- Patience is Key for Setting: This is perhaps the most crucial tip! Do not attempt to remove or slice the cake until it has completely cooled to room temperature and then chilled thoroughly in the refrigerator for at least 2 hours (or preferably overnight). The custard layer needs this time to fully set and firm up. Rushing this step will result in a messy, broken cake.
- Monitor Baking Time: Oven temperatures can vary significantly. The cooking time provided is an estimate. Keep a close eye on your cake towards the end of the baking time. The top should be golden, and while the center might still have a slight wobble, it shouldn’t be liquid. Overbaking can dry out the cake and toughen the custard.
If you adored creating and tasting this easy and magical custard cake, you’re sure to fall in love with these other delightful dessert recipes. Click each link below to explore the simple, printable recipes and discover more sweet treats!
Check out this recipe
Check out this recipe
Check out this recipe
Check out this recipe
Check out this recipe
More Great Vanilla Desserts You’ll Love
If the pure, comforting taste of vanilla is what you crave, explore these other fantastic recipes that celebrate this timeless flavor:
Homemade Vanilla Wafers
Classic Vanilla Cookies
Best Bakery-Style Vanilla Cupcakes
Rich Vanilla Bean Ice Cream
CONNECT WITH YUMMI HAUS!
Be sure to follow me on my social media, so you never miss a post!
Substack, Facebook, Pinterest, Instagram, Email Subscription
Rate this Recipe
Magic Custard Cake
Ingredients
- 4 large eggs separated
- ¾ cup granulated sugar
- ½ cup butter melted and slightly cooled – unsalted
- 1 teaspoon vanilla extract
- ¾ cup all-purpose flour
- 2 cups warm milk whole or 2%
For Dusting
- Confectioner’s sugar
Instructions
- Preheat the oven to 325°F (160°C).
- Grease an 8×8-inch baking dish and set aside.
- Beat the egg yolks and sugar in a large mixing bowl until pale and creamy.
- Stir in melted butter and vanilla until smooth.
- Mix in the flour until just combined.
- Slowly whisk in the warm milk until the batter is thin and smooth.
- Beat egg whites in a separate small bowl until stiff peaks form.
- Gently fold the whipped egg whites into the batter in three additions, keeping as much air as possible. You don’t want to deflate them.
- Pour batter into the prepared baking dish.
- Bake for 50–55 minutes, or until the top is golden and set.
- Remove and cool completely on a wire rack at room temperature. Then refrigerate for at least 2 hours before slicing.
- Dust with confectioner’s sugar before serving.
Nutrition
|
Calories: 256kcal
|
Carbohydrates: 27g
|
Protein: 6g
|
Fat: 14g
|
Saturated Fat: 6g
|
Cholesterol: 31mg
|
Sodium: 104mg
|
Potassium: 15mg
|
Fiber: 0.3g
|
Sugar: 19g
|
Calcium: 2mg
|
Iron: 0.5mg
|
Net Carbohydrates: 24g
Nutritional information for the recipe is provided as a courtesy and is approximate. Please double-check with your own dietary calculator for the best accuracy. We at Yummi Haus cannot guarantee the accuracy of the nutritional information given for any recipe on this site.