
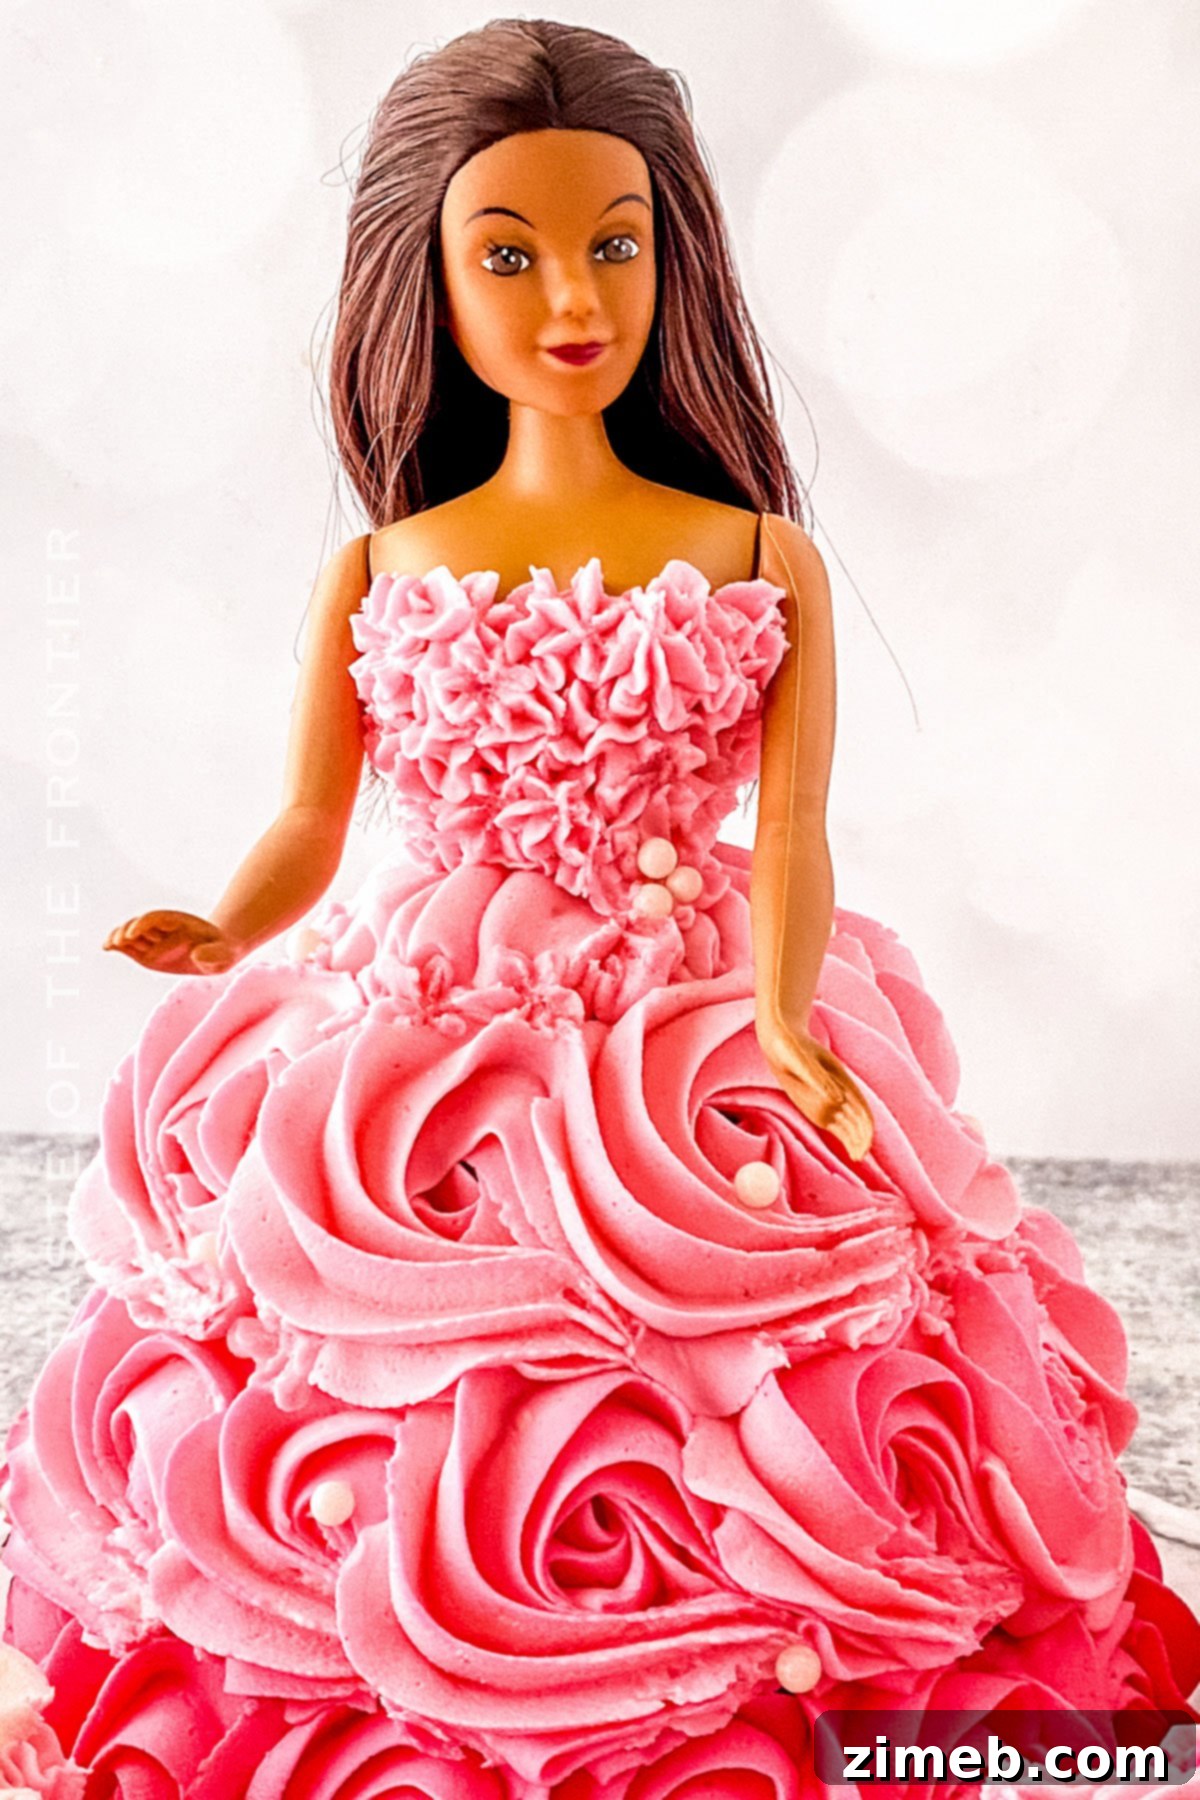
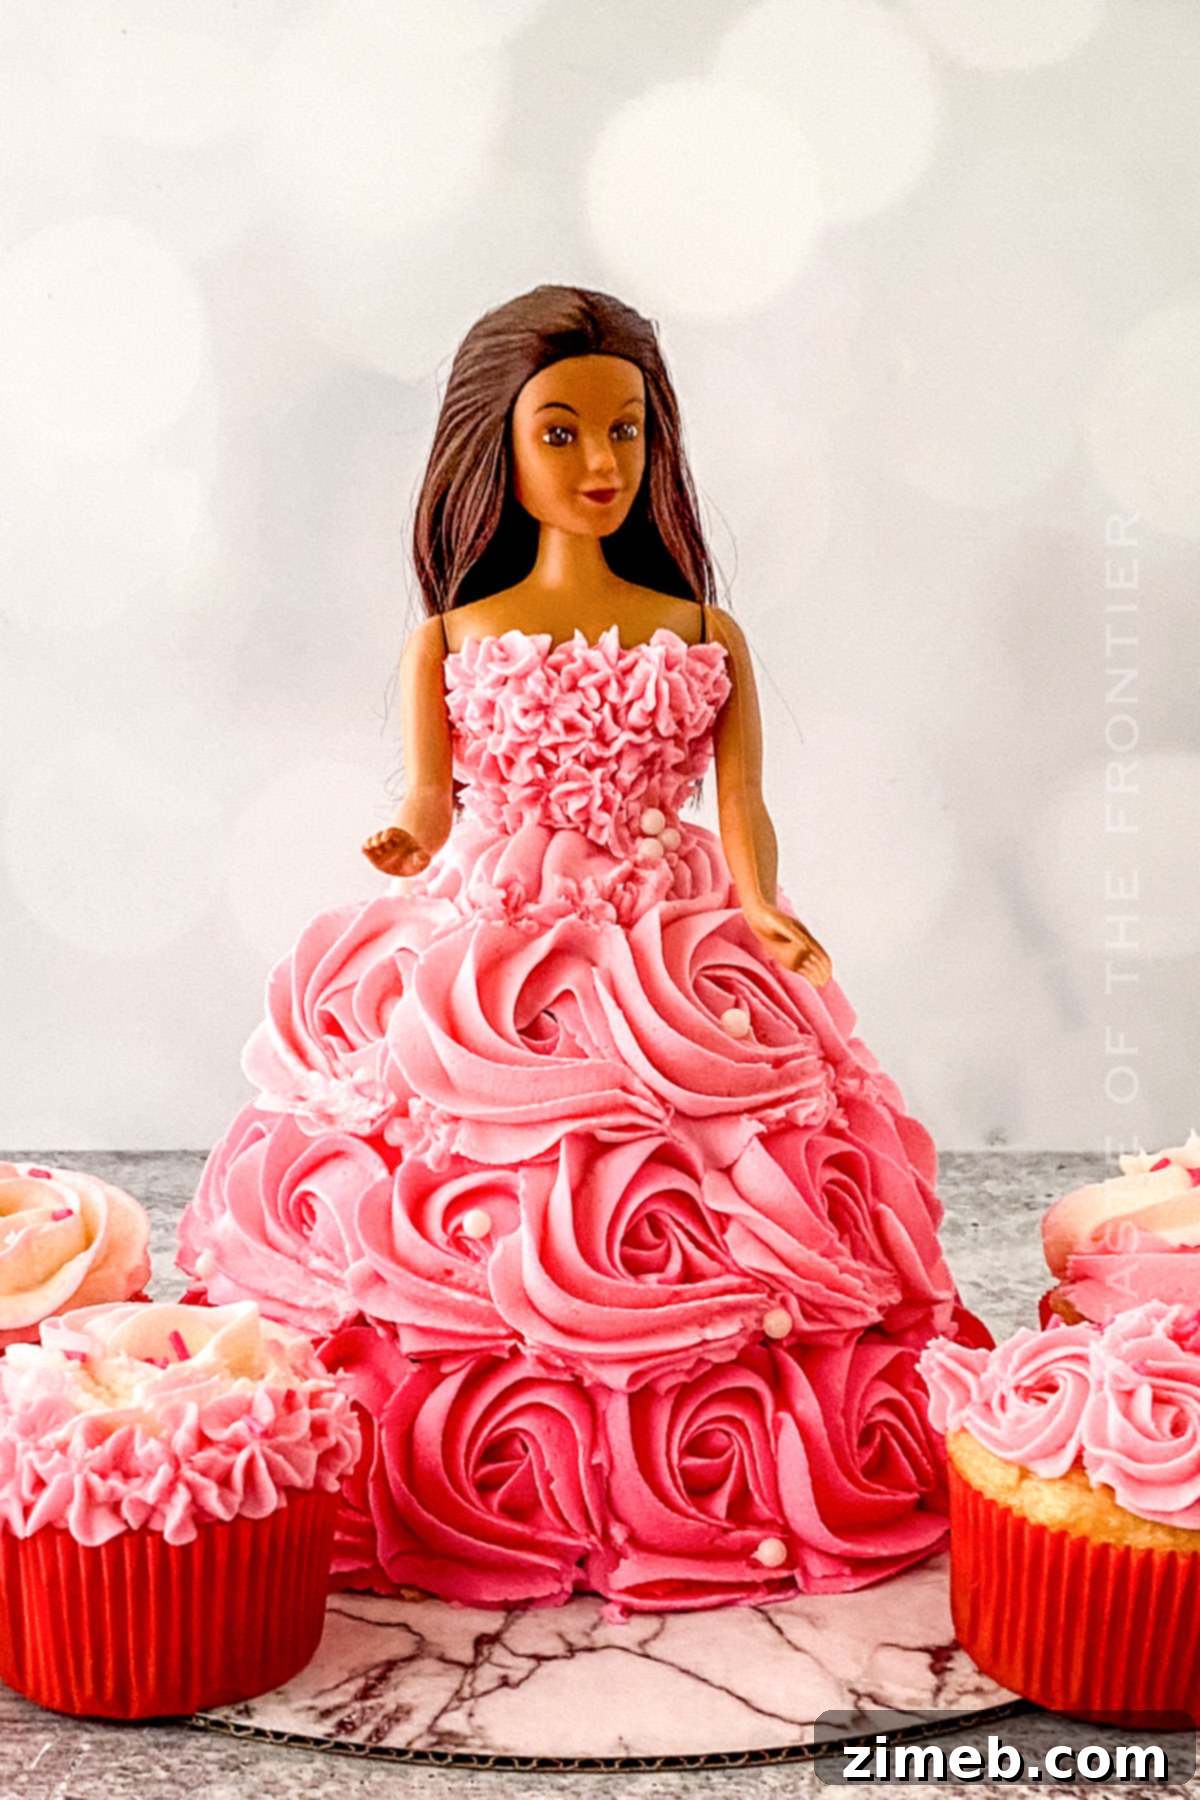
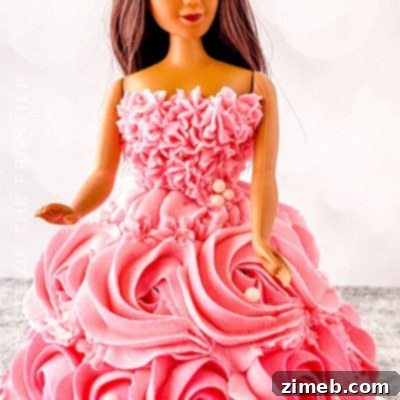
Just like the classic doll cakes you cherished from childhood, this captivating Barbie Cake Design is the ultimate centerpiece for any Barbie-themed birthday celebration or special event. Prepare to embark on a delightful baking journey that combines nostalgic charm with delectable flavors, culminating in a show-stopping edible masterpiece.
Step into the enchanting world of doll cake designs, where imagination takes edible form! Today, we’re focusing on the timeless and iconic Barbie Cake – a creation guaranteed to bring immense joy to any little girl (or even grown-up Barbie enthusiast!). Picture the sheer delight on a child’s face as her favorite doll is magically transformed into a glamorous gown, crafted from layers of fluffy cake and adorned with vibrant, artful frosting. This isn’t just a cake; it’s a dream come true, a centerpiece that will spark wonder and create cherished memories for years to come. Whether you’re planning an elaborate birthday bash, a special milestone celebration, or simply want to add a sprinkle of fairy tale magic to an ordinary day, this exquisite Barbie Cake is an impeccable choice for the young princess in your life.
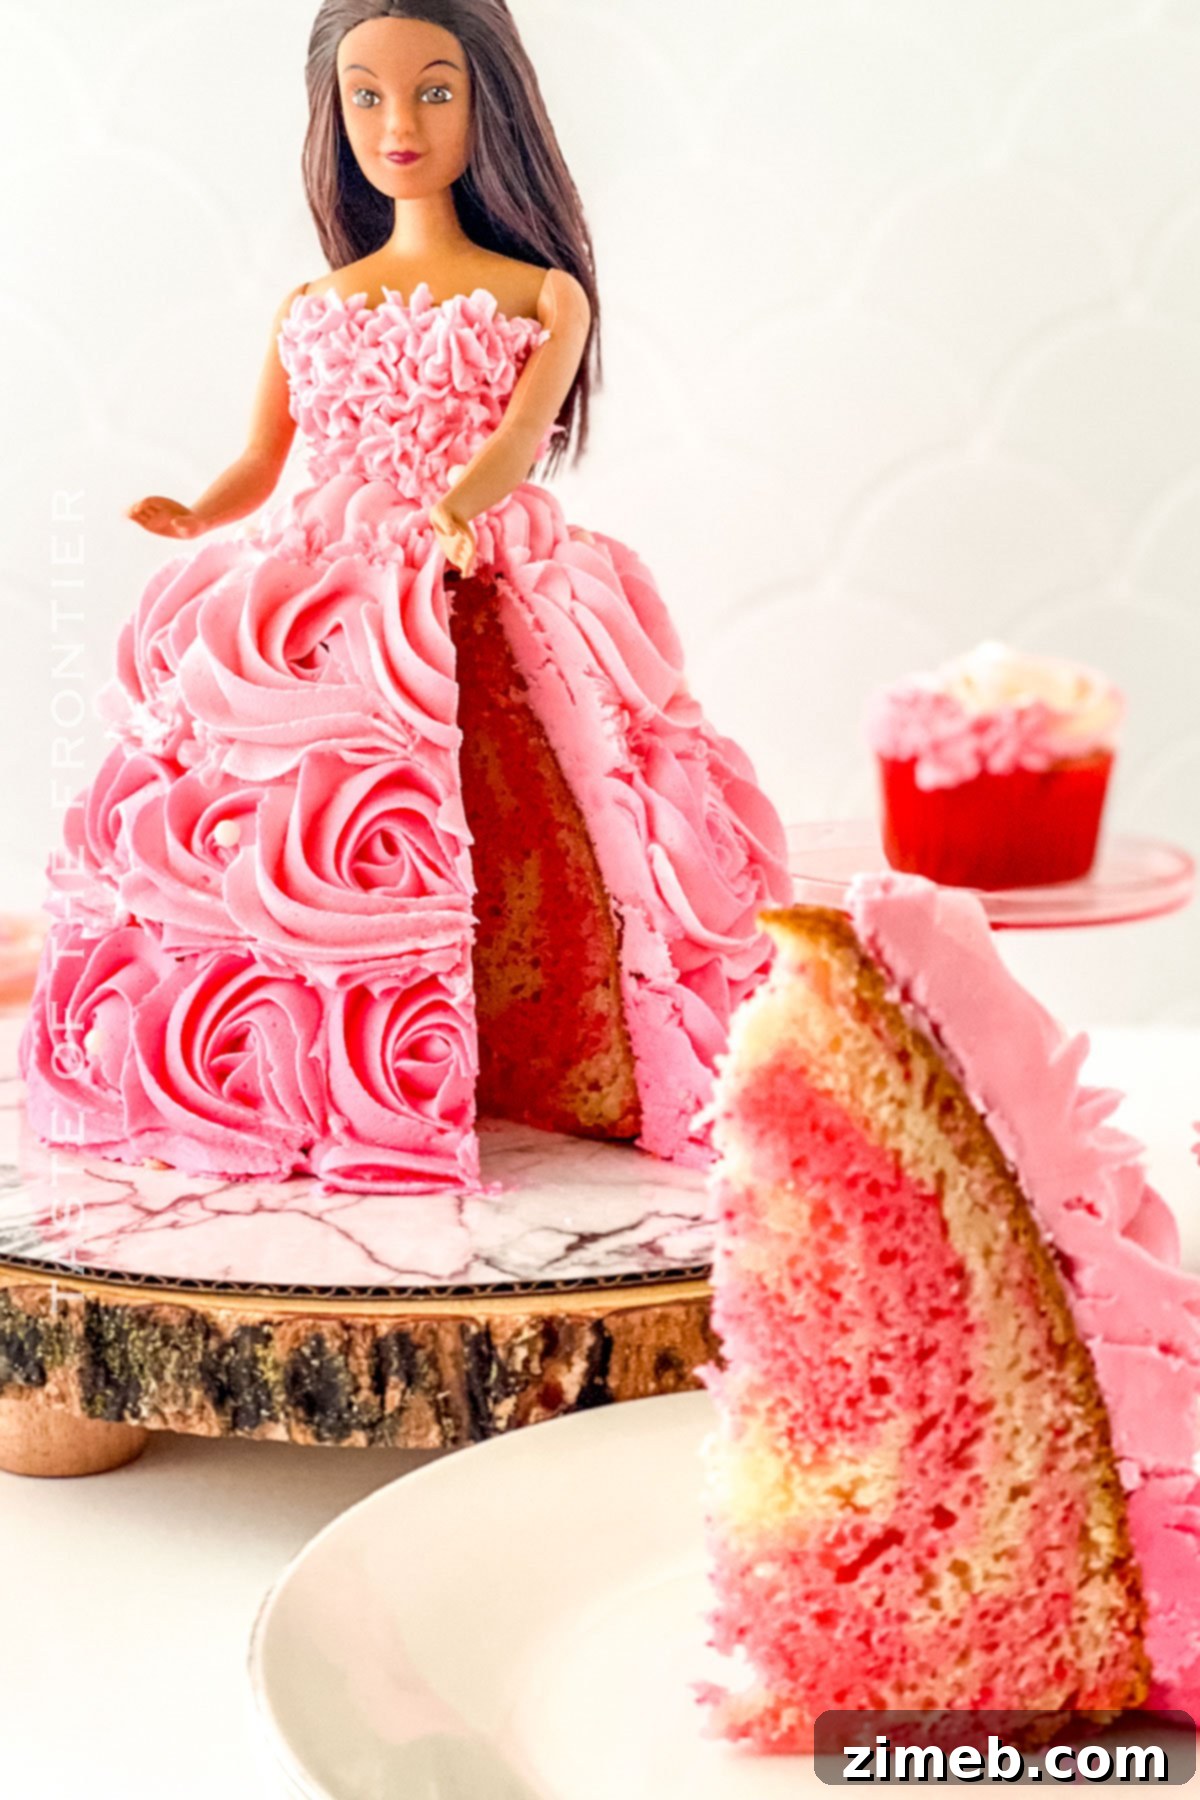
Our recipe features a beautifully layered vanilla cake, offering a versatile base that can be customized with marble, pink, and white hues. This moist and tender cake is meticulously sculpted to mimic the graceful silhouette of Barbie’s iconic dress, then lavishly embellished with colorful, smooth buttercream frosting. The process of creating a Barbie Cake is an art form, allowing you to infuse personal touches and creative flair into every detail, from the choice of colors to the intricate piping work. It’s an unforgettable project that promises a rewarding experience and a truly spectacular result. Let’s delve into how you can bring this magical confection to life in your own kitchen.
Why Choose a Barbie Doll Cake for Your Next Celebration?
There’s something uniquely special about a Barbie Doll Cake that transcends a typical birthday dessert. For many, it’s a nostalgic callback to childhood, a symbol of innocence and dreams. My own mother, a professional cake decorator, ensured I always had the most adorable cakes for every special occasion, including several beautiful Barbie cakes just like this one. This personal touch highlights the emotional connection these cakes hold.
Creating a Barbie Cake, while requiring patience and a bit of practice, is an incredibly rewarding endeavor. The look of pure joy and wonder on your child’s face when they see their custom-made doll cake is truly priceless. It transforms any event, big or small, into an extraordinary memory. Furthermore, baking a Barbie Cake offers a fantastic opportunity to involve the kids in the kitchen. They will absolutely cherish the experience of helping to create such a magical treat, making it a wonderful family activity. It’s more than just baking; it’s about sprinkling a bit of fairy tale magic into your routine and creating lasting bonds. Happy Baking!
Common Questions About Creating Your Barbie Cake
Can I customize the cake flavor for my Barbie Cake?
Absolutely! While our recipe provides a classic vanilla base, feel free to unleash your creativity with different cake flavors. Imagine a rich red velvet Barbie Cake for a deep, luxurious color, or perhaps a zesty lemon for a refreshing twist. Chocolate, strawberry, or even a fun confetti cake mix can provide an exciting foundation for Barbie’s magnificent gown. Don’t hesitate to experiment and choose a flavor that perfectly suits the birthday girl’s preferences!
Is decorating a Barbie Cake a challenging task for beginners?
While the idea of decorating a doll cake might seem intimidating at first glance, rest assured that with the right guidance, a few helpful tips, and a dash of patience, you can achieve stunning results. Techniques like using a star tip for elegant frosting rosettes or a petal tip for flowing skirt effects become much easier with practice. The key is to take your time, enjoy the process, and remember that every beautifully decorated Barbie Cake begins with a single, carefully piped detail. Your little princess will undoubtedly adore the amazing Barbie Cake you create, regardless of any minor imperfections.
What is the estimated time commitment for making a Barbie Cake?
This Barbie cake recipe is designed as a two-day process, and for good reason! Allowing the cake to freeze overnight after baking is a crucial step that significantly aids in the decorating process. A firm, chilled cake is much easier to carve, handle, and frost, minimizing crumbs and ensuring clean lines. While it requires a bit of planning, the extra effort spread over two days is undoubtedly worth it for that special event, guaranteeing a professional-looking and structurally sound Barbie Cake.
Storage Solutions for Your Masterpiece
After all your hard work, proper storage is essential to keep your Barbie doll birthday cake fresh and beautiful. I once made this as a surprise for a friend’s daughter, and the look on her face was absolutely priceless! Adding that special treat made it the best day for her, and proper storage helped keep it perfect until the big reveal.
Refrigerator Storage
Your exquisitely decorated Barbie Cake should be kept refrigerated until it’s ready to be served. This ensures the frosting remains firm, especially if it’s buttercream, and the cake stays wonderfully fresh. For best results, place the cake in an airtight container or cover it loosely with plastic wrap to prevent it from drying out or absorbing other food odors. Allow it to sit at room temperature for about 15-30 minutes before serving to ensure the cake and frosting are at their optimal texture.
Freezer Storage for Baking Success
The cake portion itself should be frozen overnight after baking, before any decorating begins. This crucial step, known as “crumb freezing,” makes the frosting process infinitely easier and neater by firming up the cake and locking in moisture, thereby preventing loose crumbs from mixing into your pristine frosting. Simply wrap the cooled cake tightly in plastic wrap and then in aluminum foil before placing it in the freezer. Remember, only freeze the baked cake layers. Avoid freezing the entire cake with the Barbie doll inserted and fully decorated, as this can affect the frosting’s texture and the doll’s condition.
Expert Tips for a Flawless Barbie Cake
This isn’t just a cake that brings radiant smiles to little girls’ faces (and plenty of adults too, let’s be honest!); it also tastes absolutely amazing! It’s truly the ideal choice for any Barbie lover in the family. To ensure your Barbie Cake turns out perfectly, keep these expert tips in mind:
- Take Your Time with Decorating: Patience is your best friend when decorating a doll cake. The fact that your cake will be frozen provides a significant advantage, giving you much more control and stability during frosting application. Work slowly and steadily, especially on intricate details.
- Prevent Crumb Woes with a Crumb Coat: Even with a frozen cake, a thin “crumb coat” of frosting applied before your final decorative layers is highly recommended. This seals in any remaining loose crumbs, ensuring a smooth, flawless finish for your beautiful Barbie gown. Chill the cake for 15-20 minutes after applying the crumb coat before proceeding.
- Don’t Overfill Your Frosting Bag: It’s tempting to load up the piping bag, but an overfilled bag is difficult to handle and control. Aim to fill your piping bag to about ¾ full. This allows you a better grip, more consistent pressure, and ultimately, neater designs.
- Rotate the Cake, Not Yourself: For consistent and even decorating, especially when piping rows or intricate patterns, always rotate the cake on a turntable instead of moving around the cake yourself. This technique helps maintain a steady hand and a uniform design.
- Mind the Pan Fill Level: When baking in the dress mold pan, it’s crucial not to overfill it. If you do, the batter may overflow during baking, leading to a messy oven and a misshapen cake. Follow the recipe’s guidance on fill levels carefully, and use any excess batter for delicious cupcakes!
- Ensure a Food-Safe Doll: Before inserting the Barbie doll, make sure it is thoroughly cleaned and ideally, wrap the lower half of the doll (the part that will be inside the cake) in plastic wrap to ensure food safety.
Simple Ingredients for Your Dream Barbie Cake
We believe that making a spectacular Barbie Cake shouldn’t require an overwhelming list of obscure ingredients. Our approach keeps the process as simple as possible, focusing on readily available items. If you’re familiar with doll cakes, you know they can sometimes get a little crazy, but we’re keeping it streamlined for maximum enjoyment and ease of execution. Here’s what you’ll need:
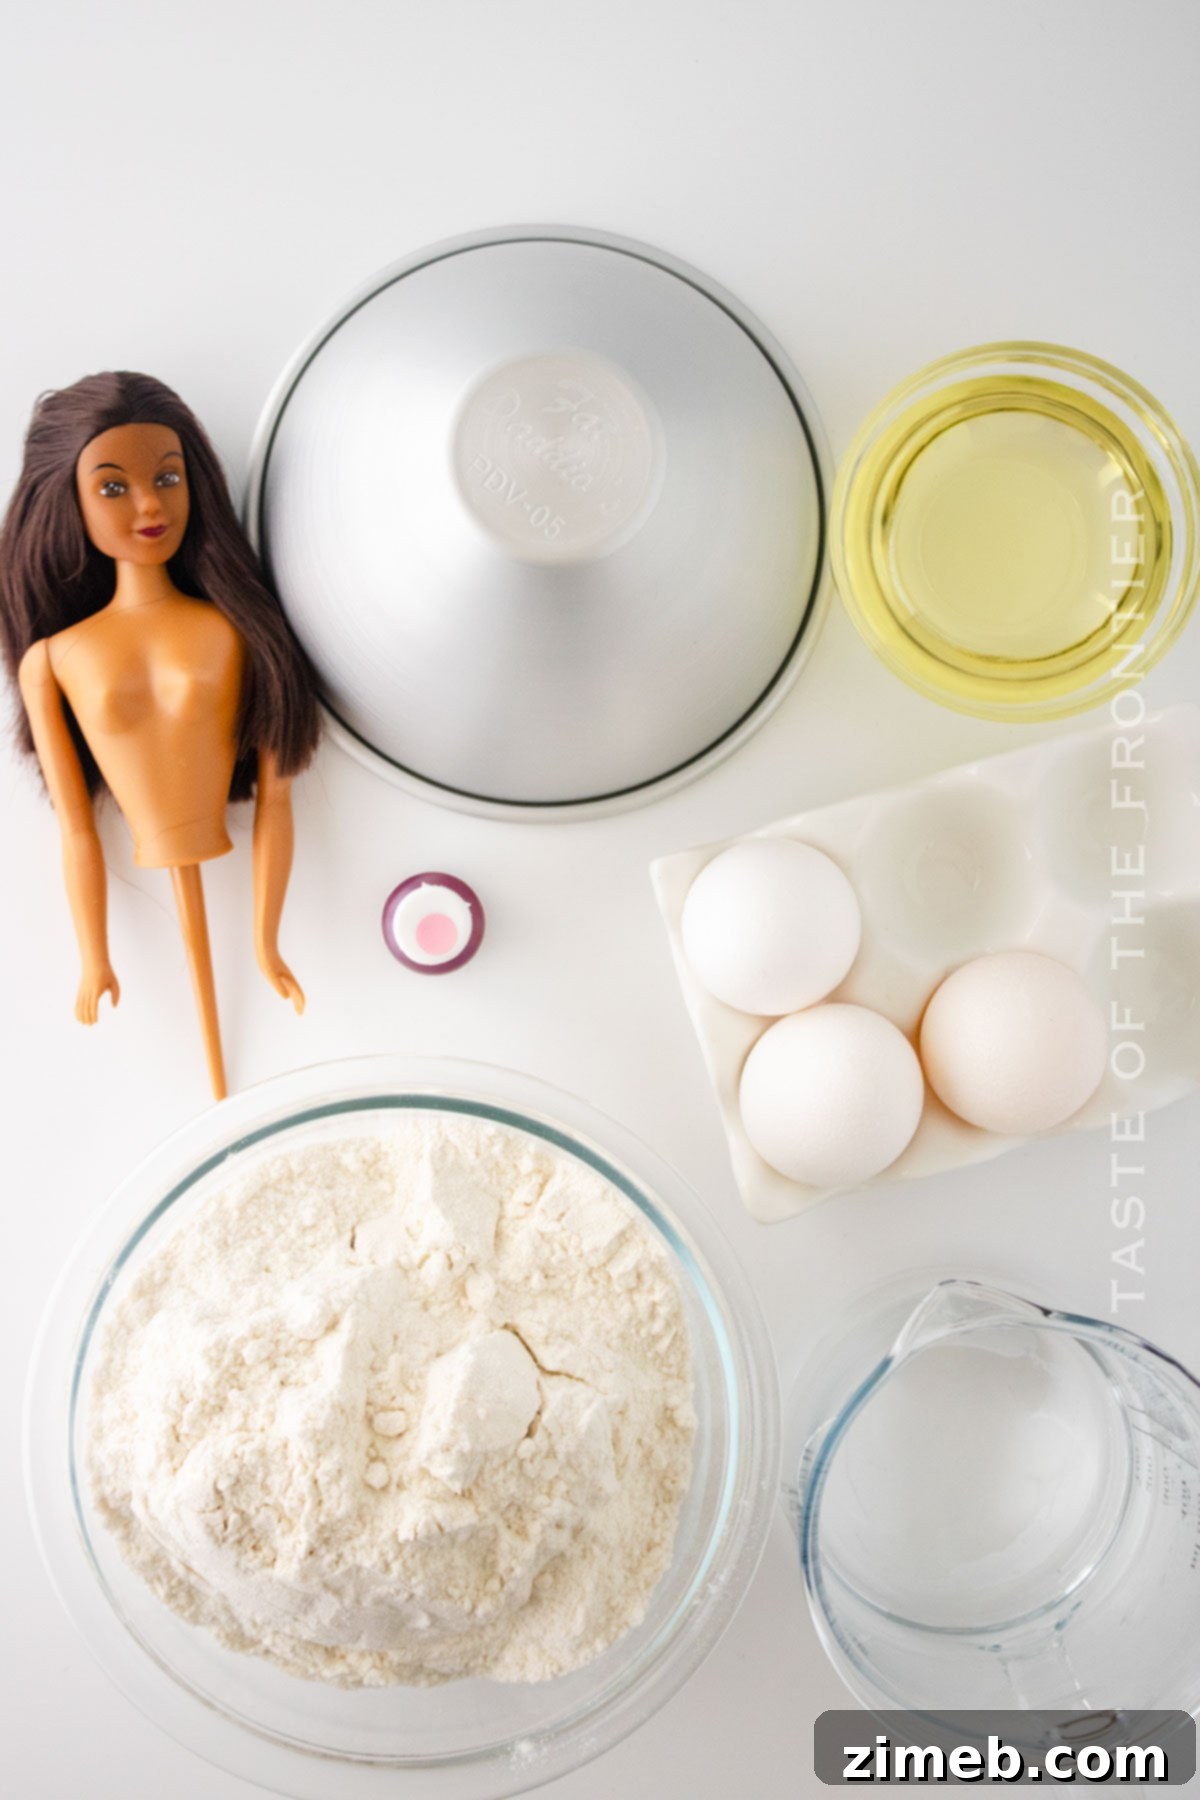
- Vanilla Cake Mix: A convenient and reliable base for a fluffy, flavorful cake. You can easily adapt this to other flavors if preferred.
- Eggs: Essential for structure, richness, and moisture in your cake batter.
- Water: The liquid component that activates the dry ingredients and contributes to the cake’s texture.
- Oil: Adds moisture and tenderness to the cake, ensuring it stays soft and delicious.
- Pink Gel Color: Crucial for achieving those iconic Barbie pink hues, from subtle pastel to vibrant fuchsia. Gel colors are concentrated and won’t thin your batter like liquid food coloring.
- Nonstick Baking Spray: To ensure your cake releases flawlessly from the intricate dress mold pan.
- Frosting of Your Choice: Buttercream is highly recommended for its piping stability and smooth finish. You can use your favorite homemade recipe or a high-quality store-bought frosting.
Step-by-Step Guide: How to Make and Design Your Barbie Cake
Alright, let’s dive into creating your custom Barbie Cake design! This project is ideally suited as a two-day endeavor, allowing ample time for chilling and decorating, but always adjust to what feels best for your schedule. The result will be the most magnificent cake your sweet daughter has ever seen, a true testament to your creativity and effort.
Day 1: Baking the Perfect Dress Mold
The foundation of any great Barbie Cake is a perfectly baked, beautifully shaped cake. Following these steps will ensure your cake is ready for its glamorous transformation on Day 2:
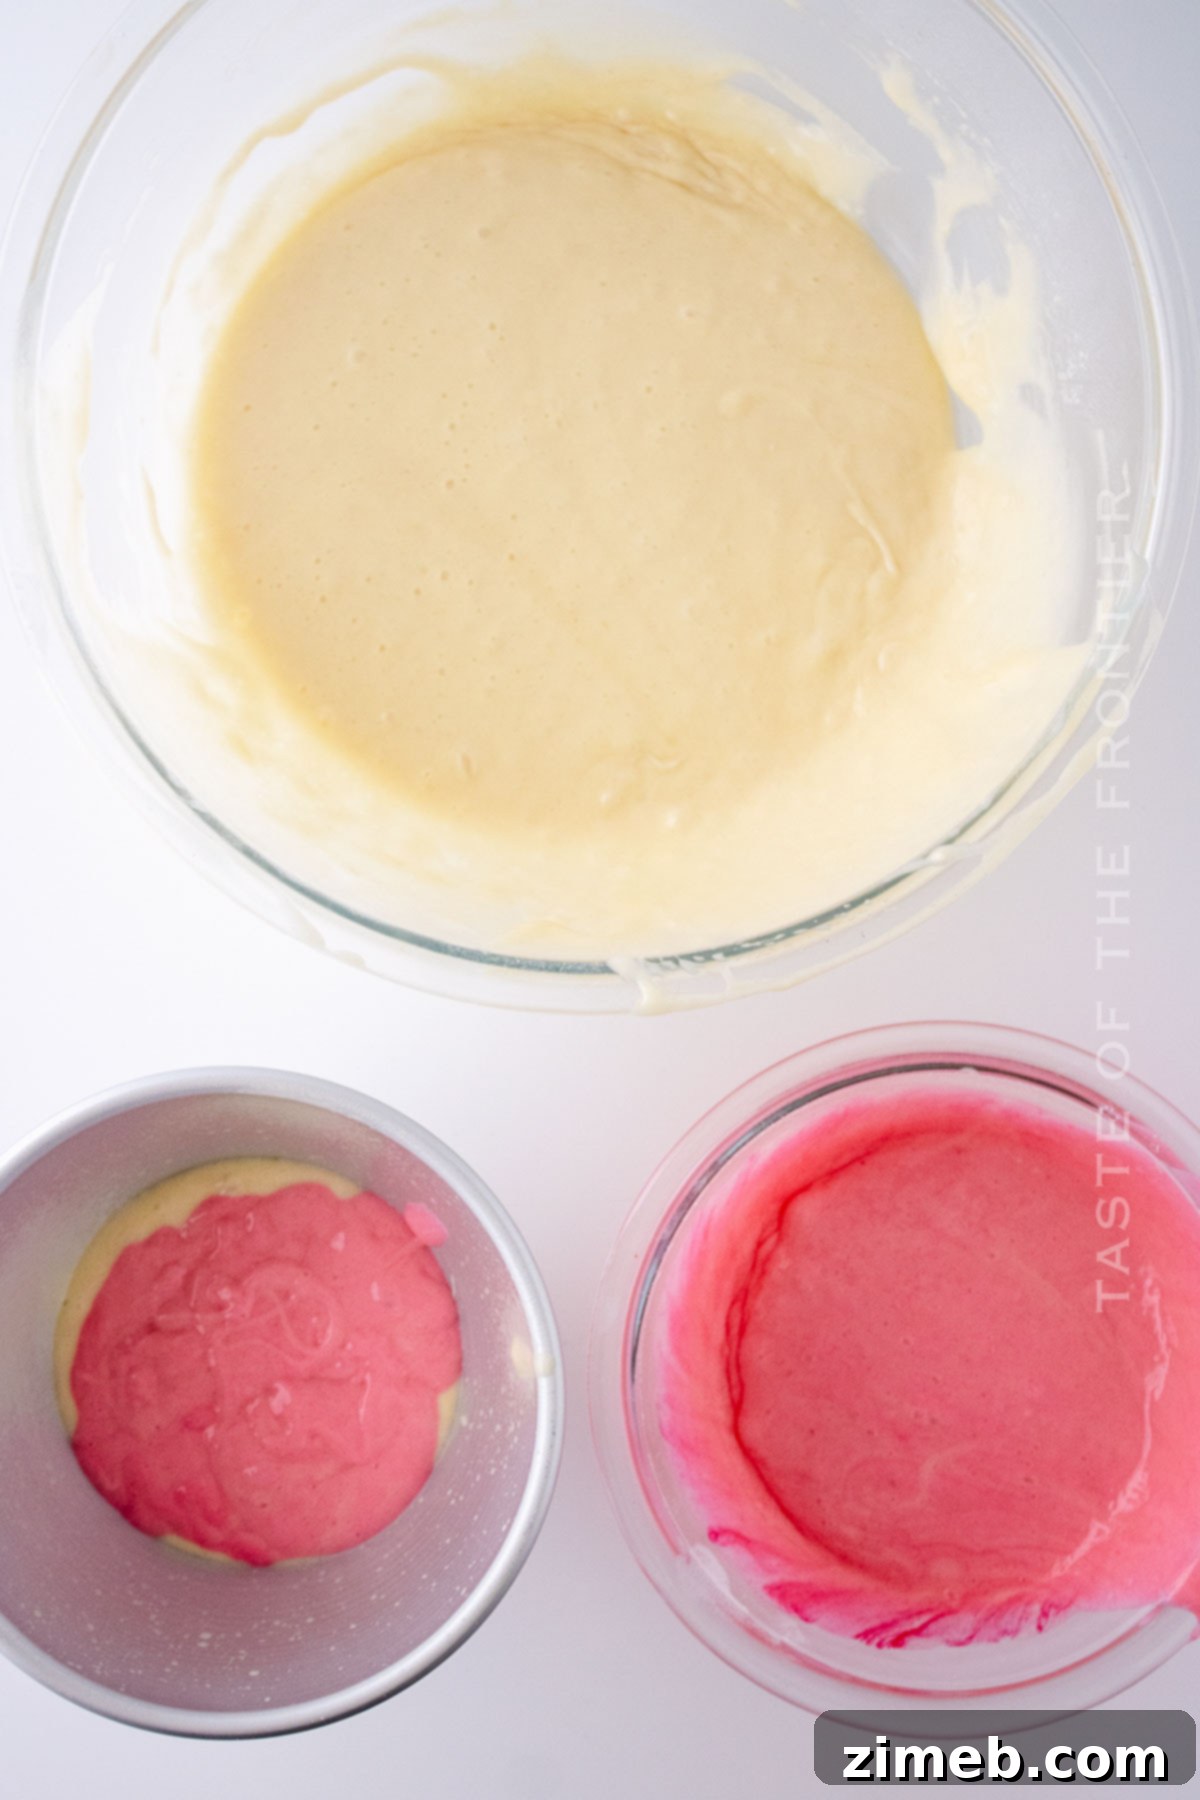
- Prepare the Batter: In a large bowl, or the bowl of a stand mixer, combine the cake mix, eggs, water, and oil. Beat until the ingredients are thoroughly blended, typically about 90 seconds. Avoid overmixing, as this can lead to a tough cake.
- Create Pink Batter: Carefully remove about 1 cup of the prepared batter. Add a few drops of pink gel food coloring to this smaller portion. Mix gently until the pink color is evenly distributed and vibrant, ready to create a beautiful marble effect or a distinct pink layer.
- Prepare the Mold: Liberally spray the interior cavity of your specialized dress mold pan with nonstick baking spray. Ensure all nooks and crannies are coated to prevent sticking and guarantee an easy release.
- Layer the Batter: Alternately spoon dollops of the pink-dyed cake batter and the undyed vanilla batter into the prepared dress pan. You can swirl them gently with a knife or skewer for a marbled effect, or layer them for a subtle gradient.
- Fill Responsibly: It is crucial NOT to fill the dress mold pan all the way to the top. Overfilling will inevitably lead to overflow during baking, creating a mess and a deformed cake. From my experience, I was able to scoop out enough batter to make 6 cupcakes separately, and that was the perfect amount to bake inside the dress pan without overflowing. Use any remaining batter to fill a standard cupcake pan.
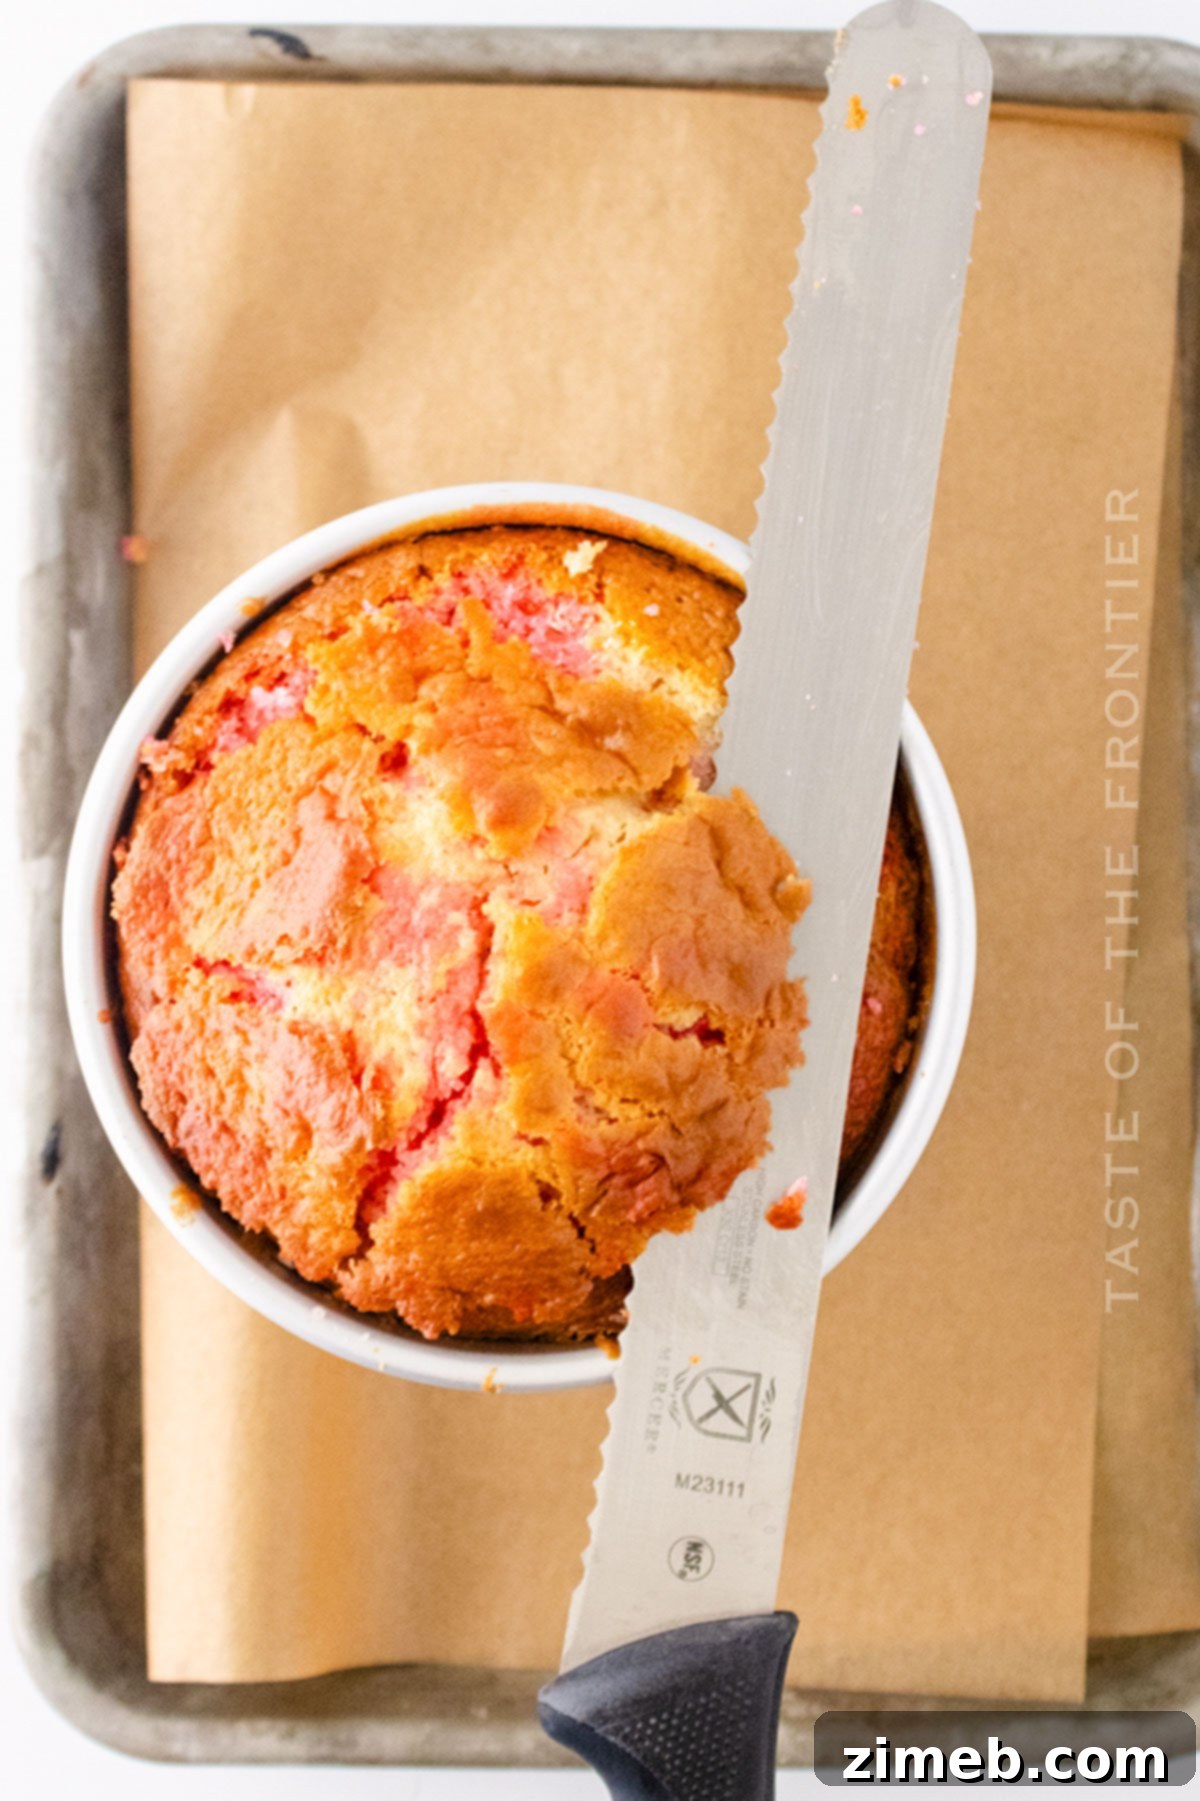
- Bake to Perfection: Bake the cupcakes for approximately 15-17 minutes. The main dress cake will require a longer baking time, usually 45-50 minutes, or until a wooden skewer inserted into the thickest part comes out clean. Baking times can vary by oven, so keep a close eye on it.
- Cool and Release: Once baked, allow the cake to rest on the counter in its pan for about 20 minutes. This cooling period helps the cake firm up, making it less prone to breaking when removed. After 20 minutes, carefully invert the dress pan onto a cooling rack and gently remove the cake. Allow it to cool completely before proceeding.
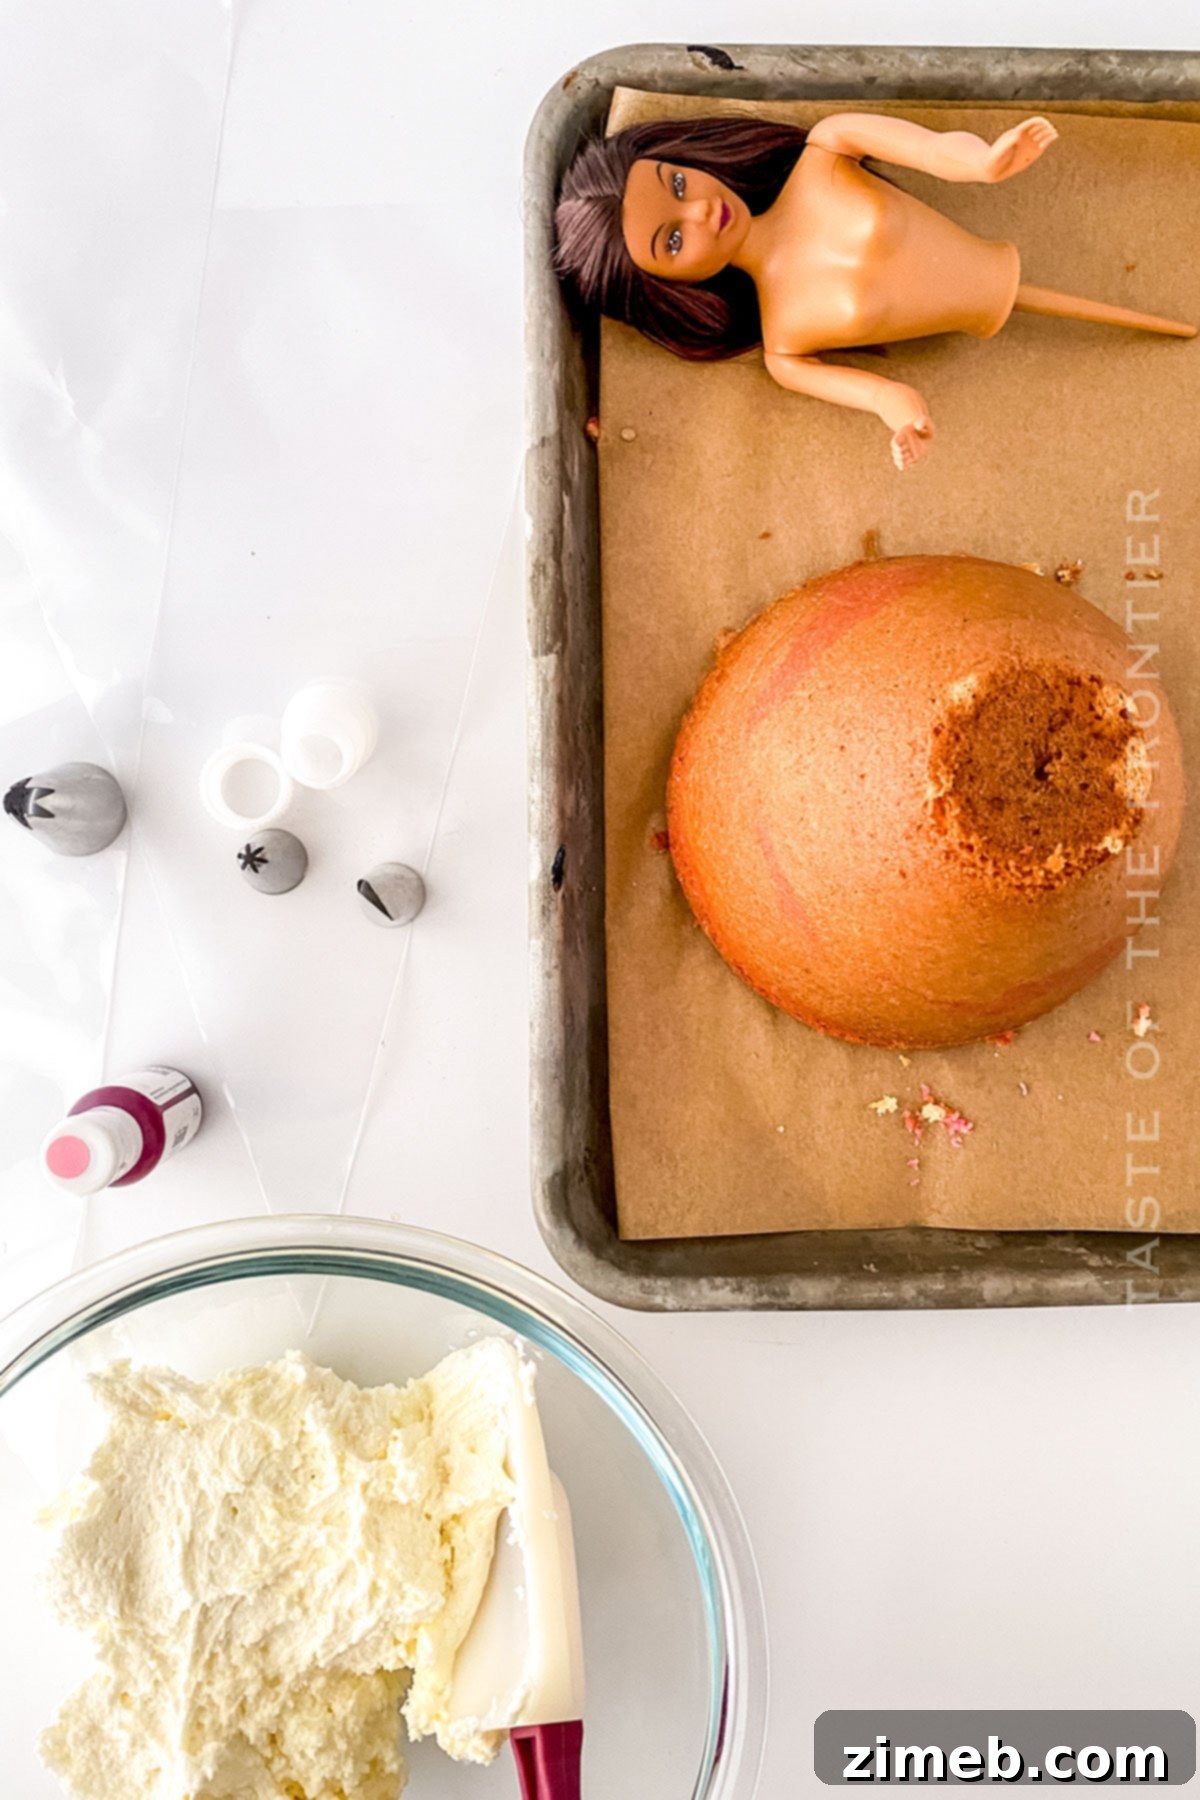
- Create the Doll Opening: Once the cake is completely cooled (this is very important!), gently place the Barbie doll topper (or the doll itself, with its lower half wrapped for hygiene) into the small, pointed end of the cake. Press down just enough to create a distinct hole for the doll. Then, remove the doll.
- Freeze for Success: Wrap the cooled and cored cake tightly in plastic wrap and freeze it for at least 3-6 hours, or preferably overnight. Freezing the cake is a game-changer; it significantly reduces the chances of having crumbs mix into your frosting, resulting in a much cleaner, smoother finish, particularly helpful for lighter-colored frostings or intricate designs.
Day 2: Mastering the Art of Barbie Cake Decorating
With your perfectly chilled cake ready, it’s time to unleash your inner artist and transform it into a stunning Barbie gown. The frozen state of the cake will make this process much smoother.
To Make the Ombre Rosette Dress:
- Prepare Deep Pink Frosting: Once the cake is frozen solid, take 1 cup of your chosen buttercream frosting and dye it a deep, vibrant pink using gel food coloring. Ensure the color is rich and evenly mixed.
- Set Up Piping Bag 1: Fit a piping bag with a 1M star tip (or your preferred rosette tip). Snip off the tip of the bag, allowing the piping tip to fit securely.
- Fill Piping Bag: Add about ¾ cup of the deep pink buttercream to the piping bag. Avoid overfilling, as this makes it harder to control.
- Seal and Secure: Twist the top of the piping bag to close it, holding it firmly at that end. This ensures the frosting stays contained and prevents it from squeezing out the top while you pipe.
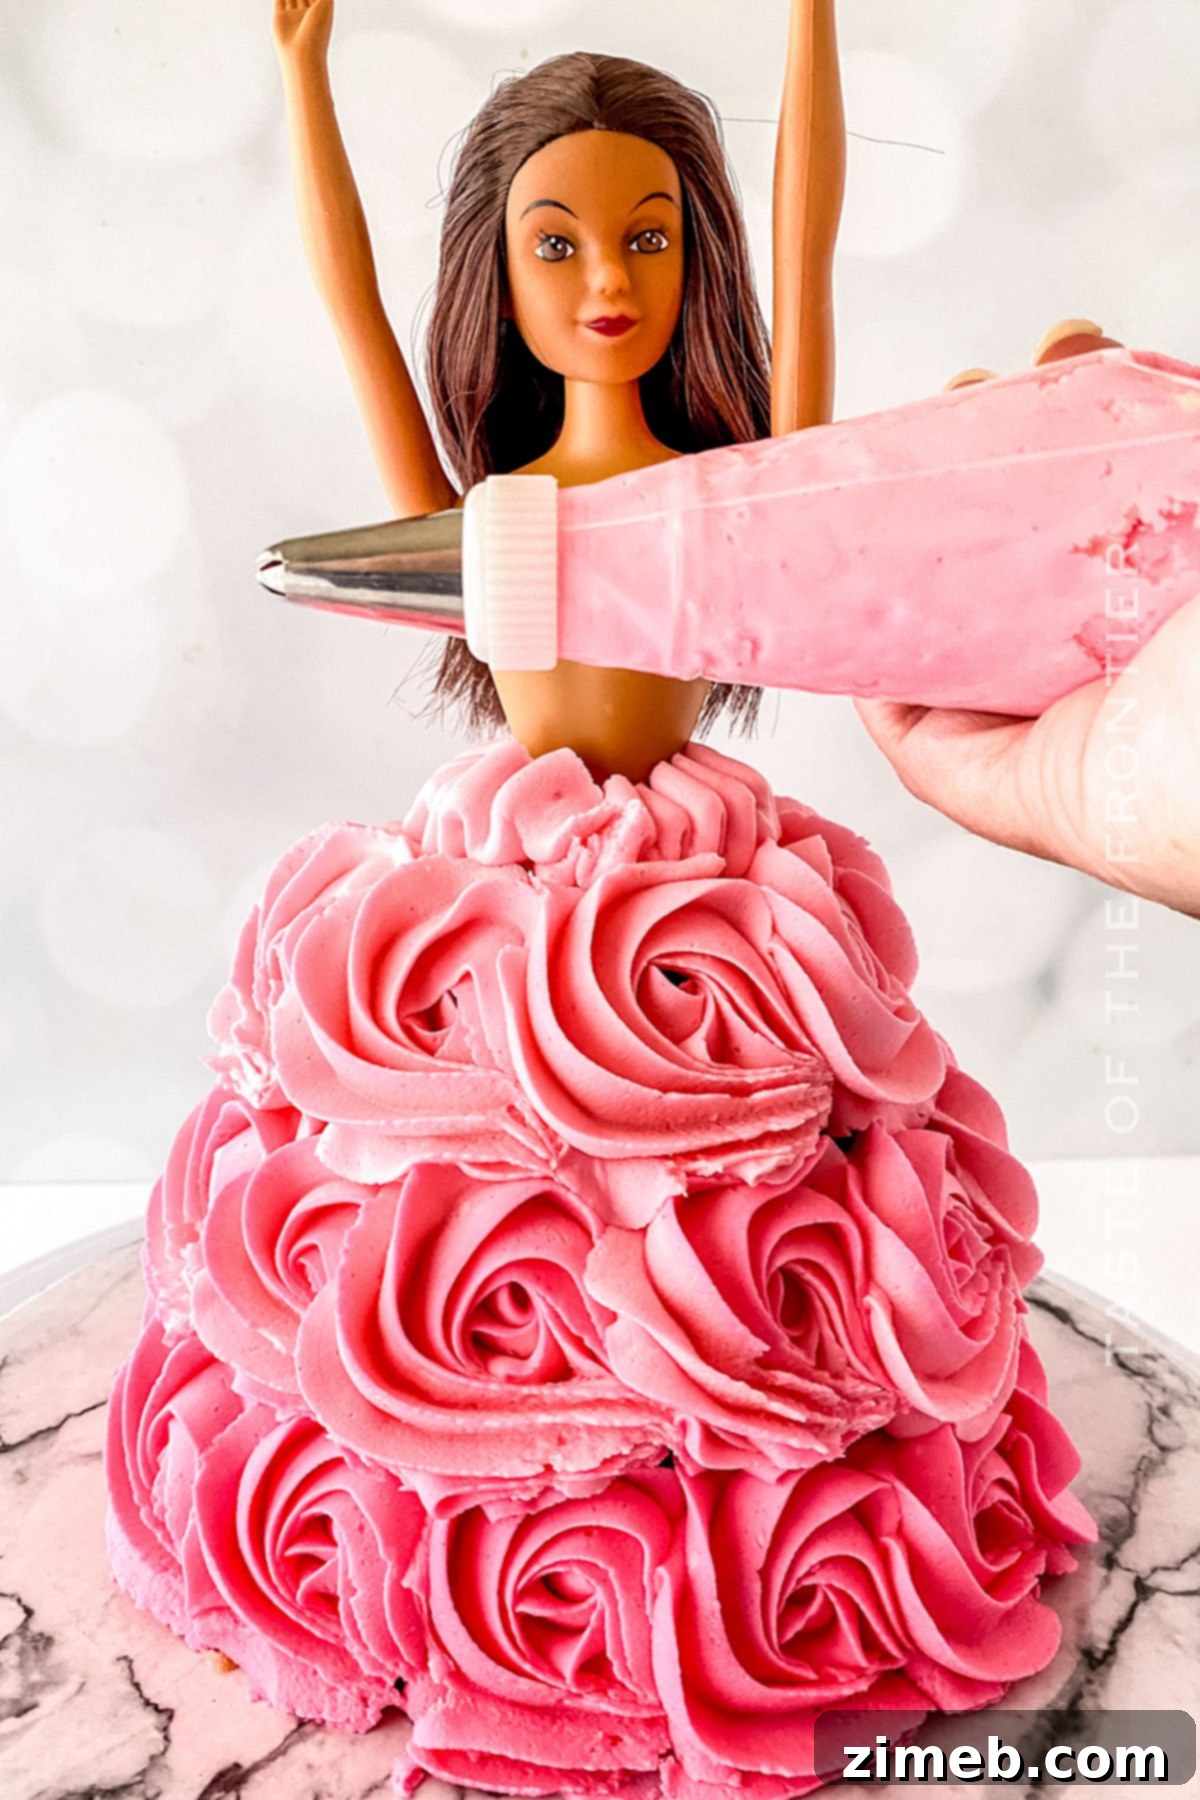
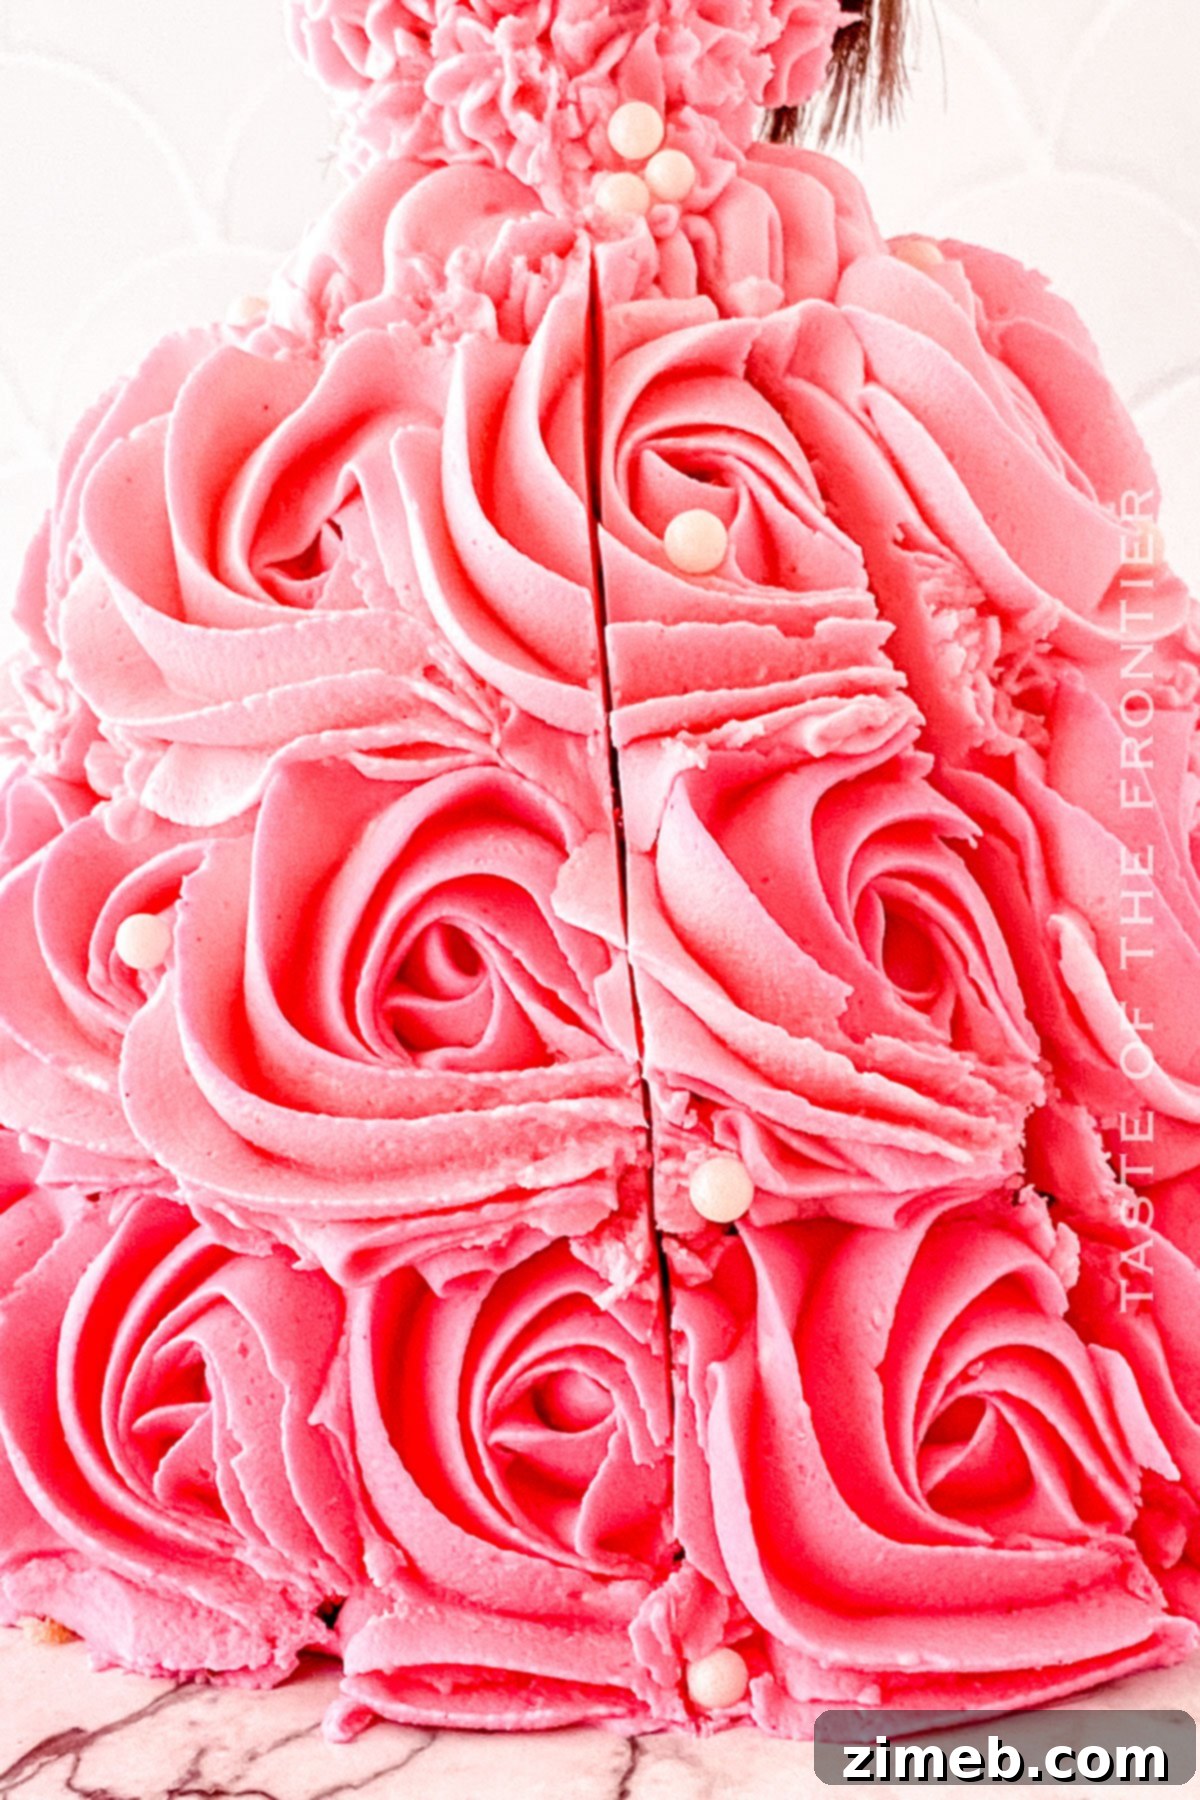
- Practice Rosettes: To create a rosette, gently squeeze a small amount of frosting to form a “star,” then immediately pipe a continuous circle around the star, ending where you began, at the bottom. If you’re new to this technique, practice a couple of times on a piece of parchment paper. If the cake is frozen, it’s much easier to scrape off and redo frosting if you don’t like it. If a “tail” of buttercream lags, remember to stop squeezing before completing the circle to minimize it.
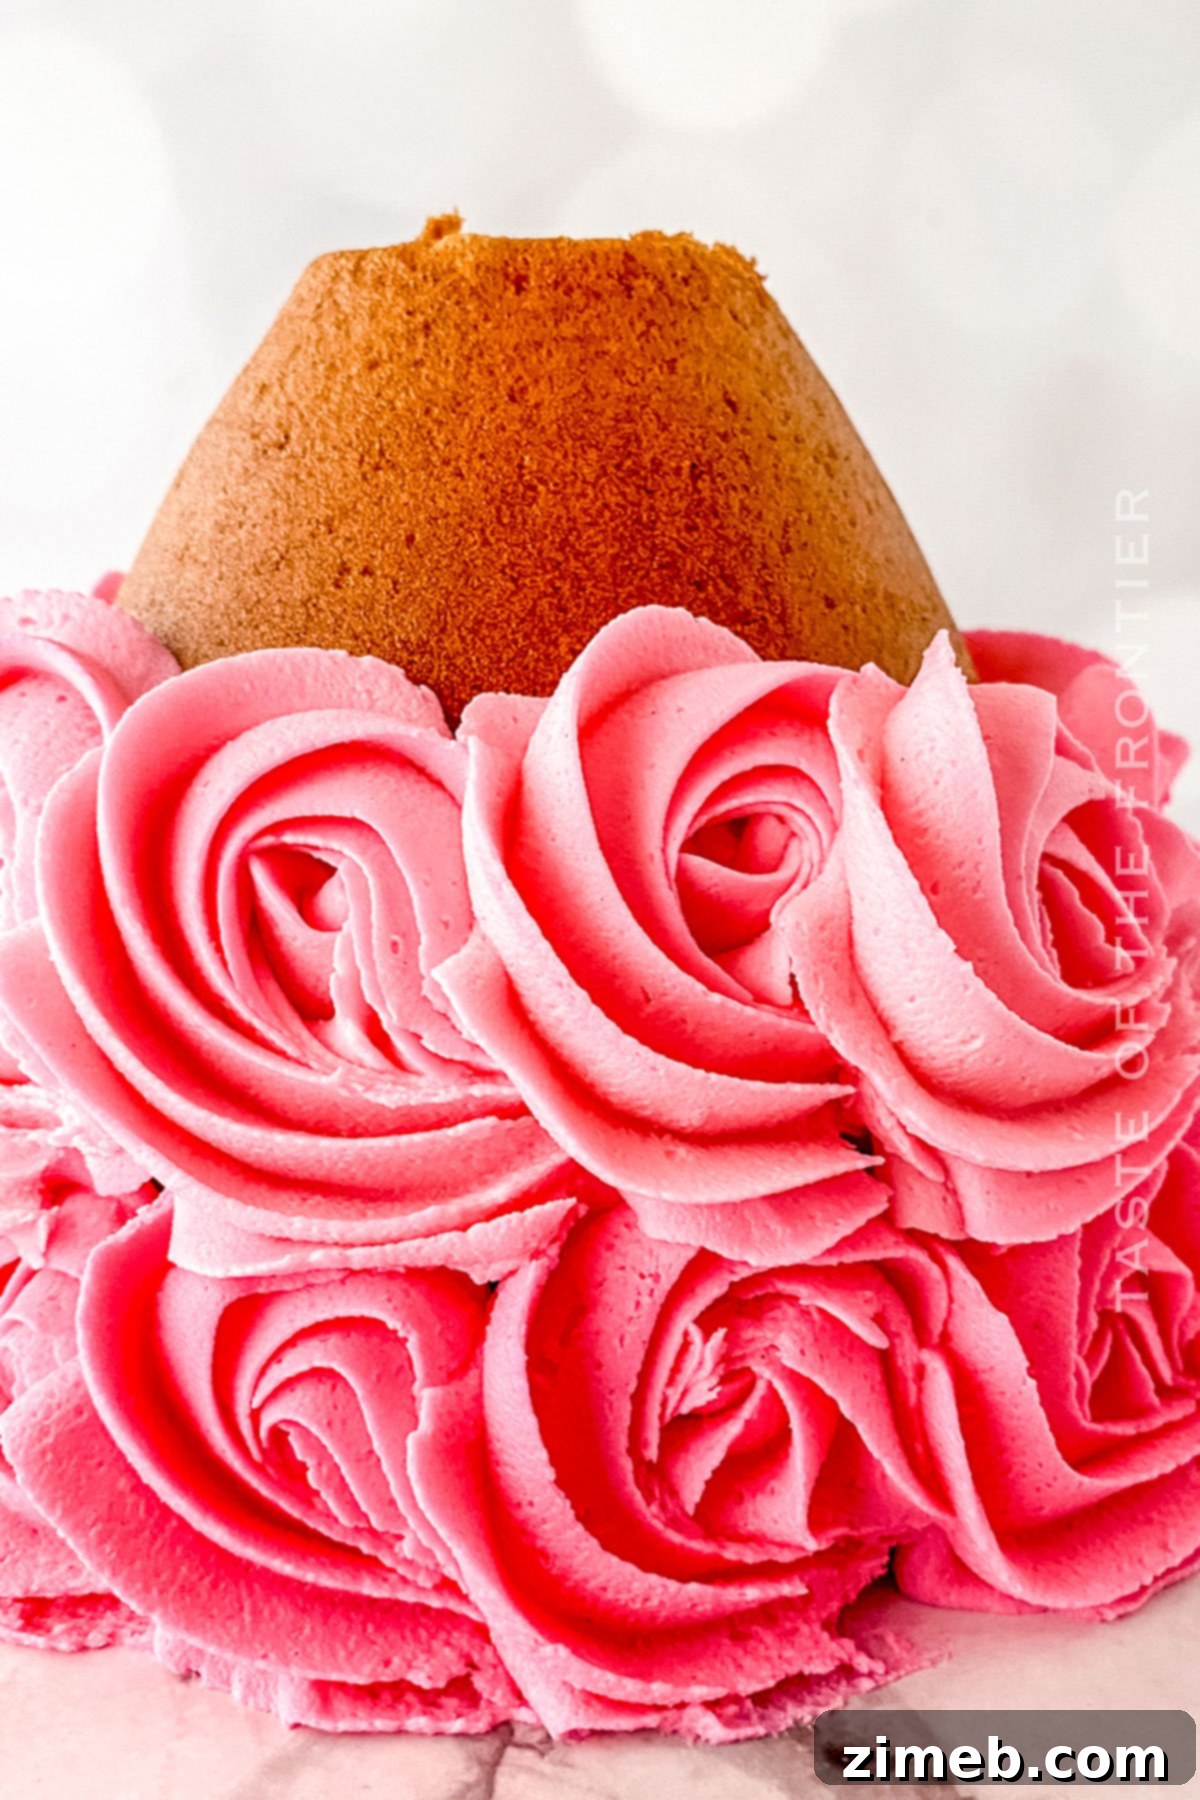
- Pipe First Row (Deep Pink): Begin piping your rosettes around the bottom edge of the Barbie cake, covering the entire circumference. This will be your darkest shade of pink.
- Lighten Frosting for Next Row: After completing the first row of rosettes, carefully empty any remaining deep pink frosting from the bag back into your bowl. Add another ¾ cup of plain white buttercream to the colored buttercream in the bowl. Mix well. This will lighten the existing frosting, creating a beautiful gradient for your next row.
- Reload and Pipe Second Row: Reload your piping bag with the newly lightened pink frosting and pipe another row of rosettes directly above the first, maintaining consistency in your design.
- Repeat for Ombre Effect: Continue this process two more times: emptying the bag, adding more white buttercream to lighten the color further, reloading, and piping another row. You will do this a total of three times, resulting in four distinct shades of pink, gradually lightening as you move up the cake towards the doll.
- Insert the Doll: Carefully place the Barbie doll into the hole you created on Day 1, ensuring she is stable and centered.
- Prepare Piping Bag 2 (Tutu): Grab your second piping bag. Fit it with a tip and coupler, starting with a size 104 petal tip. This tip is perfect for creating flowing ruffles.
- Transfer Remaining Frosting: Squeeze any leftover frosting from the first piping bag into this second bag. You can also mix a small amount of white into it if you want an even lighter color for the top of the dress.
- Create the Tutu Ruffles: Hold the piping bag sideways, with the wider end of the petal tip slightly touching the base of the doll and the cake. While holding steady pressure, spin the cake on your turntable and move the bag up and down in small, quick motions. This technique will create beautiful, delicate ruffles around the base of the doll, forming the elegant “tutu” of her dress.
- Decorate the Bodice: Switch the piping tip on your second bag to a size 12 or 14 star tip. Using this smaller star tip, pipe stars or small rosettes all over the bust of the doll, creating a beautifully detailed and secure top for her dress.
- Chill Before Serving: Keep your finished Barbie Cake refrigerated until you are ready to serve. This helps maintain the integrity of the frosting and the overall structure, ensuring it looks perfect for the grand reveal!
Essential Kitchen Supplies for Your Barbie Cake Project
Having the right tools can make all the difference in creating a professional-looking and enjoyable Barbie Cake. While some items are specialized, many can be improvised or are useful for other baking projects. If you don’t own a turntable, search online for some awesome make-shift ideas to help you rotate your cake smoothly. However, if you’re serious about creating custom cakes like this, investing in a good turntable is highly recommended.
- Turn Table: A rotating cake stand is invaluable for smooth and even decorating, allowing you to pipe consistently around the cake without moving yourself.
- 6 Cupcake Liners & Cupcake Pan: To bake any excess batter, ensuring no delicious cake goes to waste.
- 2 Piping Bags: Essential for handling different frosting colors and tips. You might use one for the ombre rosettes and another for finer details and the tutu.
- Piping Tips (1M, 12 or 14-star, and 104 petal tip):
- 1M Star Tip: Perfect for creating beautiful rosettes and large stars.
- 12 or 14-Star Tip: Ideal for smaller stars and intricate details on the doll’s bodice.
- 104 Petal Tip: Used for creating delicate ruffles and the elegant ‘tutu’ effect.
- Cake Drum or Cake Plate: Provides a sturdy base for your cake, making it easier to transport and present.
- Dress Mold Pan: The specialized pan that gives your cake its iconic gown shape.
- Doll Bust: A food-safe doll pick or a cleaned Barbie doll (wrapped in plastic wrap) to insert into the cake.
- Cake Stand: For elegant presentation of your finished masterpiece.
Perfect Pairings: What to Serve With Barbie Cake
The Barbie Cake is typically the radiant star of the show, a magnificent centerpiece that captures everyone’s attention. However, you can enhance the celebration by pairing it with other delightful party treats that complement its sweetness and charm. It pairs wonderfully with light, refreshing options like a vibrant fruit platter, offering a fresh contrast to the cake’s richness. Classic party snacks such as dainty finger sandwiches or colorful mini-quiches can provide savory balance. And of course, it’s a time-honored tradition to serve any type of cake alongside some delicious ice cream. Whether you opt for a simple vanilla, a classic strawberry, or a whimsical sprinkles flavor, ice cream is the perfect cool and creamy accompaniment to every slice of your magical Barbie Cake. Consider serving pink lemonade or sparkling cider for a complete Barbie-themed beverage experience!
The Enduring Appeal: Why You Should Make a Barbie Cake
Beyond being a simple dessert, making a Barbie Cake is an adventure in itself, a journey of creativity and fun! There is something profoundly satisfying about meticulously creating a layered cake like this, especially one that culminates in such a recognizable and beloved design. The effort and artistry you pour into it are always reflected in the finished product – a sight to behold that brings smiles and delight to all who see it. Here are just a few compelling reasons why this enchanting project is worth every moment:
- It makes a special day even more magical for your little princess, transforming an ordinary celebration into an extraordinary fairy tale.
- It allows you to showcase your creativity and baking skills, offering a unique canvas for edible art and personal expression.
- It brings the iconic Barbie doll to life in a truly unique, memorable, and utterly delicious way, making her the literal center of attention.
- It creates unforgettable memories and beautiful photos for your family, providing cherished moments that will be looked back upon fondly for years to come.
- It serves as a wonderful opportunity to teach children about baking, patience, and the joy of creating something with their own hands.
Creative Variations and Delightful Add-Ins for Your Barbie Cake
The beauty of the Barbie Cake is its versatility! You are the designer, and the entire cake is yours to decorate and personalize. Don’t be afraid to change things up and make it uniquely your own. Want some enchanting purple frosting instead of pink? Go right ahead! Here are some ideas to spark your imagination and help you customize your Barbie masterpiece:
- Experiment with Different Cake Flavors: While vanilla is a classic, try bold flavors like rich chocolate, festive red velvet, zesty lemon, or even a refreshing strawberry cake for a fun and unexpected twist.
- Add Edible Decorations and Sparkle: Give Barbie’s dress some extra shimmer and glamour! Incorporate edible glitter dust, vibrant sprinkles, delicate edible pearls, or even small sugar flowers to create a truly dazzling gown.
- Play with Frosting Colors and Techniques: Don’t limit yourself to pink! Experiment with different frosting colors to match your little girl’s favorite shade, a party theme, or a specific Barbie outfit. Try blues, purples, yellows, or even a rainbow effect. Explore other piping techniques beyond rosettes, such as simple stars, shells, or basketweave patterns.
- Create Different Doll Cake Designs: While Barbie is iconic, the doll cake concept can be adapted. Use a different doll to create a fairy tale princess, a modern fashionista, a mermaid, or even a superheroine in a flowing cape gown. The possibilities are endless!
- Incorporate Fillings: Add a delicious filling between cake layers, such as fresh berries, fruit preserves, chocolate ganache, or cream cheese frosting, to elevate the flavor profile.
If you love this Barbie cake recipe and are looking for more adorable and creative cake ideas, you’re in for a treat! Please click each link below to find easy, printable recipes that will inspire your next baking project!
Check out this recipe
Check out this recipe
Check out this recipe
Check out this recipe
Check out this recipe
Enhance Your Barbie Cake with These Delicious Frosting Recipes
The right frosting can elevate your Barbie Cake from wonderful to truly spectacular. While any good quality buttercream will work, consider these tried-and-true recipes for a truly delectable finish:
- Best Bakery Buttercream Frosting: A classic, smooth, and easy-to-pipe frosting that holds its shape beautifully for intricate designs.
- Fresh Strawberry Buttercream Frosting: Infuse your cake with the delightful taste of fresh strawberries, perfect for a vibrant and fruity Barbie gown.
- Cake Batter Frosting Recipe: A fun and whimsical frosting that tastes just like cake batter, adding an extra layer of sweetness and nostalgia.
- Cookie Dough Frosting: For the ultimate indulgence, this rich frosting will turn your Barbie Cake into an irresistible treat.
If you love this recipe for Barbie Cake as much as I do, please take a moment to write a five-star review below. Your feedback means the world to me! And don’t forget to help me share this magical creation with fellow bakers and Barbie enthusiasts on Facebook and Pinterest!
CONNECT WITH YUMMI HAUS!
Be sure to follow me on my social media channels, so you never miss a post!
Substack, Facebook, Pinterest, Instagram, Email Subscription
Rate this Recipe
Barbie Cake Design
Ingredients
Servings: 12
- 15.25 ounces vanilla cake mix
- 3 eggs
- 1 cup water
- 1/3 cup oil
- Pink gel color
Nonstick Baking Spray
Frosting of any kind – I used my Best Bakery Buttercream Frosting
Instructions
Day 1
-
Add the cake mix, eggs, water, and oil to a stand mixer, or use a hand mixer and a large bowl. Beat until blended – about 90 seconds.
-
Remove about 1 cup of the batter and add a few drops of food coloring to dye it pink. Mix until the color is evenly distributed.
-
Spray down the cavity of the dress mold with the cooking spray.
-
Alternately add pink and the non-dyed cake batter to the pan.
-
Do Not Fill all the way to the top. I was able to scoop out 6 cupcakes with an ice cream scooper and that was the perfect amount to bake inside the pan.
-
If you fill the pan up, it will overflow.
-
Fill a cupcake pan with the remaining batter.
-
Bake the cupcakes for 15-17 mins and the cake for 45-50 min or until a skewer comes out clean.
-
Let rest on the counter for 20 mins before turning over the dress pan and removing the cake from the pan.
-
Once cooled place the Barbie topper into the small end of the cake, creating a hole.
-
Remove the doll and freeze the cake for at least 3-6 hours, preferably overnight.
-
Freezing cake helps you significantly decrease your chances of having crumbs in the frosting, particularly if it’s a chocolate cake.
Day 2 – Decorating
To make the ombre dress:
-
Once the cake is frozen solid, dye 1 cup of buttercream frosting deep pink.
-
Add a 1M tip to a piping bag. Snip off the tip.
-
Add about ¾ cup buttercream to the bag, don’t overfill it.
-
Twist the top to close and hold the bag at that end, ensuring it stays closed while you pipe.
-
To make the rosette, you will first make a “star” by gently squeezing a small amount of frosting, then make a circle around the star ending at the bottom.
-
Practice this a couple of times if you’ve never done it. If the cake is frozen it is much easier to remove the frosting if you don’t like it. If a “tail” of buttercream lags, STOP squeezing before completing the circle, and then you should stop the tail.
-
After each row of rosettes, empty all frosting back into a bowl and add another ¾ cup of white buttercream to the colored buttercream. This will lighten the existing frosting for your next row which will be a lighter shade.
-
Reload the bag and pipe another row.
-
Do this 3 times until you reach the top.
-
Place the doll in the hole you created after baking.
-
Grab your second piping bag and fit it with a tip and coupler, starting with tip 104.
-
Squeeze the leftover frosting from the first bag into the second.
-
Turn the bag sideways and spin the cake while holding steady pressure and moving up and down in small quick motions. This will create the “tutu” of the dress around the base of the doll.
-
Switch the tip to a size 12 or 14-star tip and then pipe stars all over the bust of the doll, creating the top of her dress.
-
Keep refrigerated until ready to serve.
Notes
Equipment
-
Turn Table
-
6 cupcake liners
-
cupcake pan
-
2 Piping Bags
-
Tip 1M
-
Coupler with Tip 12 or 14 and Tip 104
-
Cake Drum or Cake Plate
-
Dress Mold Pan
-
Doll Bust
Nutrition
Nutritional information for the recipe is provided as a courtesy and is approximate. Please double-check with your own dietary calculator for the best accuracy. We at Yummi Haus cannot guarantee the accuracy of the nutritional information given for any recipe on this site.