
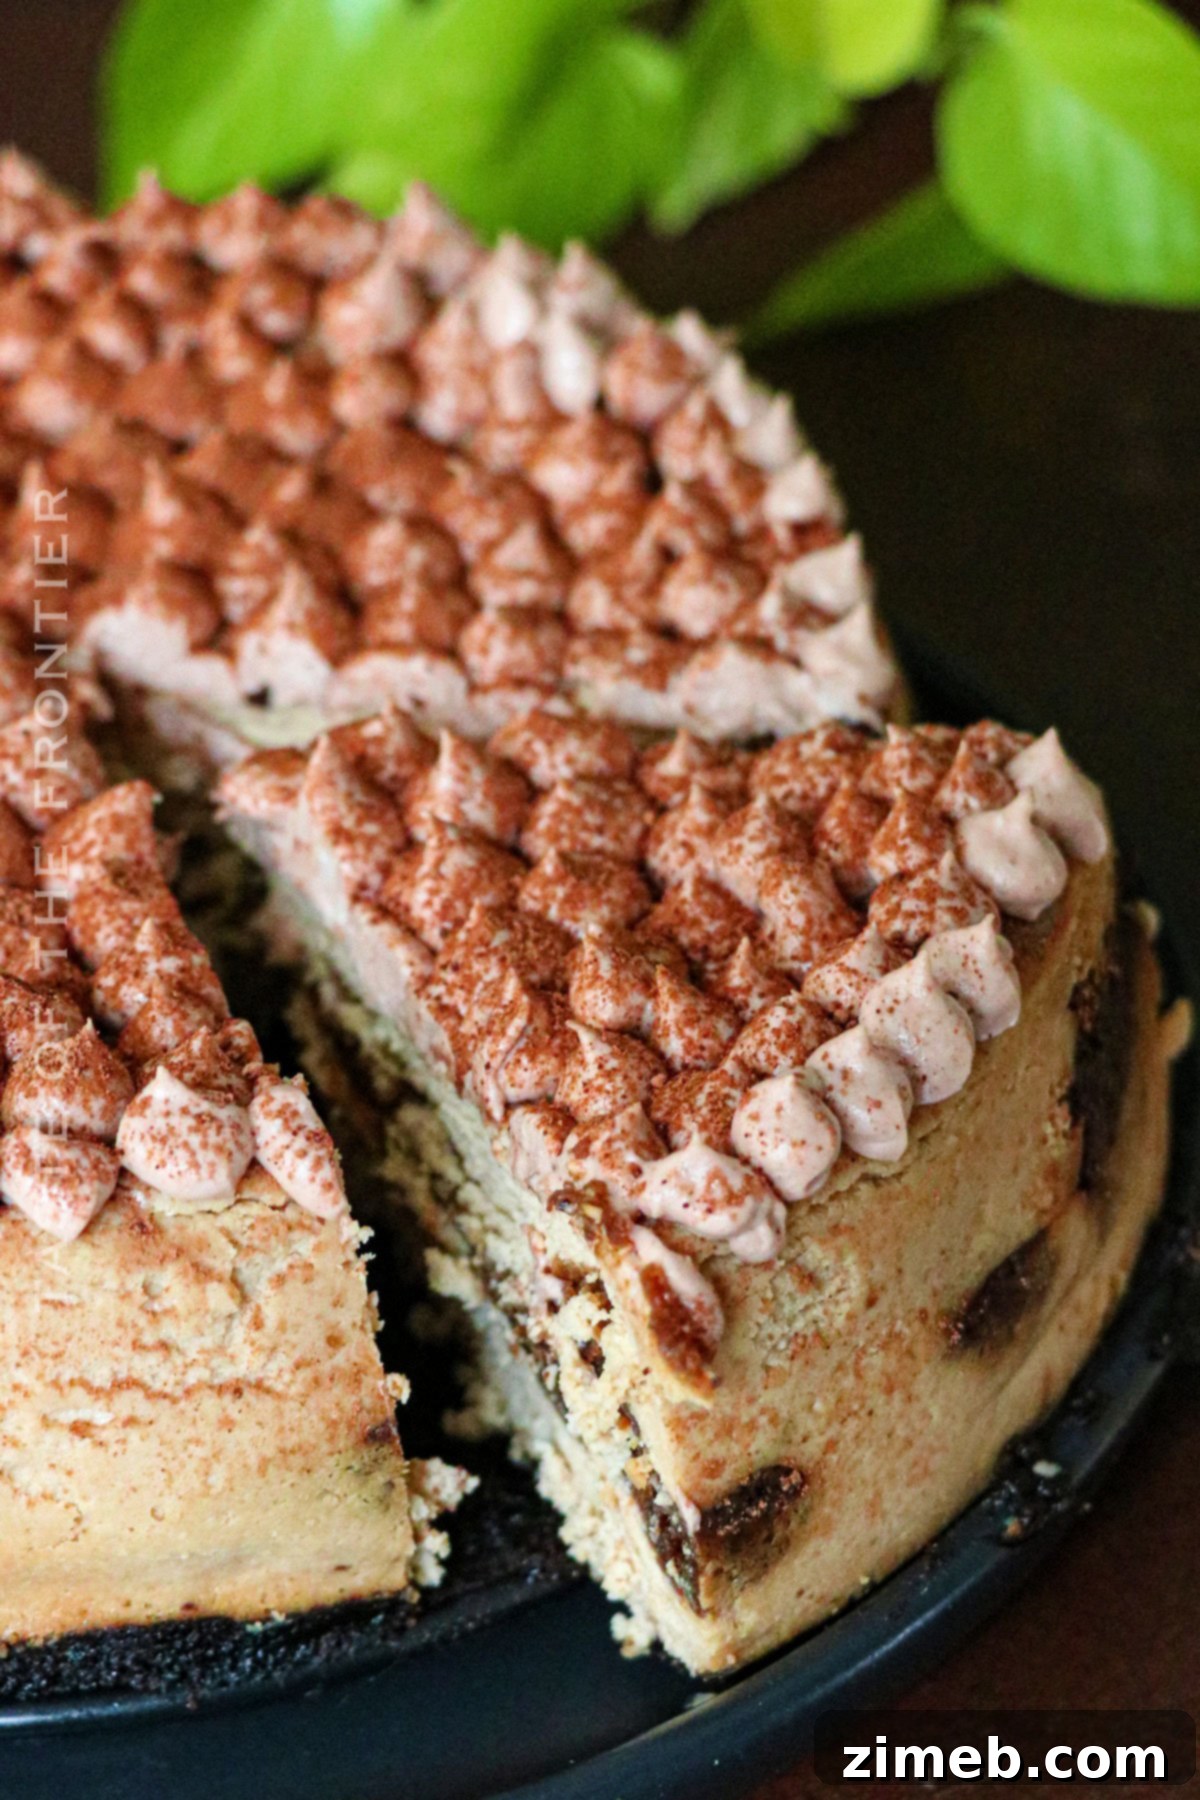
Elevate your dessert experience with this rich, creamy, and undeniably decadent Tiramisu Cheesecake. It’s a beautifully crafted treat, making it the perfect showstopper for any holiday gathering, special celebration, or simply a luxurious weekend indulgence.
Oh, the timeless allure of tiramisu! This classic Italian dessert holds a special place in my heart, and it’s a joy to share a truly unique rendition with you today. Tiramisu, with its delicate coffee-soaked ladyfingers and velvety mascarpone cream, is a masterpiece on its own. But what if we could make it even better? The answer lies in transforming it into a luxurious cheesecake!
Imagine a dessert that combines the best of both worlds: the iconic, bold coffee and cocoa flavors of Italian tiramisu flawlessly blended with the smooth, rich, and tangy creaminess of an American cheesecake. This Tiramisu Cheesecake is precisely that – a delectable fusion destined to captivate your taste buds and earn a permanent spot in your dessert repertoire. Each spoonful promises a delightful journey, offering a taste that feels both wonderfully familiar and excitingly new.
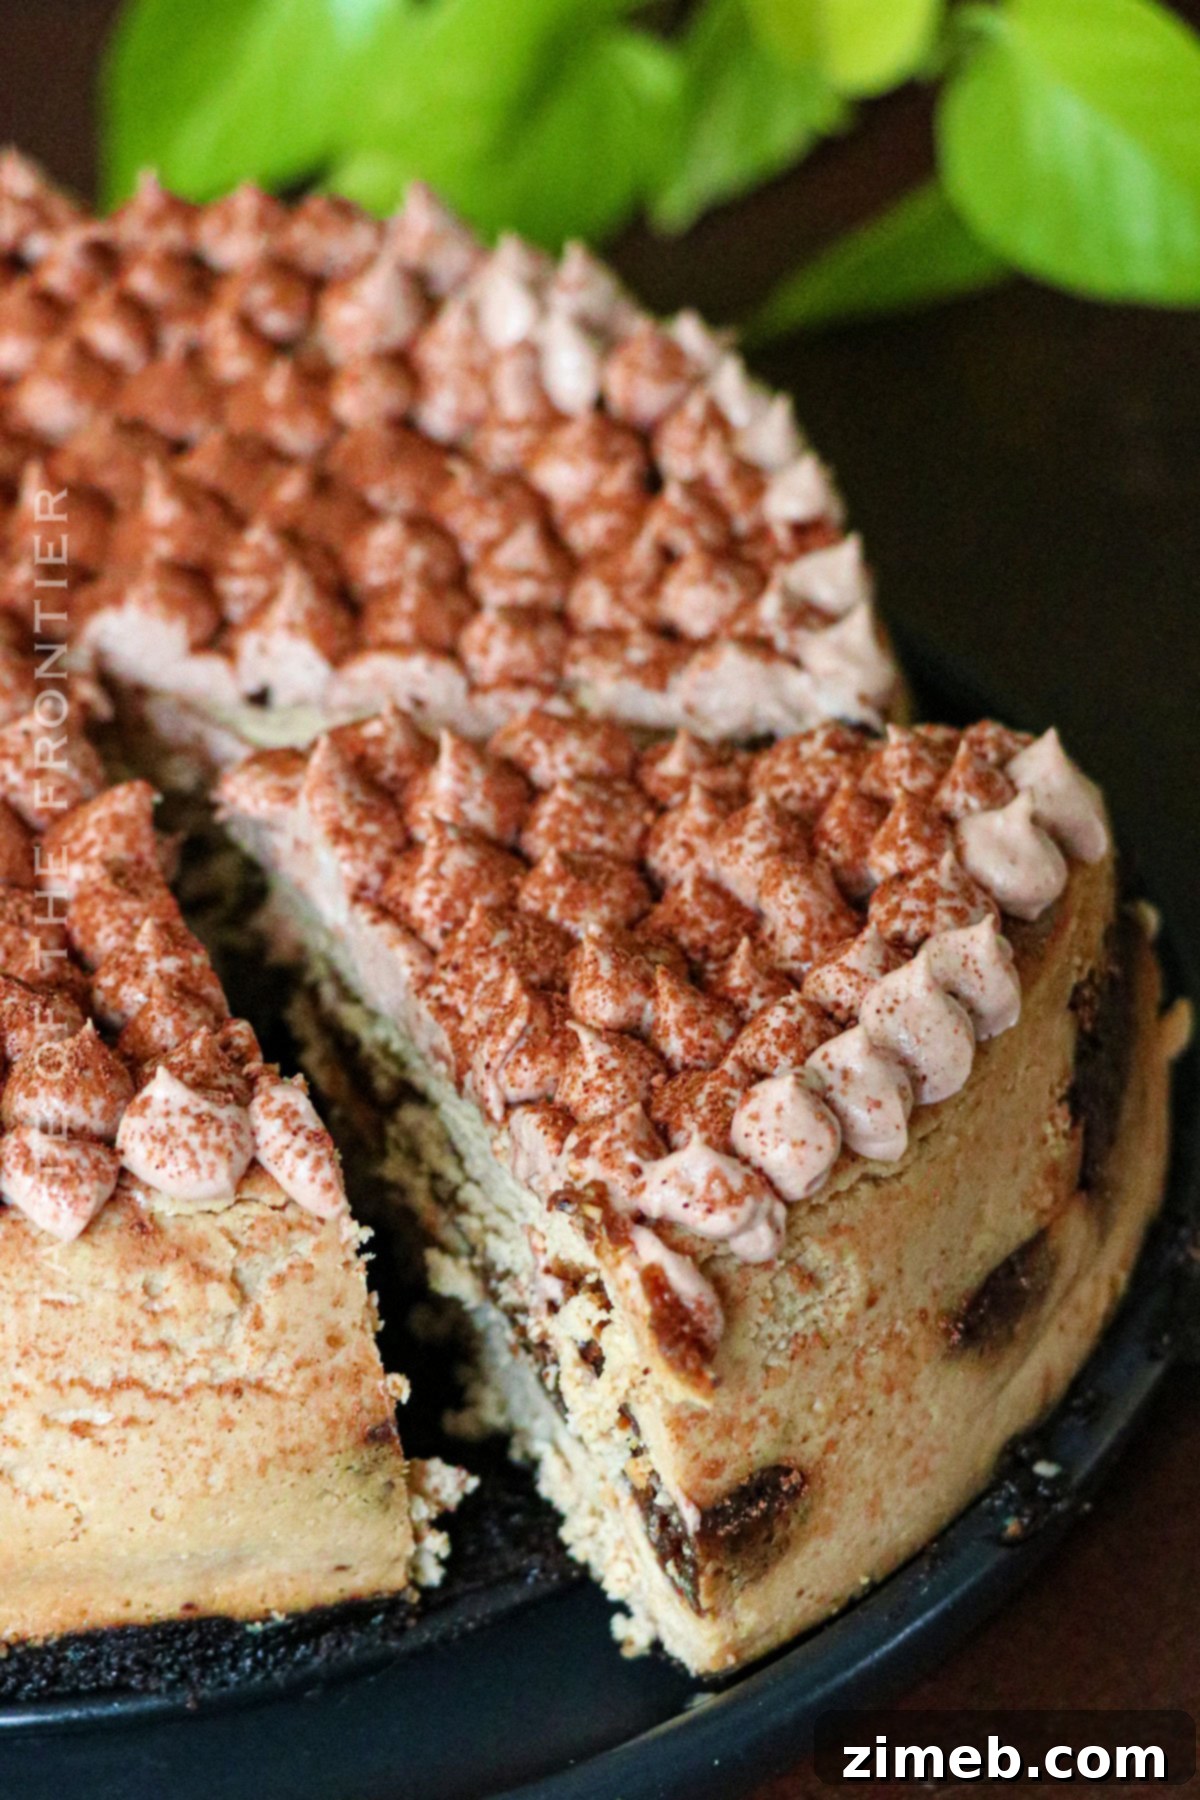
Tiramisu Cheesecake is the ultimate dessert solution for those moments when choosing between two beloved classics seems utterly impossible. Why pick one when you can savor the harmonious blend of both? This recipe marries the distinctive espresso-infused layers of tiramisu with the luscious, dense texture of a perfectly baked cheesecake. The result is a dessert that offers a complex symphony of flavors – the bittersweet notes of coffee and cocoa complementing the sweet, tangy, and incredibly smooth cheesecake base.
This dessert isn’t just a treat; it’s an experience. The delightful combination ensures that every single bite is a delicious journey. It’s a wonderful way to introduce the flavors of tiramisu to cheesecake lovers, and vice-versa, creating a universally adored dessert that appeals to a wide range of palates. Prepare to fall in love with its rich layers and irresistible charm.
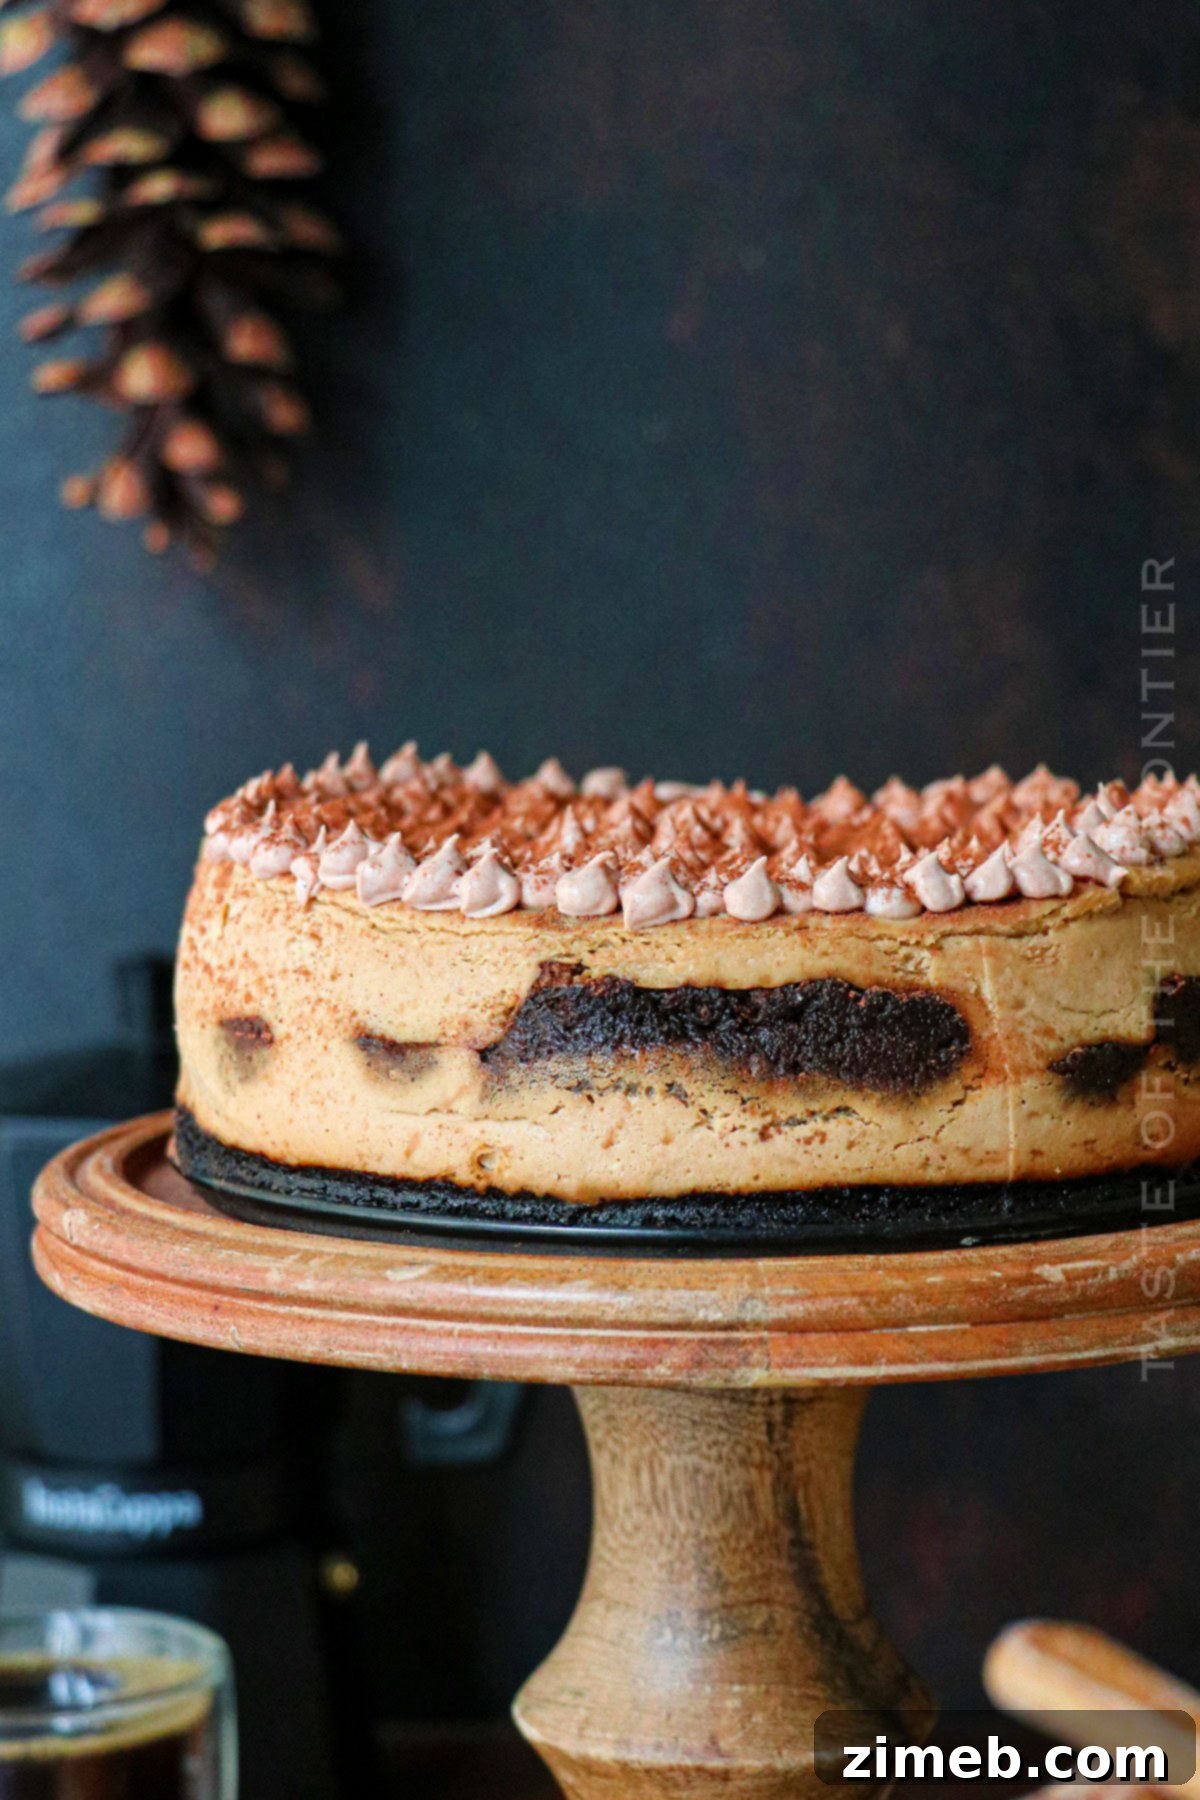
Common Questions About Tiramisu Cheesecake
Can I use instant coffee instead of espresso powder?
Certainly! While high-quality espresso powder is recommended for its rich, concentrated coffee flavor and dark color, instant coffee can serve as a suitable substitute if you’re in a pinch. To substitute, dissolve 1-2 tablespoons of instant coffee in a small amount of hot water (just enough to make a concentrated paste or liquid, depending on how much espresso is called for) and allow it to cool before adding to the batter. Do note, however, that the flavor profile might be slightly less intense and have a different nuance compared to genuine espresso powder.
What if I don’t have a springform pan?
A springform pan is indeed ideal for this cheesecake recipe due to its removable sides, which make for effortless unmolding and a beautifully intact dessert. However, if you don’t own one, you can still make this cheesecake using a regular round cake pan. To ensure easy removal, generously line the pan with parchment paper, allowing a significant overhang on two opposite sides to create “slings.” After the cheesecake has thoroughly chilled, use these parchment slings to gently lift the cheesecake out of the pan.
Why do I need a water bath for baking the cheesecake?
The water bath, also known as a bain-marie, is a crucial technique for achieving a perfectly smooth and crack-free cheesecake. It works by insulating the cheesecake, providing a gentle, even heat distribution during baking. This prevents the edges from cooking faster than the center, which is a common cause of cracks. Additionally, the steam created by the hot water bath adds moisture to the oven environment, preventing the cheesecake from drying out and resulting in a silky, creamy texture that melts in your mouth.
How do I prevent cheesecake cracks?
Beyond the water bath, there are several key steps to prevent cracks. First, ensure all your dairy ingredients (cream cheese, eggs, butter) are at room temperature. This helps create a smooth, lump-free batter without overmixing. Second, avoid overmixing the batter once the eggs are added; mix just until incorporated to minimize air bubbles. Third, allow the cheesecake to cool slowly. After baking, turn off the oven and leave the cheesecake inside with the door slightly ajar for at least an hour. This gradual cooling prevents a sudden temperature change that can cause cracks. Finally, don’t forget to run a knife around the edge of the pan before the cheesecake fully cools to release any tension as it shrinks.
Storage and Making Ahead
This delicious Tiramisu Cheesecake is so irresistible, I won’t blame you if it disappears before it even makes it to the refrigerator! I’ve been known to enjoy more than my fair share, too. But for those times when you want to plan ahead or save some for later, here’s how to store it:
Refrigerator
For optimal freshness and flavor, keep your Tiramisu Cheesecake in an airtight container in the refrigerator. It will stay wonderfully delicious for up to 4-5 days. Be sure to cover it well to prevent it from absorbing any other odors from the fridge.
Freezer
Absolutely! This cheesecake freezes beautifully, making it an excellent make-ahead dessert. To freeze, ensure the cheesecake is fully cooled, then place it in the freezer without the whipped topping until it is solid. Once frozen, wrap it tightly first in plastic wrap, then in aluminum foil, or place it in a heavy-duty freezer bag. It will stay fresh for up to 3 months. When you’re ready to serve, thaw it overnight in the refrigerator, then prepare and add the whipped topping just before serving.
Essential Tips for a Perfect Tiramisu Cheesecake
My biggest piece of advice for any baking project, especially one as special as this cheesecake, is to read the entire recipe from start to finish before you begin. It’s not overly complicated, but knowing what to expect at each stage will ensure a smoother and more enjoyable baking process. Here are some detailed tips to help you create a masterpiece:
- Achieve a Perfect Cheesecake Base: For a truly seamless and stable Oreo crust, using a food processor to grind your Oreo cookies into fine crumbs is highly recommended. This consistency allows the butter to bind more effectively, creating a firm and even base that won’t crumble when sliced.
- Ensure Flawless Mixing: When preparing your cream cheese mixture, beat it on medium speed until it’s light and smooth. This incorporates just the right amount of air for a creamy texture without making the batter too airy. Crucially, avoid overmixing, especially after adding the eggs, as excessive air can lead to cracks in the finished cheesecake.
- Prevent Cracking with Slow Cooling: The transition from a hot oven to a cool kitchen can shock a cheesecake, causing cracks. To prevent this, allow your cheesecake to cool very slowly. Once baked, turn off the oven and leave the oven door slightly ajar for at least an hour. This gradual temperature reduction helps the cheesecake settle gracefully.
- Boost Rich Coffee Flavor: While finely ground espresso powder provides the most authentic and robust coffee flavor, good quality instant coffee can also do the trick if espresso powder isn’t available. Just remember to dissolve it in a small amount of hot water first to create a concentrated coffee liquid before incorporating it into the recipe.
- Elevate Your Topping: For an extra layer of decadence and a more traditional tiramisu flavor profile in your topping, consider mixing some mascarpone cheese into your whipped cream. Mascarpone adds a luxurious richness and a subtle tangy sweetness that complements the coffee notes beautifully.
- Room Temperature Ingredients: Always ensure your cream cheese, eggs, and butter for the filling are at room temperature. This is vital for a smooth batter that combines easily without lumps, resulting in a perfectly creamy cheesecake.
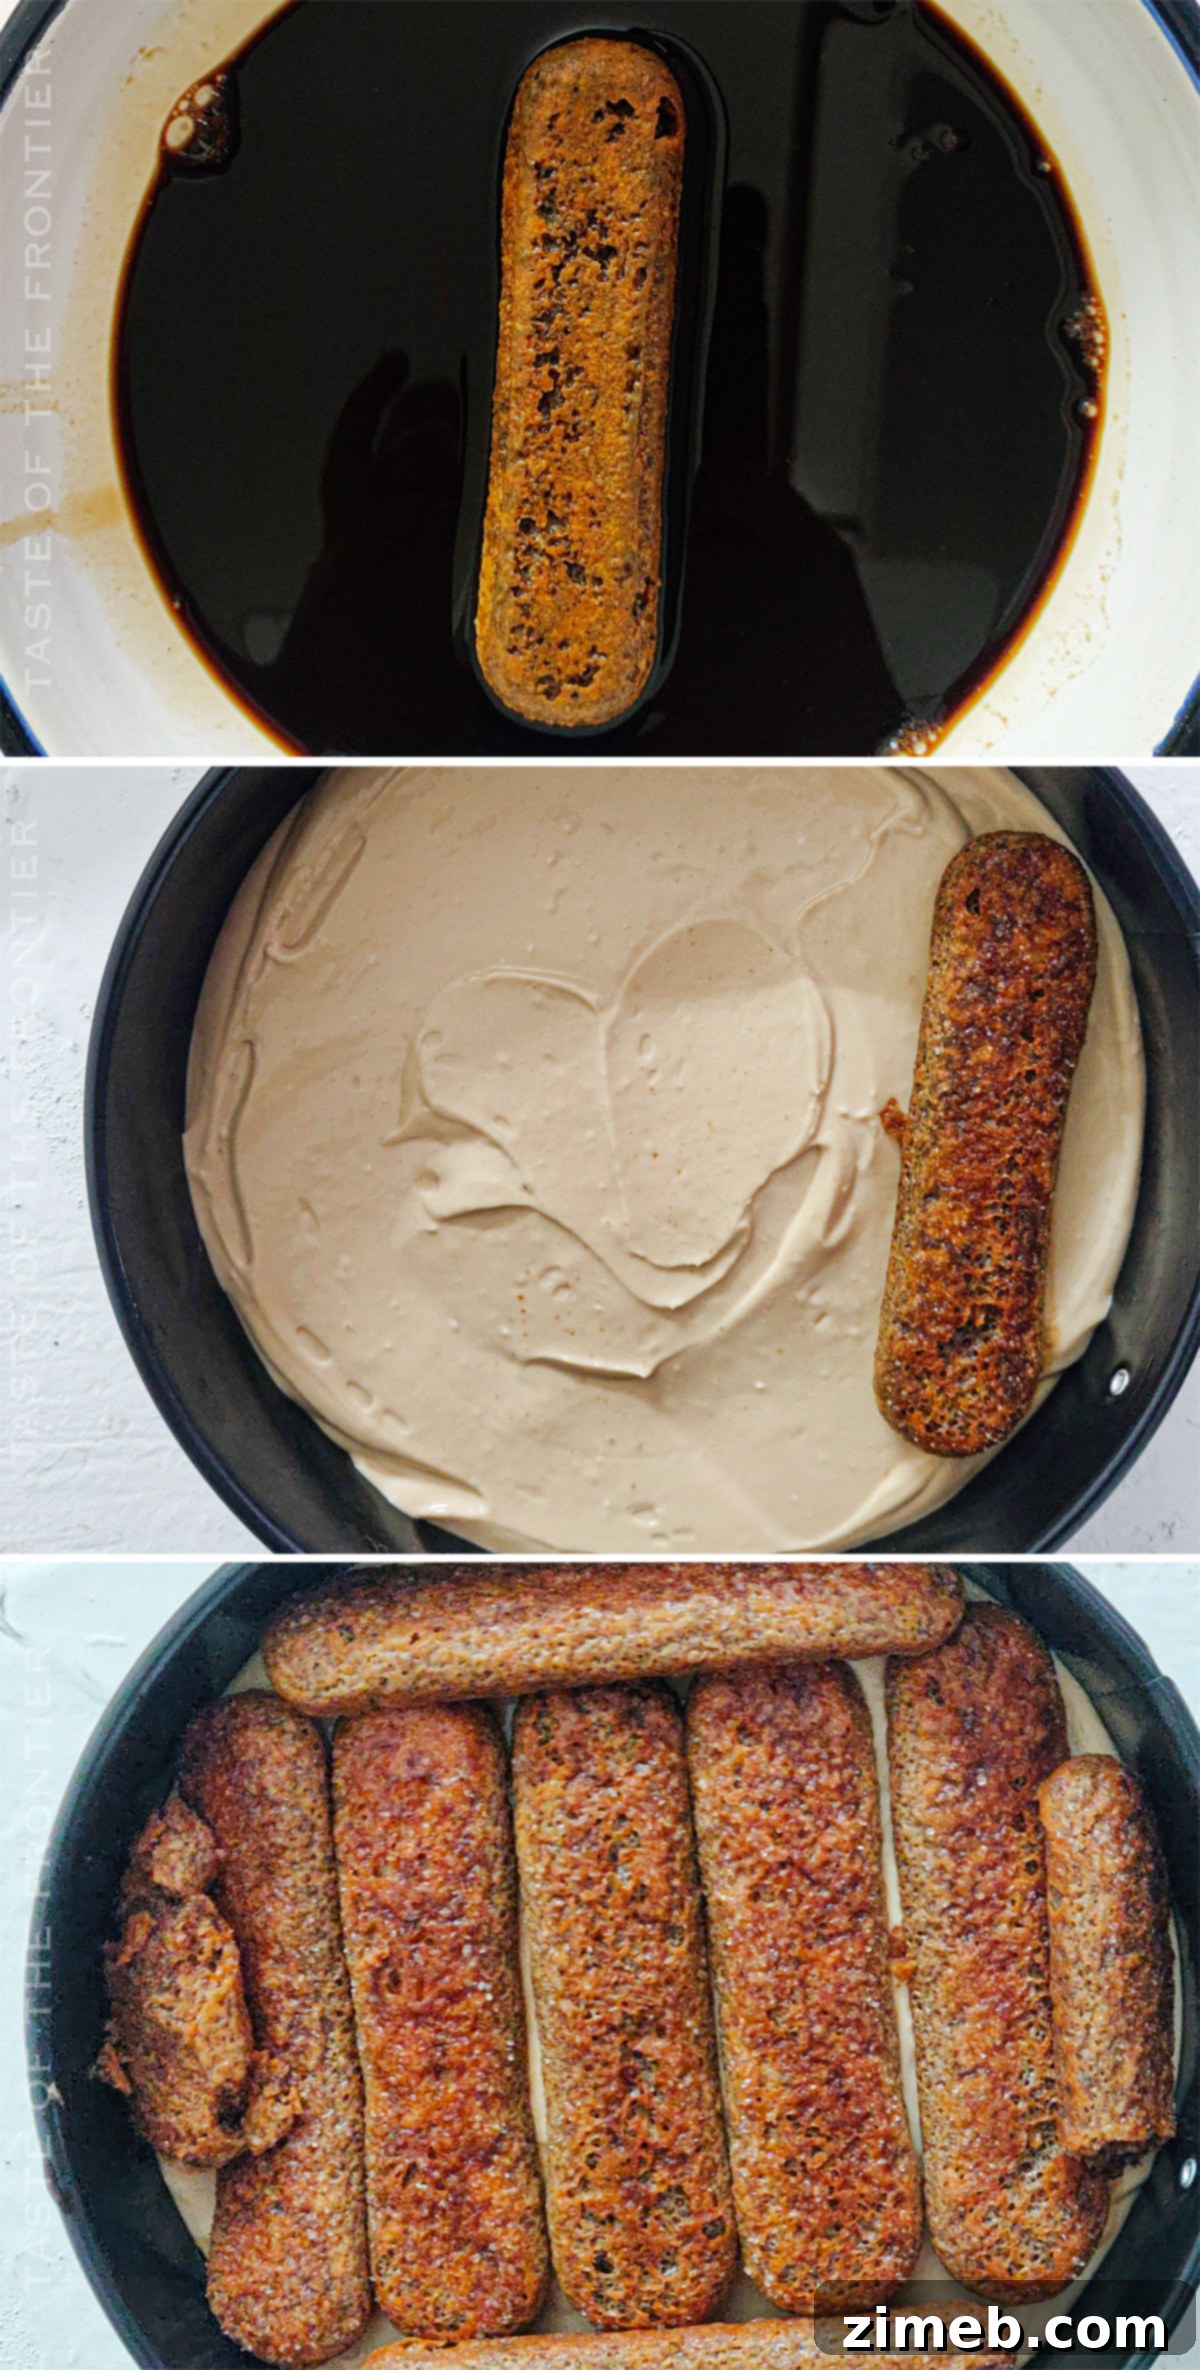
- Don’t Over-Soak Ladyfingers: Ladyfingers absorb liquid quickly. Dip them briefly in the espresso – just a quick dunk on each side – to ensure they become moist but not soggy. Soggy ladyfingers can make the cheesecake watery and compromise its structure.
Gather Your Ingredients for Tiramisu Cheesecake
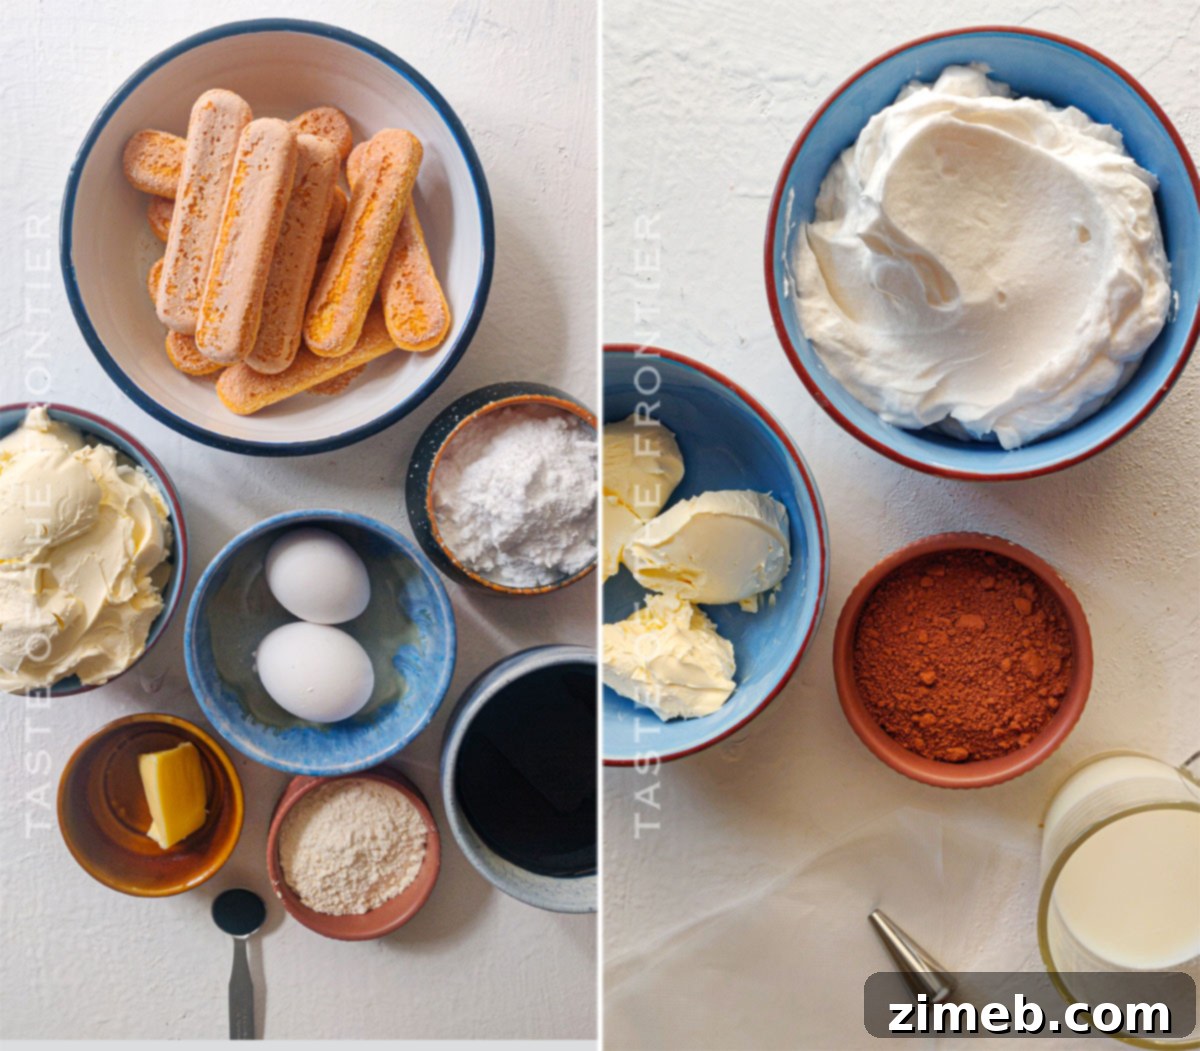
Take a look at this list of ingredients. Doesn’t it just look lovely? These components, both classic and complementary, are carefully chosen to create a dessert that you’ll surely remember. Be sure to save this recipe alongside your other cherished cheesecake favorites!
- Unsalted butter
- Oreo cookies
- Espresso powder
- Cream cheese (full-fat, for best results)
- Granulated sugar
- Large eggs
- All-purpose flour
- Vanilla extract
- Ladyfingers (savoiardi biscuits)
- Heavy whipping cream
- Milk
- Cocoa powder (for dusting)
How to Make Tiramisu Cheesecake: A Step-by-Step Guide
I genuinely believe this is the best tiramisu cheesecake recipe you’ll ever try. While I might be a little biased, its rich flavors and smooth texture speak for themselves! Don’t worry, the process isn’t overly complicated. Just follow these detailed steps, and you’ll create your own show-stopping masterpiece that will impress everyone.
Begin by preheating your oven to 350 degrees F (175°C). Prepare a 9-inch springform pan by lining the bottom with parchment paper and generously greasing the sides with butter or non-stick spray. This preparation is key for easy removal later.
CRUST
- In a food processor, grind the Oreo cookies into a fine, sand-like powder. Transfer the crumbs to a medium bowl.
- Add the espresso powder and melted unsalted butter to the Oreo crumbs. Mix thoroughly until the crumbs are evenly moistened and resemble wet sand.
- Press the mixture firmly and evenly into the bottom of the prepared 9-inch springform pan. Use the back of a spoon or the bottom of a flat glass to ensure a compact and perfectly set base.
- Bake the crust for 5 minutes. This brief bake time helps to set the crust, making it sturdy.
- Remove the pan from the oven and set it aside to cool completely while you prepare the creamy filling.
FILLING
- In a large mixing bowl, using an electric hand mixer on low speed, beat the softened cream cheese, softened butter, and granulated sugar together until the mixture is light, smooth, and free of lumps. Ensure these ingredients are at room temperature for the best results.
- Add the large eggs, one at a time, beating just until each egg is fully incorporated into the mixture. Avoid overmixing once the eggs are added.
- Stir in the vanilla extract, 5-6 tablespoons of the prepared medium-strong espresso, and the all-purpose flour. Continue to beat on low speed for just a few minutes until all ingredients are well combined and the batter is smooth. Again, be careful not to overmix.
WHIPPED CREAM TOPPING
This light and airy topping adds the perfect contrast and classic tiramisu finish.
- In a clean, chilled mixing bowl, beat the heavy whipping cream on high speed until stiff peaks form. Be careful not to overbeat, or it may turn grainy.
- In a separate bowl, combine the softened cream cheese, milk, and cocoa powder. Beat with an electric mixer until fully incorporated and smooth.
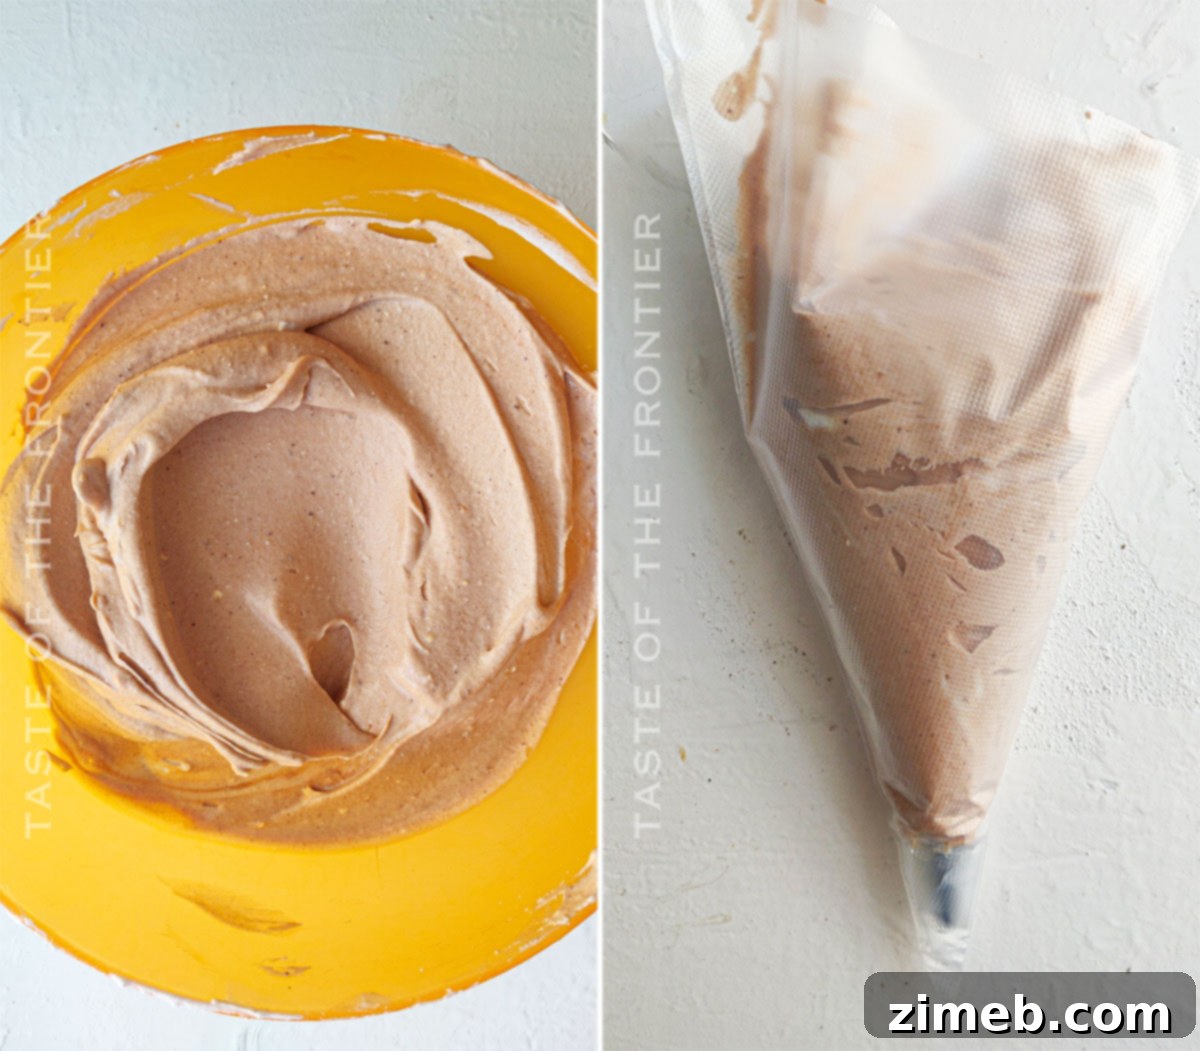
- Gently fold the prepared whipped cream into the cream cheese and cocoa mixture using a rubber spatula. Mix until just combined, maintaining the airy texture of the whipped cream. Set aside in the refrigerator until ready to assemble.
LAYER AND ASSEMBLE (Pre-Bake)
- Pour half of the prepared cheesecake filling evenly over the cooled Oreo crust in the springform pan. Gently smoothen the top with a spatula.
- Carefully dip the ladyfingers into the remaining prepared espresso. Ensure they are quickly dipped and not soaked, as they can become soggy. Arrange these espresso-soaked ladyfingers in a single, even layer over the cheesecake filling. You may need to break some ladyfingers to fit.
- Pour the remaining half of the cheesecake filling over the ladyfingers, spreading it smoothly to cover them completely.
PREPARE FOR WATER BATH AND BAKE
- Place a large baking pan (larger than your springform pan) in the oven. Carefully pour hot water into this larger pan to about 1 inch deep. This creates your water bath.
- To prevent any water from seeping into your cheesecake, double-wrap the bottom and sides of your springform pan tightly with heavy-duty aluminum foil.
- Carefully place the foil-wrapped springform pan containing the cheesecake mixture into the hot water bath in the oven.
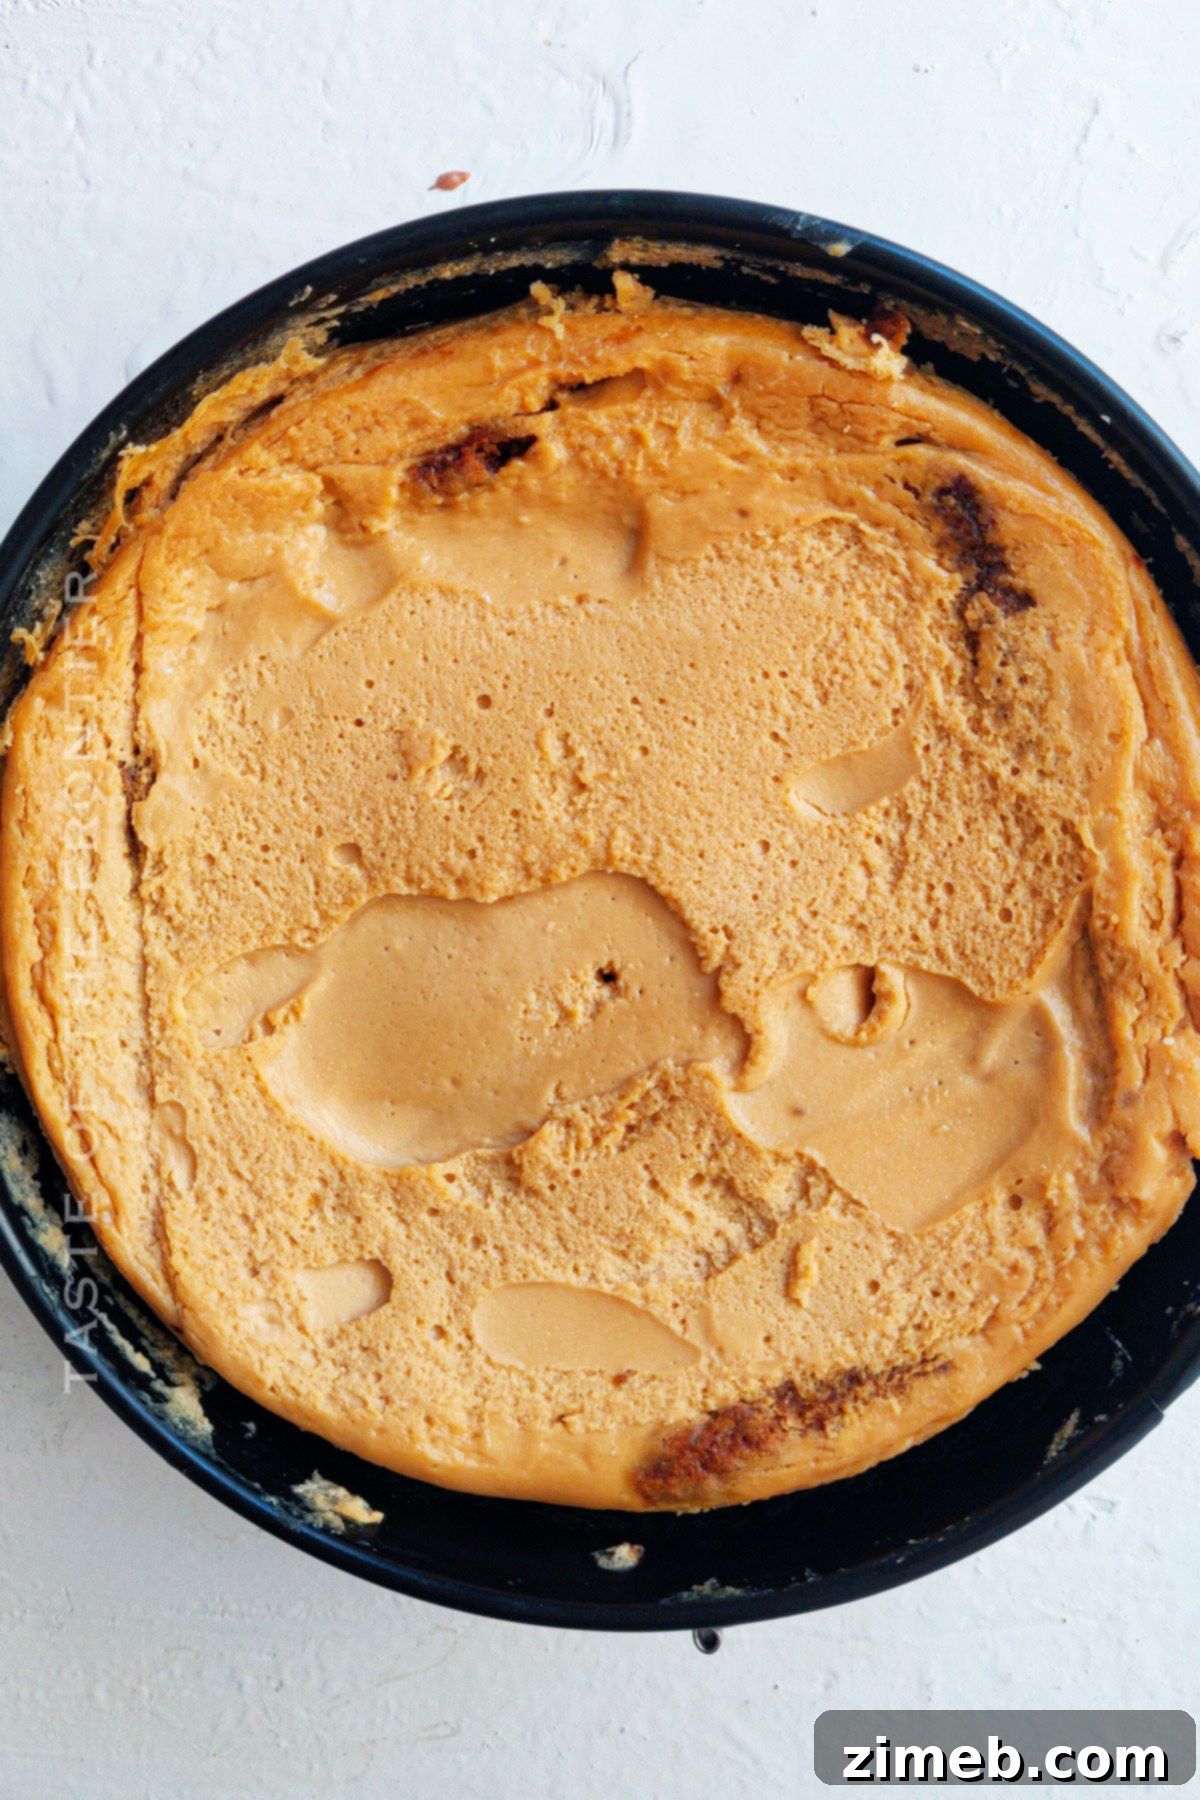
- Reduce the oven temperature to 320°F (160°C). Bake the cheesecake for approximately 1 hour. The edges should be set, but the center will still be slightly jiggly when gently shaken.
- Once baked, turn off the oven. Leave the cheesecake inside the oven with the door slightly ajar for almost an hour. This gradual cooling prevents cracking.
- Remove the cheesecake from the oven and the water bath. Run a thin knife around the edge of the springform pan to loosen the cheesecake. Let it cool completely on a wire rack at room temperature.
- At this point, the center of the cheesecake will still be a little jiggly. This is normal. Transfer the cooled cheesecake to the refrigerator for at least 4-5 hours, or preferably overnight, to allow it to fully set and firm up. Chilling is crucial for the perfect cheesecake texture.
FINAL ASSEMBLE AND SERVE
- Once the cheesecake is thoroughly chilled and firm, carefully remove the sides of the springform pan. Place the cheesecake on your serving platter or counter.
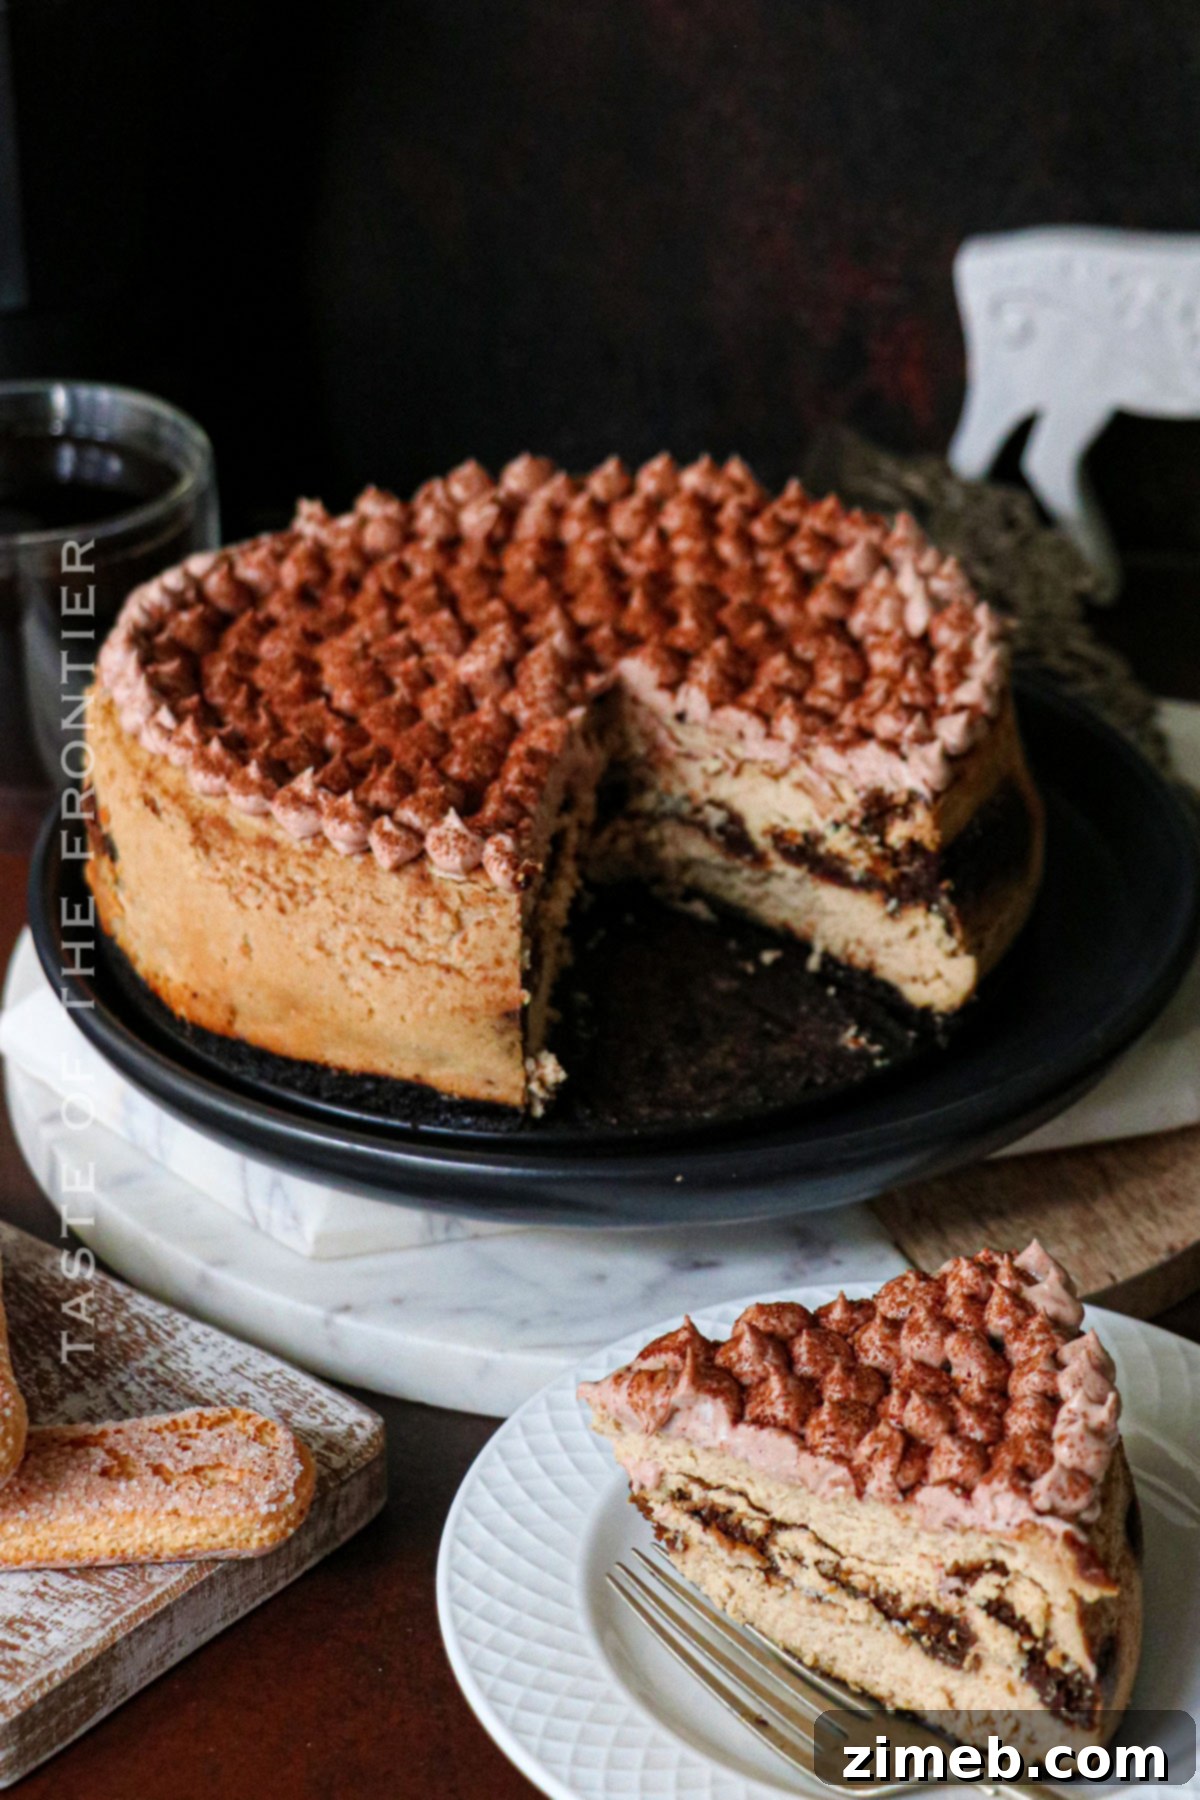
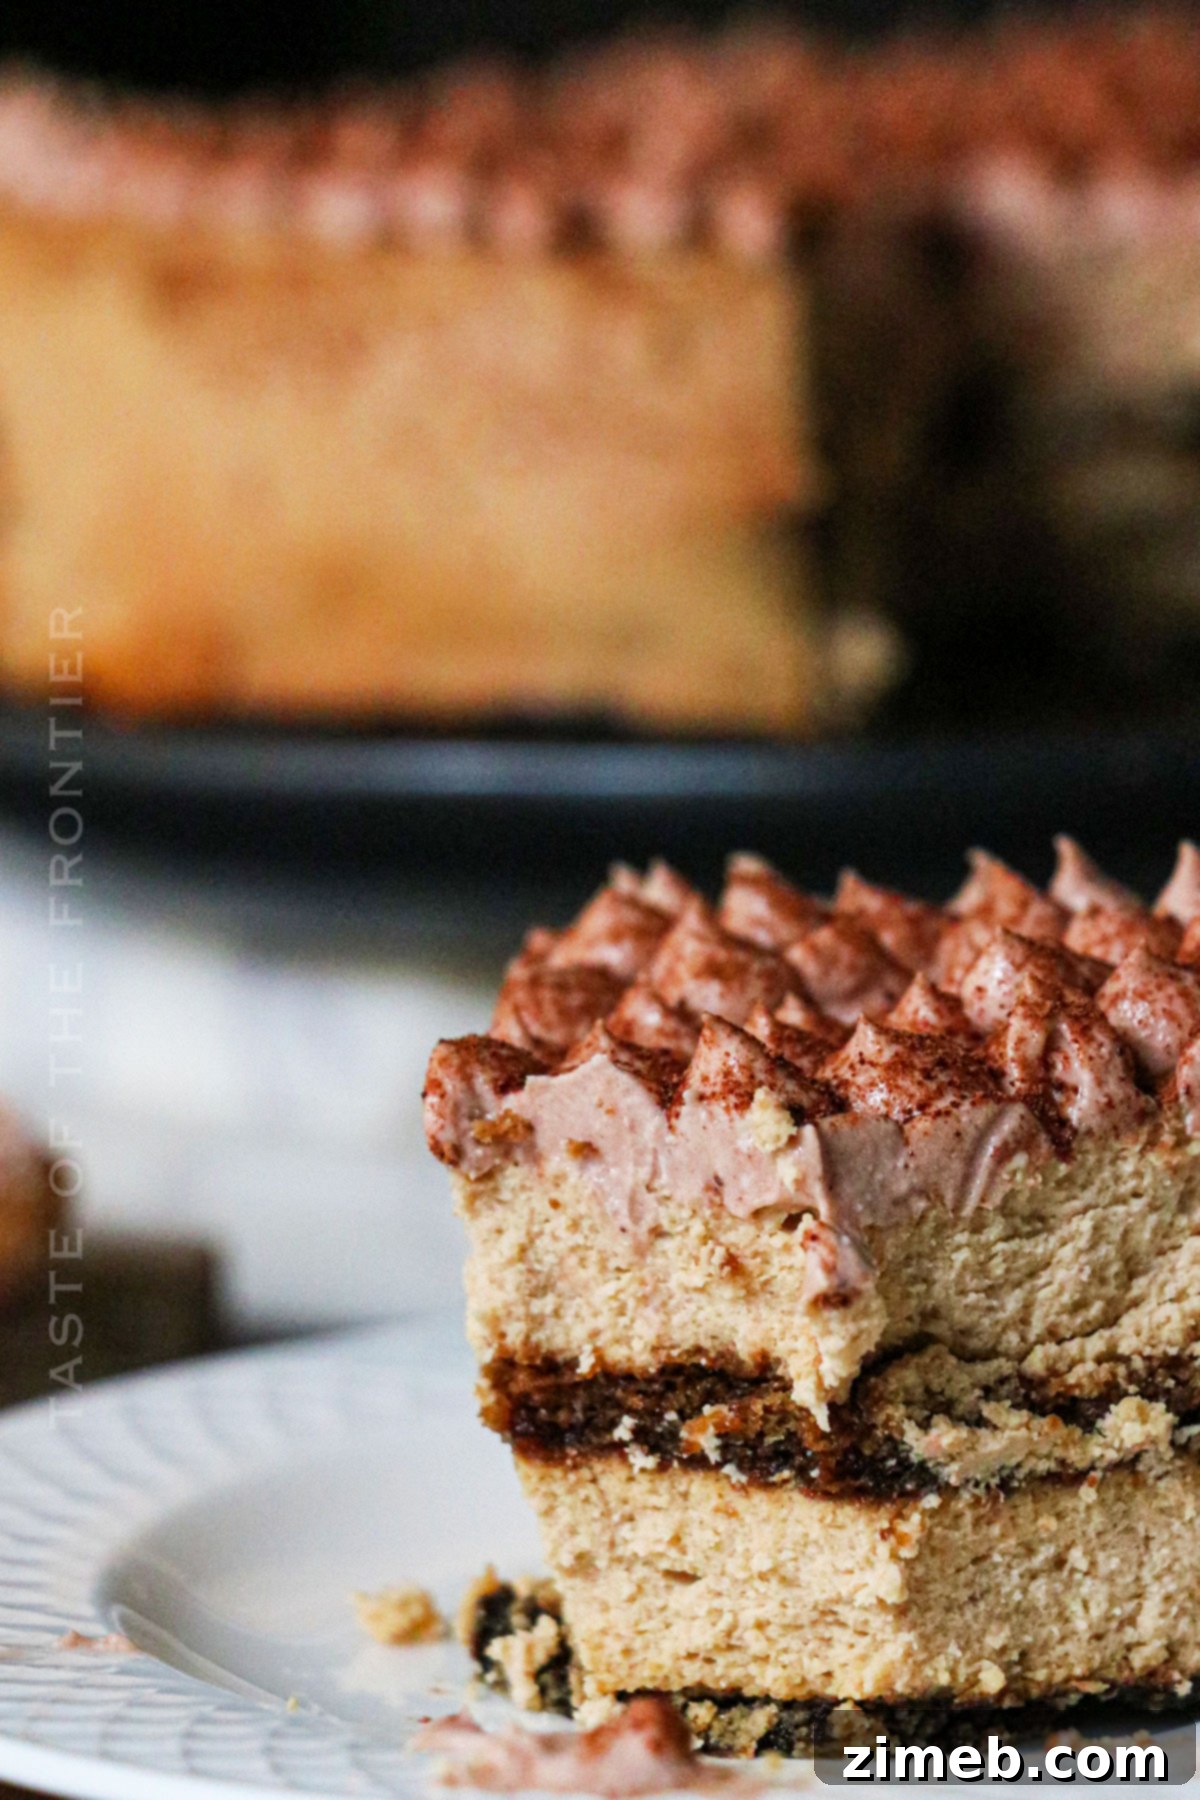
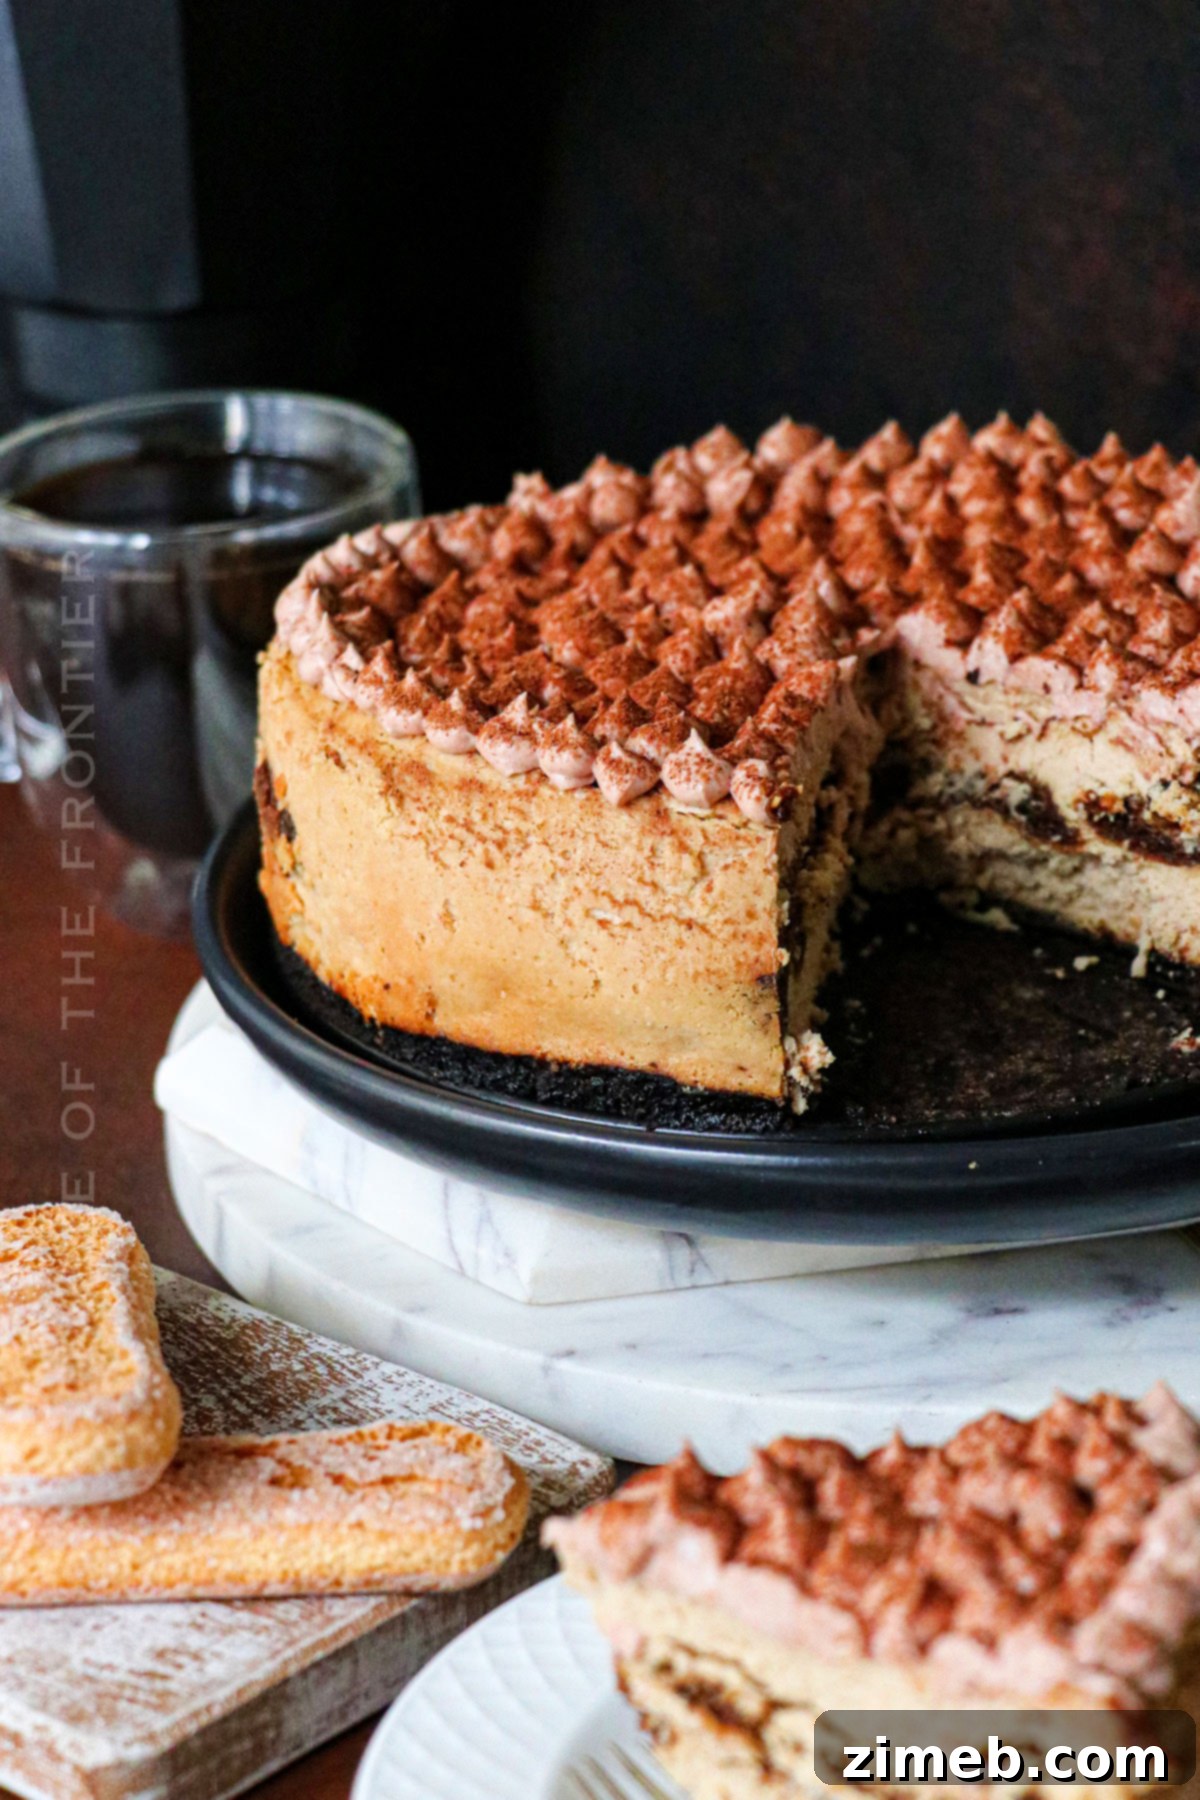
- Transfer the prepared whipped topping mixture into a piping bag fitted with a large round or star tip nozzle. Decorate the top of the cheesecake with beautiful swirls or dollops of the topping. Alternatively, you can simply spread the topping evenly over the surface.
- For the classic tiramisu finish, dust a generous amount of cocoa powder evenly over the whipped topping using a fine-mesh sieve.
- Let the Tiramisu Cheesecake chill for a little more time in the refrigerator to allow the flavors to meld and the topping to set slightly before slicing and serving. Enjoy your homemade masterpiece!
Essential Kitchen Supplies for Tiramisu Cheesecake
Having the right tools can make all the difference in your baking journey. Using a springform pan, for instance, will genuinely help you achieve the best results and a picture-perfect presentation. While not all items are strictly necessary, they certainly make the baking process more enjoyable and efficient!
- 9-inch Springform Pan: This is highly recommended for easy unmolding and creating a beautiful, clean-sided cheesecake. Its removable sides are invaluable for delicate desserts.
- Large Mixing Bowls: You’ll need at least two – one for the crust ingredients and another for the cheesecake filling.
- Food Processor or Mixer: Essential for grinding the Oreo cookies into fine crumbs for the crust and for blending the cream cheese mixture smoothly. An electric hand mixer or stand mixer works well for the filling.
- Parchment Paper: Crucial for lining the bottom of the springform pan to prevent sticking and ensuring a clean release.
- Oven: For baking the crust and the cheesecake.
- Heavy-Duty Aluminum Foil: Used to double-wrap the springform pan, protecting your cheesecake from water in the bath.
- Large Baking Pan: Needed to create the water bath around your springform pan.
- Rubber Spatula: Perfect for scraping down the sides of the bowl, folding ingredients gently, and smoothing layers.
- Wire Rack: For allowing the cheesecake to cool completely after baking, ensuring air circulation.
- Fine-Mesh Sieve: Ideal for dusting cocoa powder evenly over the finished cheesecake.
- Piping Bag with Nozzle (Optional): For decorating the top with elegant swirls of whipped cream.
What to Serve With Tiramisu Cheesecake
This Tiramisu Cheesecake is truly a decadent dessert that can stand proudly on its own as the star of any meal. However, pairing it with complementary beverages or small embellishments can elevate the experience even further. It will undoubtedly be a perfect centerpiece at any dining room table, beckoning guests with its irresistible aroma and elegant presentation!
- A Dollop of Mascarpone Mixture on Top: For an even richer, more authentic Italian touch, a small dollop of plain mascarpone cheese or a slightly sweetened mascarpone cream can be served alongside each slice.
- Freshly Brewed Espresso or Coffee: The classic companion to tiramisu is, of course, coffee. A small cup of freshly brewed espresso, a strong black coffee, or even a creamy latte provides a perfect balance to the cheesecake’s sweetness and intensifies the coffee notes.
- A Glass of Marsala Wine for an Italian Touch: For an authentic Italian after-dinner experience, consider pairing a slice with a small glass of sweet Marsala wine. Its nutty, caramelized notes beautifully complement the dessert.
- A Handful of Chocolate-Covered Espresso Beans: These offer a delightful textural contrast and an extra burst of coffee and chocolate flavor. Sprinkle them around the plate for garnish or offer them on the side.
- Fresh Berries: While not traditional, a few fresh raspberries or strawberries can add a touch of vibrant color and a hint of fruity tartness that cuts through the richness of the cheesecake.
- Dusting of Chocolate Shavings: Instead of or in addition to cocoa powder, fine chocolate shavings can add another layer of chocolatey goodness and an elegant look.
Why You Should Make This Tiramisu Cheesecake
Sometimes, you just have to go big with your culinary creations! That’s exactly how I feel about this recipe. While I generally appreciate simple, straightforward dishes that taste great, there are occasions when the urge to create something truly extraordinary strikes. This Tiramisu Cheesecake is that “bigger and better” creation, and here’s why you absolutely need to try it:
- The Best of Both Worlds: This dessert masterfully combines the iconic flavors and textures of creamy American cheesecake with the rich, coffee-soaked elegance of traditional Italian tiramisu. It’s a harmonious marriage that delivers a unique and unforgettable taste experience.
- A Guaranteed Crowd Pleaser: Whether you’re hosting a dinner party, celebrating a holiday, or simply indulging your sweet tooth, this cheesecake is bound to impress every guest. Its sophisticated appearance and complex flavors make it ideal for any special occasion.
- A Coffee Lover’s Delight: With the intense espresso powder infused into the crust, filling, and ladyfingers, this cheesecake offers a deeply satisfying coffee flavor that will truly delight any caffeine enthusiast. It’s a celebration of coffee in dessert form!
- Incredible Versatility: This recipe provides a fantastic base, but it’s also wonderfully adaptable. You can easily modify this cheesecake to suit your taste preferences, adding different liqueurs, chocolate elements, or nutty twists to make it uniquely yours.
- Easier than it Looks: Don’t let its elegant appearance intimidate you. With detailed, step-by-step instructions and helpful tips, even first-time cheesecake bakers can confidently master this dessert. The result is a professional-looking and tasting treat that you’ll be proud to share.
- Make-Ahead Friendly: As discussed in the storage section, this cheesecake can be prepared in advance, freeing up your time on the day of your event. Its flavors often deepen and improve with a day or two of chilling, making it a perfect option for busy hosts.
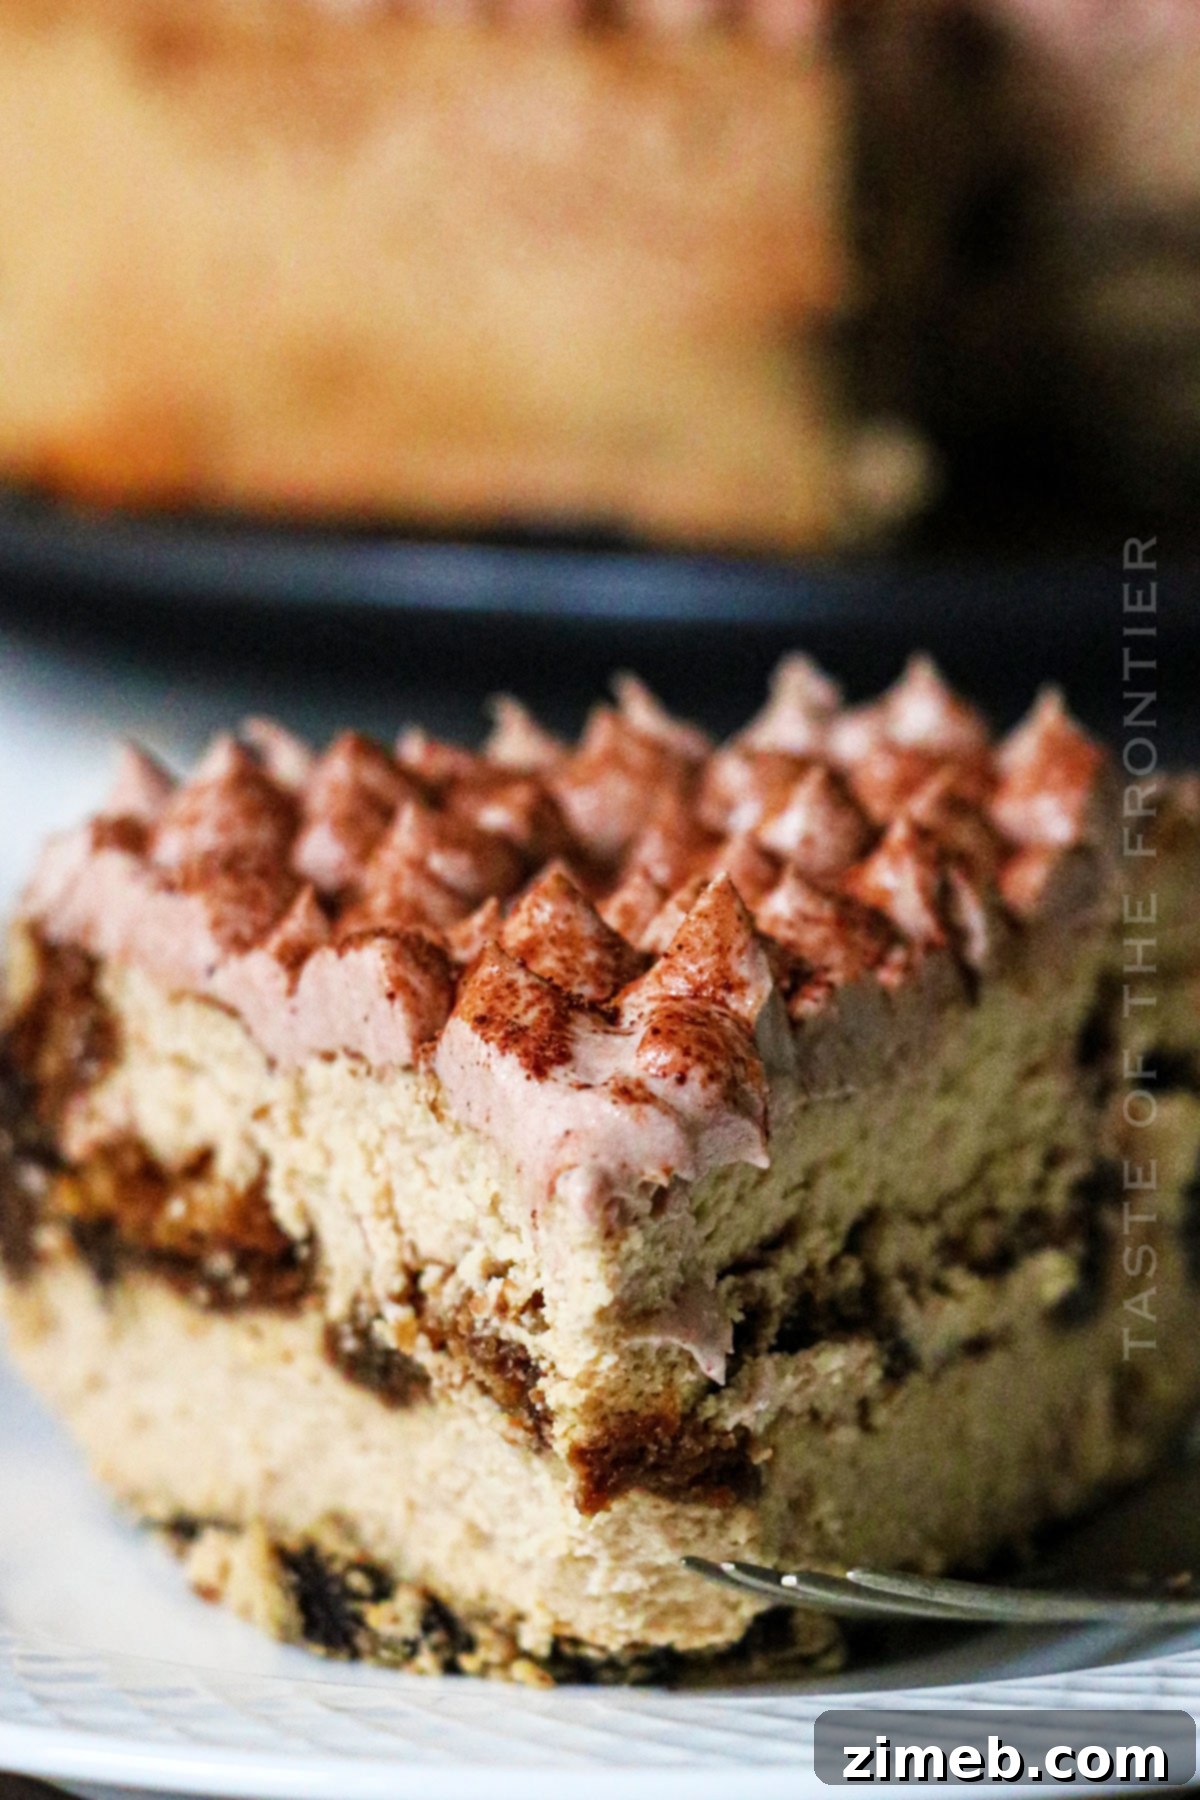
Creative Variations and Add-Ins for Tiramisu Cheesecake
This Tiramisu Cheesecake recipe is a fantastic starting point, but don’t hesitate to get creative and personalize it to your liking! If you come up with any other brilliant ideas for changing things up, please let me know in the comments below. I always love to hear what wonderful twists everyone else is putting on my recipes!
- Chocolate Chips: For an added layer of sweetness and texture, fold a cup of mini chocolate chips (dark, milk, or white) into the cheesecake filling before pouring it over the crust.
- Caramel Drizzle: A luscious caramel drizzle over the top of the finished cheesecake, perhaps just before serving, adds a wonderful layer of sweet, buttery flavor. Because why not add more decadence?
- Nutty Twist: For a delightful crunchy contrast, sprinkle finely crushed almonds, hazelnuts, or pecans over the crust before baking, or mix them into the cheesecake batter. Toasted nuts enhance their flavor even more.
- Fruity Freshness: While tiramisu is traditionally coffee and cocoa-centric, a touch of fresh fruit can brighten the flavors. Garnish with fresh berries like strawberries, raspberries, or blueberries on top just before serving for a pop of color and tartness.
- Mocha Love: For dedicated chocolate and coffee lovers, a hint of chocolate in the crust can be transformative. Consider using chocolate graham crackers in the crust instead of Oreos, or mixing a tablespoon of unsweetened cocoa powder into the Oreo crust mixture.
- Liqueur Boost: For an adult version, you can enhance the coffee soaking liquid for the ladyfingers with a tablespoon or two of Kahlúa, rum, or a coffee liqueur. This adds depth and complexity to the overall flavor.
- Mascarpone Swirl: For an even richer filling, substitute a portion of the cream cheese with mascarpone cheese in the main cheesecake batter. This brings it closer to a traditional tiramisu cream while maintaining the cheesecake’s structure.
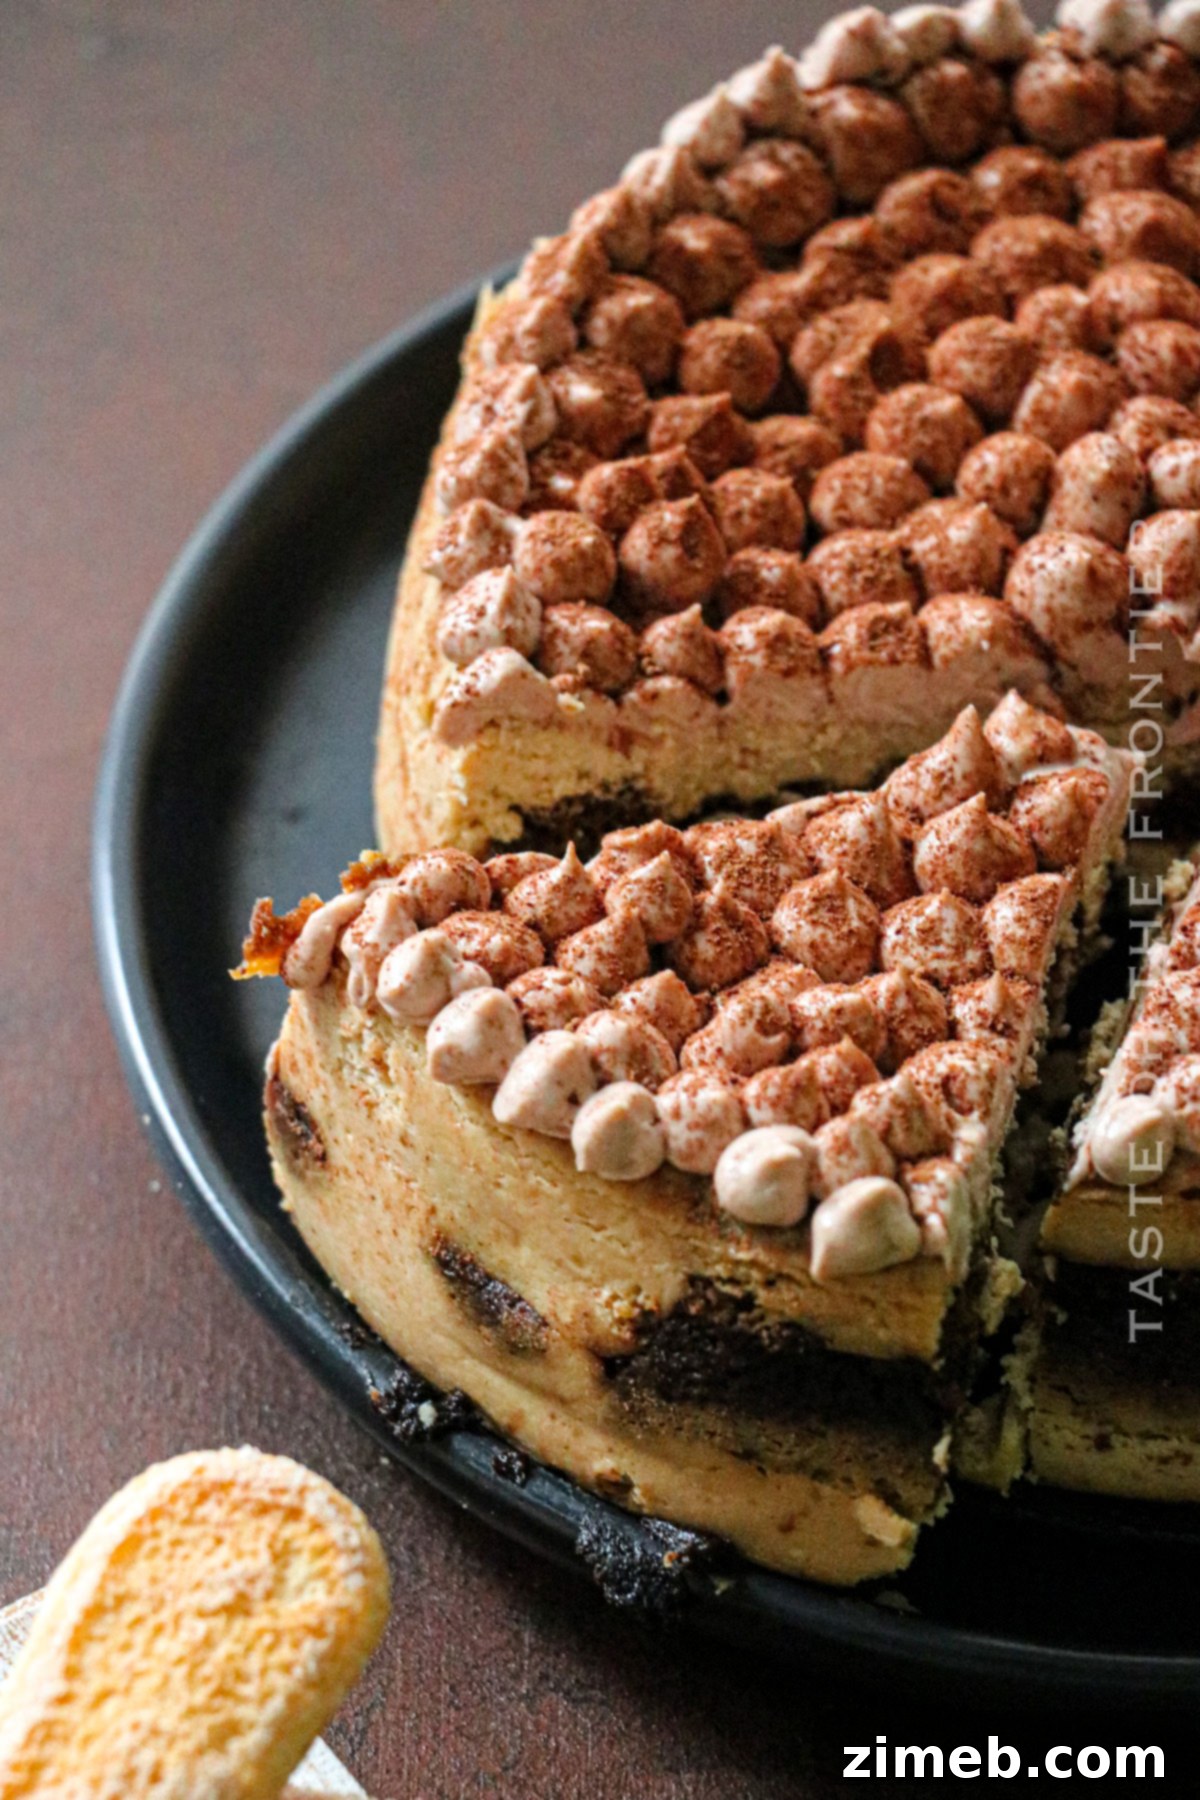
If you love this delicious Tiramisu Cheesecake recipe, you’re going to adore these other coffee-inspired treats too. Click each link below to discover easy, printable recipes that will further satisfy your coffee cravings!
Coffee Ice Cream – No Churn
This recipe for no-churn coffee ice cream is incredibly easy and utterly delicious. It delivers a bold and rich coffee flavor, and best of all, no ice cream maker is required! A perfect treat for any time of year.
Check out this recipe
Espresso Martini Recipe
An Espresso Martini, made with a sophisticated mixture of vodka, coffee, hazelnut, and chocolate liqueurs, is the perfect sophisticated cocktail for any celebration or evening indulgence. Cheers to that!
Check out this recipe

Coffee Buttercream Frosting
Calling all coffee lovers! This rich and creamy Coffee Buttercream Frosting is the ideal addition to all your cakes and confections. With just 4 ingredients, it’s ready in a mere 5 minutes, transforming any dessert into a coffee-flavored dream!
Check out this recipe
Boozy Christmas Coffee
Boozy Christmas Coffee is a fantastic way to entertain guests during the festive holidays. Made with Baileys Vanilla Cinnamon Irish Cream, this delightful drink is a delicious and warming way to celebrate the season.
Check out this recipe

Espresso Chocolate Cake
Indulge in the rich, deep flavors of this Espresso Chocolate Cake. A perfect dessert for anyone who loves the luxurious combination of robust coffee and intense chocolate. This cake is moist, flavorful, and truly satisfying.
Check out this recipe
More Irresistible Cheesecake Recipes
If your love for cheesecake knows no bounds, then you’re in the right place! Beyond our delightful Tiramisu Cheesecake, there’s a world of creamy, dreamy cheesecake creations waiting to be discovered. Here are some other fantastic recipes that promise to deliver pure dessert bliss:
- Best Chocolate Cheesecake: A truly indulgent and rich chocolate experience for the ultimate chocoholic.
- Birthday Cheesecake: Celebrate any occasion with this festive and fun cheesecake, adorned with sprinkles and joy.
- Raspberry Cheesecake Recipe: A vibrant and tangy dessert featuring sweet raspberries swirled into a creamy base.
- No-Bake Pecan Pie Cheesecake: The comforting flavors of pecan pie in a luscious, easy no-bake cheesecake form.
CONNECT WITH YUMMI HAUS!
Be sure to follow me on my social media, so you never miss a post!
Substack, FB, Pinterest, IG, Email Subscription
Tiramisu Cheesecake
Elevate your dessert with this rich and decadent Tiramisu Cheesecake. It’s a beautiful treat making it perfect for any holiday or celebration.
Course: Dessert
Servings: 10
Prep Time: 30 mins
Cook Time: 1 hr
Chill Time: 6 hrs
Total Time: 7 hrs 30 mins
Ingredients
CRUST:
- 18 Oreo cookies
- 1 tbsp espresso powder
- 6 tbsp unsalted butter – melted
FILLING:
- 18 ounces cream cheese – softened, full-fat recommended
- 1 cup granulated sugar
- 2 tbsp unsalted butter – softened
- 2 large eggs – at room temperature
- ¼ cup all-purpose flour
- 1 ½ tsp vanilla extract
- 10 ladyfingers (savoiardi biscuits)
- 1 ½ cups prepared espresso – medium-strong (reserve 5-6 tbsp for the filling and use the rest for soaking the ladyfingers)
WHIPPED CREAM TOPPING:
- 6 ounces heavy whipping cream – chilled
- 3 ounces cream cheese – softened
- ½ cup milk
- ¼ cup cocoa powder – for dusting
Instructions
- Preheat the oven to 350 degrees F (175°C). Line a 9-inch springform pan with parchment paper on the bottom and generously grease the sides with butter.
CRUST
- Grind the Oreo cookies into a fine powder in a food processor. Transfer crumbs to a bowl. Add the espresso powder and melted butter, mixing until well combined.
- Press the mixture firmly into the bottom of the prepared springform pan. Bake for 5 minutes.
- Set aside and let cool completely while preparing the filling.
FILLING
- In a large bowl, beat the softened cream cheese, softened butter, and granulated sugar on low speed with an electric mixer until light, smooth, and lump-free.
- Add eggs one at a time, beating just until fully incorporated after each addition. Avoid overmixing.
- Stir in the vanilla extract, 5-6 tbsp of prepared espresso, and flour. Beat for a few minutes until well combined and smooth, taking care not to overmix.
WHIPPED CREAM TOPPING
- In a chilled bowl, beat the heavy whipping cream on high speed until stiff peaks form.
- In a separate bowl, beat the softened cream cheese, milk, and cocoa powder until fully incorporated and smooth.
- Gently fold the whipped cream into the cream cheese mixture until just combined, preserving the airy texture. Refrigerate until ready for final assembly.
LAYER AND ASSEMBLE (Pre-Bake)
- Layer half of the cheesecake filling at the bottom of the cooled crust in the prepared pan and smoothen it.
- Quickly dip the ladyfingers in the remaining espresso (do not over-soak) and arrange them in a single layer over the filling.
- Layer the remaining half of the cheesecake filling over the ladyfingers and smoothen the top.
PREPARE FOR WATER BATH AND BAKE
- Pour hot water into a large baking pan (about 1 inch deep) and place it in the oven.
- Double-wrap the bottom and sides of the springform pan with heavy-duty aluminum foil to prevent water seepage.
- Carefully place the foil-wrapped springform pan into the water bath in the oven.
- Reduce the oven temperature to 320°F (160°C). Bake the cheesecake for 1 hour. The edges should be set, but the center will still be slightly jiggly.
- Turn off the oven and leave the cheesecake inside with the door slightly ajar for approximately an hour to cool slowly.
- Remove the cheesecake from the oven and water bath. Run a knife around the edge of the springform pan to loosen it. Let it cool completely on a wire rack at room temperature.
- At this stage, the center will still be a little jiggly. Transfer the cheesecake to the refrigerator and chill for 4-5 hours, or preferably overnight, to allow it to fully set and firm up. This is crucial for texture.
FINAL ASSEMBLE AND SERVE
- Once thoroughly chilled, remove the sides of the springform pan and place the cheesecake on your serving platter.
- Transfer the chilled whipped topping mixture into a piping bag with a large round tip nozzle (or spread with a spatula) and decorate the cheesecake top.
- Dust a generous amount of cocoa powder over the top of the cheesecake using a fine-mesh sieve. Chill for some additional time in the refrigerator before slicing and serving.
Notes
- The Tiramisu Cheesecake stays fresh for 4-5 days in the fridge when stored properly in an airtight container.
- You can also freeze this cheesecake for later use. Place it in the freezer (without the topping) until solid, then wrap it tightly in foil and place it in a heavy-duty freezer bag. It will stay fresh for up to 3 months.
- To serve a frozen cheesecake, thaw it in the fridge overnight and then decorate it with the whipped topping and cocoa powder before serving.
- Instant coffee powder can be used if espresso powder is unavailable. However, note that the taste will be slightly different than with espresso.
Nutrition
Nutritional information for the recipe is provided as a courtesy and is approximate. Please double-check with your own dietary calculator for the best accuracy. We at Yummi Haus cannot guarantee the accuracy of the nutritional information given for any recipe on this site.
Serving: 1g | Calories: 595kcal | Carbohydrates: 51g | Protein: 8g | Fat: 42g | Saturated Fat: 24g | Cholesterol: 130mg | Sodium: 375mg | Potassium: 242mg | Fiber: 2g | Sugar: 32g | Vitamin C: 0.2mg | Calcium: 96mg | Iron: 3mg | Net Carbohydrates: 49g
Love this recipe?
Follow @KleinworthCo for even more tasty recipes!